
Any aquarium fanatic knows that this hobby is not only about keeping fish and other aquatic fauna/flora alive, it’s so much more and it blends many aspects of science and technology together. Aquarists learn water chemistry, plumbing, electric/electronic, cabinet making, photography, how to perform surgeries 🙂 and many more as they trying to provide the best environment to animals they keep. Over the last decades the whole aquarium industry grew into multi-million business with hundreds of companies releasing countless products every year. With all this new technology involved, there is always some space for DIY (Do-It-Yourself) applications and ideas people invent in order to save money, time and effort or just simply for the fun of doing something themselves. I am sure at least half of aquarium products available on the market started as DIY projects.
You can find DIY recipes and projects all over the net, most people in the hobby are generous enough to share their knowledge and experience with others. I found and learned many new things just by reading about other people inventions. In this article, I will bring up some cool ideas I learned from other reefers that proved to be effective and saved me some money to spend on other aquarium related stuff:)
Before I start writing about tools and methods that helped me, I need to admit that I didn’t invent any of them myself (I thought I was the first person who used a certain household item in my fish tank but I quickly learned that there were at least 10 people before me that used it with success), I’m just trying to spread the word here.
Let’s start with items that can help you with routine maintenance in and around the tank.
Scraping the glass
This is a necessary evil when it comes to frequent maintenance tasks. The algae that grow on the inside of a fish tank glass walls have to be scraped on a regular basis for the clean look and better light penetration. While cleanup crew members such as crabs and snails and herbivorous fish help getting rid of nuisance algae, they are not an ultimate solution. That’s where scraping tools come handy. I’ve tested many types of scraping tools, from algae magnets, scrubbing pads, old credit cards to razors made especially for aquariums, but I find myself coming back to good old flat scraper blades like these all the time.
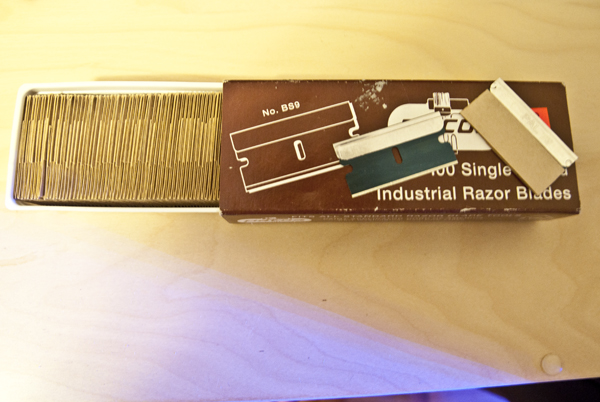
Not only they are dirt cheap (I paid less than $10 for a box of 100) and works well, but they are perfect for those tight spots where other types of scraping tools cannot get. They can be held by tweezers to get almost everywhere your hand can’t and they scrape hard coraline with ease (speaking of bad aquascape choices:)). The only drawback I can find is that scraper blades can scratch acrylic, but so can any other metal blades. If cleaned properly with RODI water and dried to prevent rust, you can used them many times before replacing (which will cost you about $0.10 anyway)
For the green dust algae I found another great scraper that can be found under household kitchen sink’s cabinet. It’s that little sponge like scrubber called Mr. Clean ORIGINAL Magic Eraser that works, well… magic on hard to clean stains.
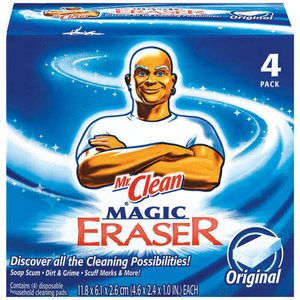
The effectiveness of this material in terms of aquarium glass cleaning has been discussed many times on various aquarium forums and majority of people report great results using it. It works as a very fine sandpaper that deteriorates after several uses, but it doesn’t scratch either glass or acrylic and it’s made of an inert material meaning that it’s safe to use inside the tank housed with fish and invertebrates. Just make sure you get the original, white version of this sponge- other varieties may have chemicals stuffed in them.
Water changes
There are several things that can be implemented to make life easier when it comes to water changes. Most helpful thing is to think ahead when setting up a tank- how close it is to the RODI unit and drain pipe, is the area around the tank easy to clean after WC, do you have enough space to easy maneuver when changing water and so on. One thing some people forget about and regret it later is making additional manifolds with shut-off valves in their sump plumbing system- that additional outlet may be used for media reactor or for easy water changes,especially for larger tanks that require more gallon value to be drained (it works on a simple rule- you connect a barbed fitting to one end of your extra pipe, put a water hose on it and turn on the valve to drain water from the tank using your return or WC pump.
Another thing most reefers have to deal with when doing a water change is getting rid of unwanted algae that grows on live rock as well as debris accumulated on the substrate. Sometimes it’s hard to get to those tight spaces without knocking off glued frags and scaring all the fish in the aquarium. There is a little device that was first invented by who knows who and helped many reefers fight with algae growing in tiny crevices and holes in live rock. It’s especially effective to get rid of Valonia spp./ bubble algae. To build one you need a piece of transparent rigid tubing and some airline hose.
It’s great to suck up small debris and bubble algae spores and it costs less than $5 to make one. There is a great video on Mr Saltwater Tank site showing how to properly use this thing to get rid of bubble algae
There is yet another thing associated with water changes-replacing the filter sock (for those who use them of course). While it is generally accepted to wash dirty filter socks in washing machines using water with chlorine bleach solution, not everyone have time and money to turn on a washing machine’s cycle just for a couple of filter socks. Those of us who are NYC apartment dwellers don’t even have the luxury of owning a washing machine. What I do is I soak dirty filter socks for two-three days in a water-bleach solution in a ratio of 1 cup bleach to about 3 gallons of water, then change for clean tap water with added aquarium tap water conditioner, like Saechem Prime to kill chlorine and finally rinse cleaned sock in RO/DI water before using them in the sump. Bleach kills all organic particles and after few days the sock is nice and clean!
Coral dips
Most commercial coral dip solutions works exceptionally well for most parasites but I recently found myself in a position where my coral dip couldn’t get rid of one particular pest- red bugs . I bought a sps frag and after examining it at home in quarantine container, I found few of those little buggers crawling on the coral’s branches. They survived the dip so I ran to my computer to search for a way to kill those bugs and be sure that they won’t get a free ride to my tank. I already knew a drug called Interceptor works on killing those, but prescription from veterinary is mandatory to obtain one, so I was out of luck. After quick research I’ve found a thread about dipping methods and someone suggested a household pest and germ killing spray called Bayer Complete Insect Killer (or Bayer Advanced Home Pest plus Germ Killer which has the same active ingredient) that can be obtained at any home department store.
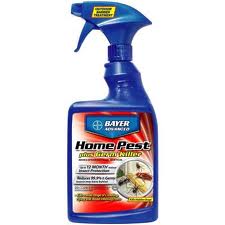
I googled it’s name with a word reef at the end and here it is- a whole thread dedicated to this product and success stories of people who used it on their corals. I thought “What the hell, I can try it” and run to my local home depot. I bought the correct thing, came home and prepared a dip solution following people suggestions (more on that in a minute). Let me tell you something- this thing really works! The maximum suggested time for the dip is 10 minutes, but I observed red bugs falling off the frag after seconds of putting it in the dip. I removed the frag after about 8 minutes and put it back into quarantine container. After several hours I closely examined the coral with a flashlight and found no bugs or any other pest on it. In the dipping container, I found dead red bugs and a couple of small copepods. Here’s the recommended dose I followed:
(please note that this solution is ONLY FOR DIPPING CORALS and not for a whole tank treatment- adding this chemical to your tank may kill all it’s inhabitants).
Solution: 0.5ml of Bayer Complete Insect Killer/Advanced Home Plus Germ Killer for every 2 cups of aquarium water.
Dip time: max 10 minutes
Next time I will talk about some more diy projects that can save time/money and provide fun for the weekend…


0 Comments