
Monitoring water quality is, without doubt, a key to healthy, flourishing reef aquarium. Just ask an experienced reefer what is his/her recipe for success and you can expect to hear two words- maintenance and monitoring. In order to maintain a fine balance in an enclosed reef ecosystem, one has to be able to know if the tank parameters are all in check. Temperature, salinity, pH,ammonia, nitrate, phosphates,calcium,magnesium, and alkalinity levels are amongst the most important parameters a true reefer should check on a regular basis. The tools used to measure those parameters range from test strips through liquid test kits to sophisticated aquarium controllers. The product I am reviewing today fits somewhere in between the last two, but it could also be placed in it’s own new category as it is an entirely new approach to the topic of maintaining stability in a reef tank. The device is called Seneye and it arrived in my mail from the other side of the ocean- the United Kingdom. What is Seneye? What is it’s main features and how well does it perform compared to other devices available for the hobbyist reefer? I will try to answer those and other questions in the rest of this review so stick around…
All photographs by author
1. Introduction to Seneye monitor
Seneye first appeared a year ago in Europe and quickly became one of the most interesting new products, mainly because of it’s unique features and a fresh approach in aquarium monitoring. As you may noticed, I labeled Seneye an aquarium monitor and although I’m going to stick to this description, it’s definitely more than that. First things first, let’s treat the shipping box with a knife and get to the product inside.
2. Unboxing
Did I mentioned that seneye is hard to categorize? Well, there’s at least few reasons to that. First of all, there are three models available from the start, each targeted for a specific side of the aquarium hobby. Seneye Home is the basic device (think of it as a standard equipped new car) destined for the freshwater and fish-only saltwater tanks. It contains the monitor itself, a USB cable and one slide (more on that later). Seneye Pond has a different temperature range and includes the additional float to measure parameters on the pond’s surface. Finally, Seneye Reef is the most complete of the three, it lacks the float but gains a light sensor capable of measuring light temperature in Kelvin degrees and light intensity in both LUX and PAR units.
But that’s not all. Seneye is not only a piece of hardware, the company spent a lot of time developing a web-based software and smartphone interface for it’s baby. I’ll get to that later, meanwhile let’s get to that box.
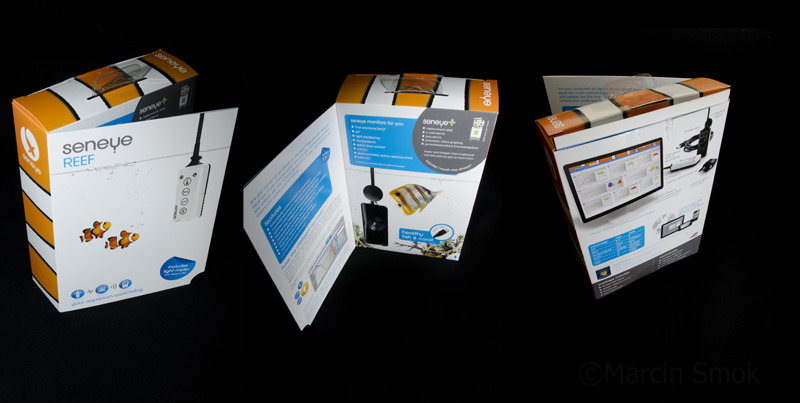
First thing that caught my attention was the quality of the packaging- the box has a glossyfinish with a nice, clean design. Inside the box there are:
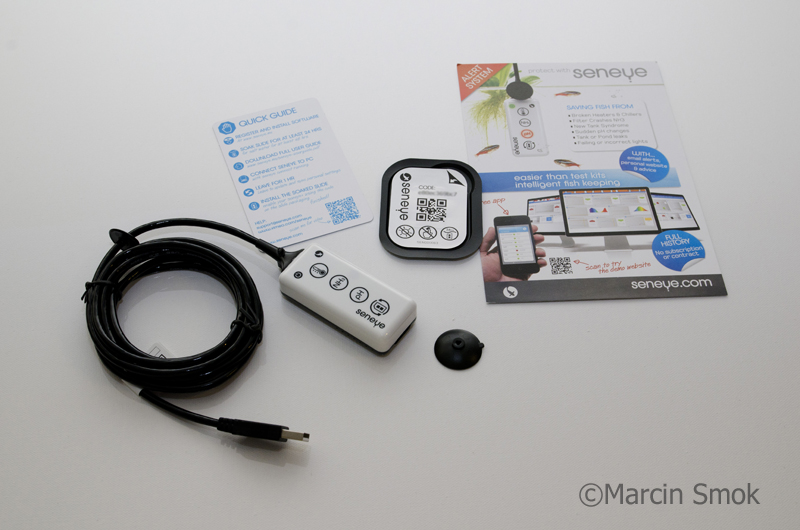 -main unit measuring 3”Lx1 3/8”Wx3/4”T ( 73x35x20mm) with attached USB cable little under 8 feet long (2.4m)
– one slide
– a quick reference guide (full manual can be downloaded on seneye website www.seneye.com) and some promotional materials
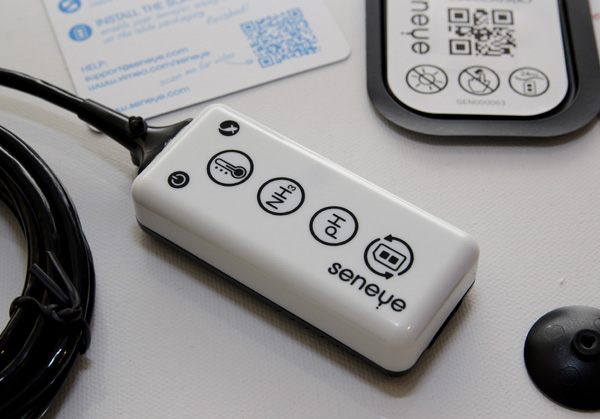
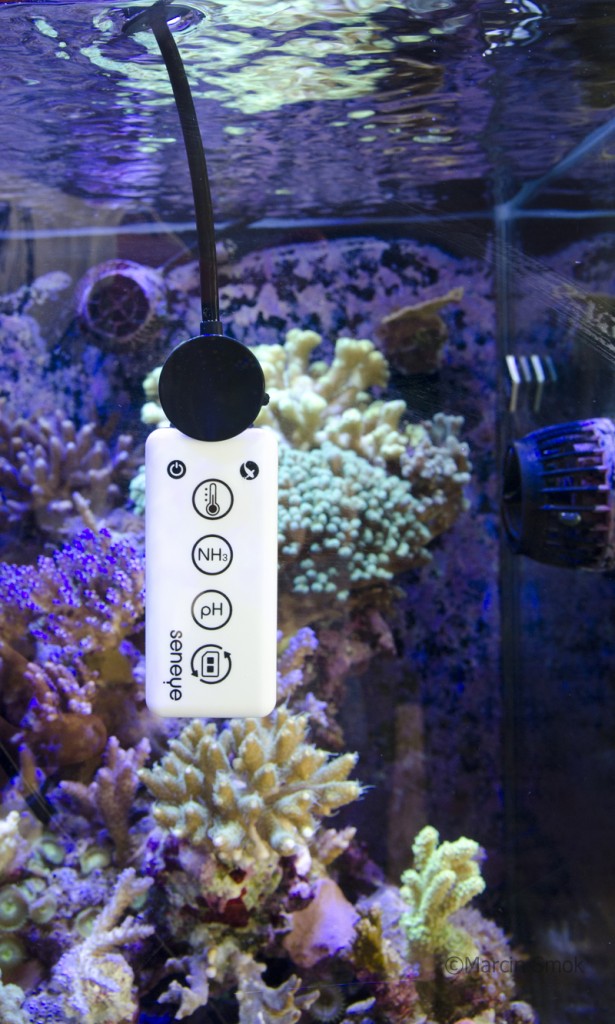
The little black and white plastic box is the heart of the seneye product. It attaches to aquarium glass via included suction cup. On the back there is a light sensor and a little socket intended to put new slides in. On the front we have a power indicator LED and four icons, each equipped with a LED that lights up when your parameters are off the set range. Looking from the top, there’s a small power indicator on the left and a testing indicator that lights up every time Seneye run tests. In the middle we have four larger icons, from top a temperature alert, a NH3 alert, a pH alert and “Replace slide” alert icon. Each one of them lights up whenever the parameter it represents is off the set range.
Next and equally important part of Seneye is the earlier mentioned slide.
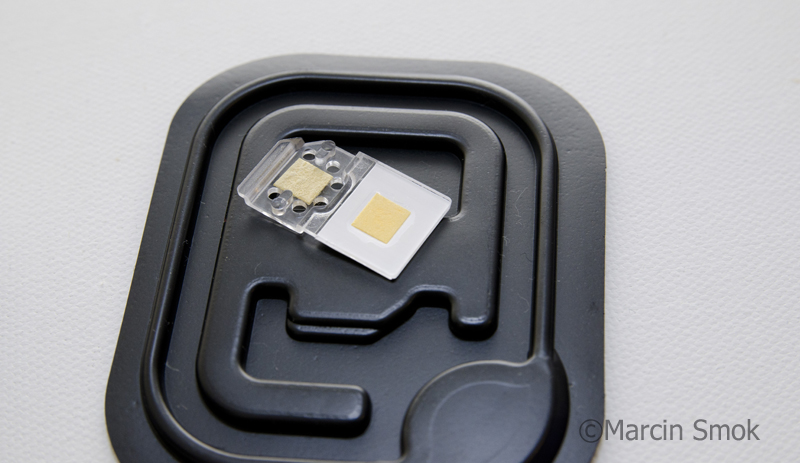
This thing alone separates Seneye from other monitoring devices on the market. The idea behind this product is that it features disposable microchip cards called Slides. Each slide has it’s own unique code that you register on Seneye website. After registering a slide you have 30 days of constant pH and NH3 readings (the testing strip is mounted on the slide), after which you need to replace the slide with a new one. Each slide costs an equivalent of about $10-at the time of writing this article, Seneye is available to purchase only through an official store and is shipped to you from UK. However, I’ve been told by Seneye stuff is working with American distributors to export their product to North American markets. According to Seneye, each slide allows for 1500 pH and NH3 tests per month. The results are upload to Seneye servers and stored for future reference.
The website itself is third key component of Seneye monitor and is designed to store test results uploaded from the device and present them to user in form of tables and graphs. I get to it later, meanwhile let’s talk about the installation process.
3. Preparation and software installation
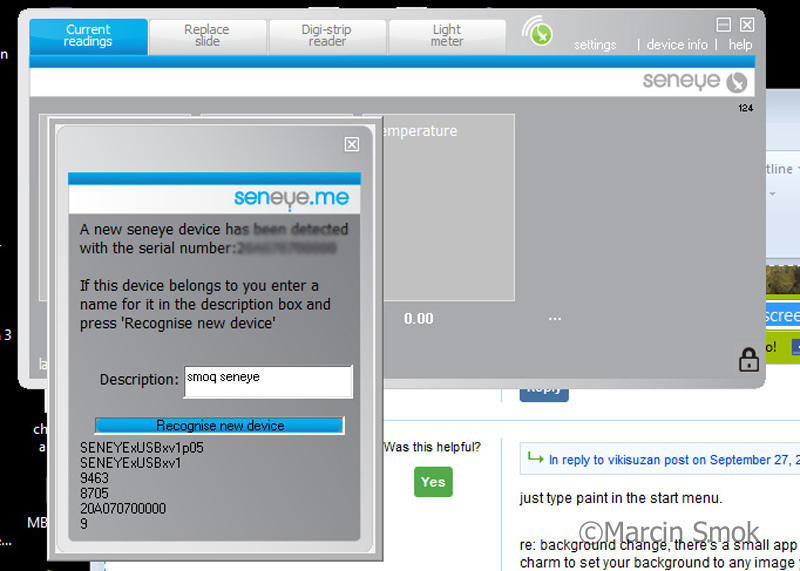
First thing Seneye recommends after opening the box is to prepare the slide by soaking it in aquarium water for 24h (48 in saltwater setups) for best accuracy. I followed the recommendations and came back to finish the installation 2 days later. Next step is registration on www.seneye.me website.You create an account and link your device to it, enabling live feed from the device. If you type in your e-mail address and mobile phone number, you also activate e-mail and text message alert functions(more on that later).
The whole registration process takes less than five minutes and after couple of minutes I received an e-mail and text message saying my account has been activated. It’s a nice thing to discover the text message alert system works on US phone numbers even that seneye website is based in Great Britain.
Seneye monitor requires you to install software on your computer in order to operate correctly and it can be downloaded from their website. One important thing- at the time of writing this review, only Windows based software (Microsoft Windows XP and later) is available- I’m sure the company writes Mac software as you read this, but as for now Apple users are out of luck. Installation went smoothly on my Windows 7 based machine and after connecting Seneye via supplied USB cable, it quickly discovered and recognized new hardware.
To this time I have to note that the whole installation process is extremely easy and user friendly, a thing not so common with aquarium monitors& controllers. It’s obvious to me that Seneye team is trying to get to all hobbyist, not only experienced ones.
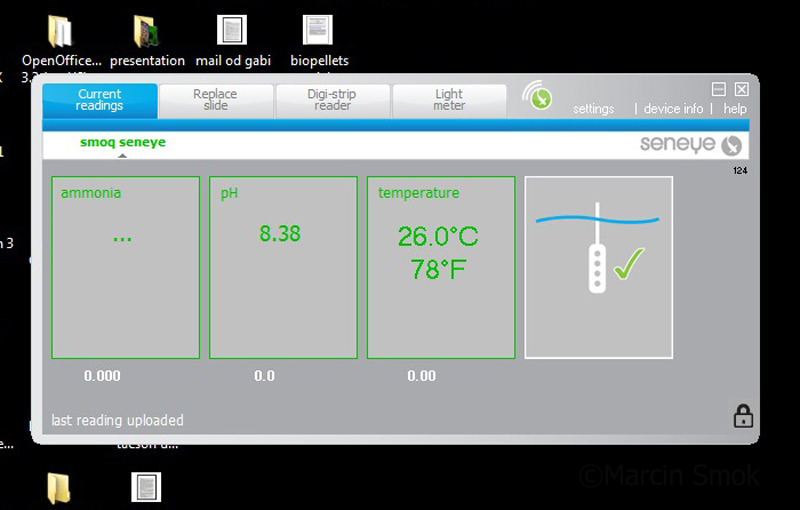
Installation’s done and it’s time to open an application that showed on my desktop. The app quickly discovered my device and a little window popped-up, displaying current readings. On top of the app there are four tabs, a settings panel and a help menu. I will talk about those tabs in a little while, let’s focus on readings now. To be able to test pH and ammonia, there has to be a registered slide inside Seneye. You have to options to register new slide, through seneye website or using the application. I’ve chosen the later method- each slide comes in hermetically sealed pouch with a unique code printed on top. You type in the code and you unlock 30 days of pH and NH3 monitoring. It’s worth mentioning that all other functions (temperature, light meter) work with or without slide present.
Let’s take a closer look at the previously installed Windows app. When opened, it takes about 1/4 of 22″ computer’s display. There are four tiles, each displaying a live feed of current readings. From the left we have ammonia, pH, temperature (displayed in centigrade or Fahrenheit degrees) and connection status.
I’ve checked and compared test results to a Digital Aquatics Reefkeper Lite controller I have connected to my reef tank and found little to none variations to the test results. The temperature difference was 0.1-0.2°F from DA probe, pH differed 0.1 between Pinpoint probe and Seneye. However, the Pinpoint probe I used is almost a year old, which makes me believe Seneye slide may be more accurate. Anyway, a 0.1 tolerance in pH test results is acceptable in hobbyist level devices.
I compared The free ammonia results with Salifert NH3 test and the results were- Seneye 0.001, Salifert-0. So far so good.
The tabs on top of the app are, from the left: current readings (the default screen displaying,well, current readings), Replace Slide( this is where you can check how many days are left until the slide has to be replaced and where you can register a new one), Digi-strip reader (an expansion tab, not much is said about the function of this tab, but Seneye team is working on expanding it’s device testing capabilities to different parameters) and last-Light Meter.
- Light meter

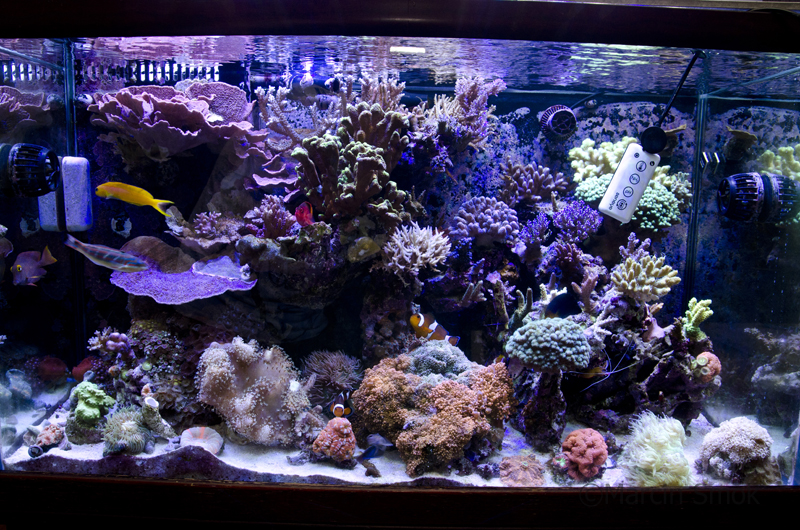
The last tab is worth its own paragraph, as in my opinion, is the most unique function of Seneye monitor, separating it from other similar devices on the market. The built in light sensor, located on the back of Seneye, is capable of measuring three crucial light characteristics- PAR (photo-synthetic radiation, the intensity of light’s spectrum usable for photosynthetic process ), LUX and light’s source color temperature (in Kelvin degrees). To properly measure those three parameters, the sensor has to be mounted parallel to the light source, which means that if you need constant light measuring, you need to mount the device on the bottom of your tank or on a frag rack (the suction cup included in Seneye can be attached on either side of the unit). The optional Float attachment allows for testing light on the surface, a thing useful mostly for pond owners, where Seneye can measure sunlight intensity and color throughout the day. The test results are stored on Seneye servers and presented to user in form of graphs, parts of you can hoover over to see individual test times and results.
From the thee light parameters Seneye is able to measure, PAR values are most important for a reef tank enthusiasts, allowing them to test and compare the quality of light source they are using. I didn’t have the opportunity to compare Seneye light sensor to other PAR meters, notably the most popular Apogee Instruments Quantum Meter, but I did my research and contacted few people in Europe who have both devices and asked them to compare PAR test results for me. Measurements were taken and test results show little to none differences between seneye and Quantum Meter. Conclusion- the little device’s light meter does not disappoint. This could be a buying factor for those looking for an affordable PAR meter. Anyway, let’s go back to Seneye’s interface.
5. Web interface
I mentioned before there’s more than one way to check Seneye’s status, the second being their web interface. When you create an account on www.seneye.me and register new device, you gain access to a personalized web page where all the test results from your own monitor are stored and presented to you. What is worth mentioning is that the website design is very user friendly and fully customizable. You have a separate window for every parameter Seneye tests for and you can move, resize and arrange any of them to your liking.

There’s some of the latest web design technology behind seneye.me and it all works without any glitches. I’ve tested the web interface using latest versions of four most popular web browsers: Google Chrome, Mozilla Firefox, Microsoft Inrernet Explorer and Apple’s Safari and found no problems whatsoever. The website is based on HTML5 protocol, which allows to access it from a mobile device. I’ve tested it on Android device using Dolphin Browser and it worked just fine (it opens the exact same website on the phone, not a mobile version of it). There is an Iphone application you can download for free on Itunes as well, unfortunately I didn’t have access to Apple device (Android lover:)) so I can’t collaborate on that. According to Seneye staff, there is an Android and Windows Phone app in the making and it should be released soon.
Going back to the website, each window represents other parameter using graphs for visualization. You can hoover over various points in the graph to see individual test results with date and time they were taken.
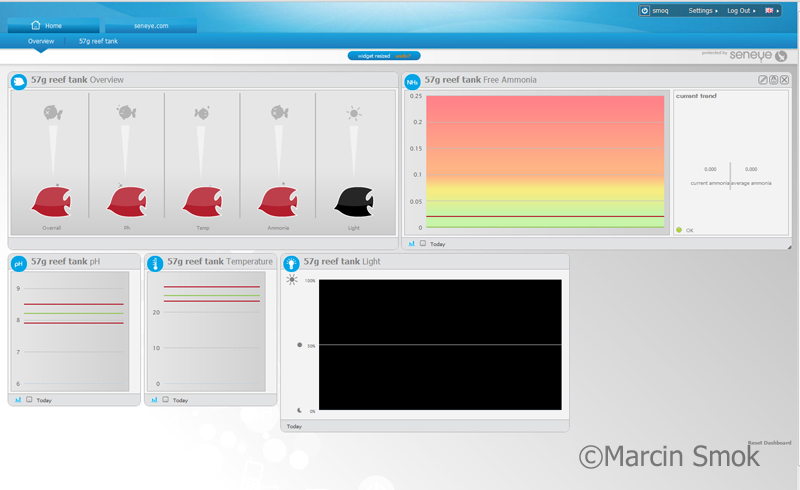
The temperature, pH and ammonia panels shows the latest test results as well as the current trend. The Color temperature shows a parabola of light source changes during the day (again, very helpful feature for those using LED lights customized to daily and seasonal sunlight variations as well as pond owners). The whole website is designed to be able to add new features in the future if Seneye would come out with additional devices.
The last thing to check is the email and text message alerts built in Seneye. The simplest test to perform was the temperature swing, so I poured some water from my tank to a small container, placed Seneye inside and went with my laptop to the kitchen, with intention to stick the container in the refrigerator (imagine your family members face expression when they see you in the kitchen with a laptop on your lap and an USB wire sticking out of the fridge- priceless).
I observed the temperature drop and once it hit 76F I received an email and text message saying that my temperature is dangerously low. Alert system-checked. However, one thing I couldn’t find how to adjust is fine tuning of the alert function. As far as I am concerned, you can’t “tell” seneye the temperature (nor pH if we’re at it) range you consider as “safe”. This is something worth working on in future updates. Different tanks have different temperature range and it should be adjustable. Speaking of updates, Seneye software ia constantly upgraded. I see that the people behind it really work on fixing bugs and listening to users’ feedbacks.
6. Conclusions
Time has come for the verdict- I spent over 30 days testing Seneye and found the results being constant and comparable to other monitoring devices I’m using on my system. Here are some key “likes” and “dislikes” I would like to bring up after the time I spent with Seneye:
What I liked:
-Seneye is an attractive looking device that won’t spoil your fish tank’s aesthetics
-most plug&play and user friendly experience of any aquarium monitoring devices I’ve ever used
-website interface is extremely easy to read and fully customizable
-alert system works well and responds quickly to changes in water quality
-constant updates from Seneye team makes me believe they really stand behind their product
-one device can be used on multiple aquatic setups
-test results are stored on www.seneye.me forever and can be accessed everywhere there’s an internet connection
-light meter is absolutely fantastic and and easily triples Seneye value as a monitoring device
…And what I didn’t like:
-only one way to connect the device to Internet (through an USB cable) which requires user to have a wi-fi USB hub or a computer nearby (an optional USB Wi-Fi sender is available to purchase from Seneye website)
-added costs of replacing slides (although pH and ammonia test cost money as well)
-I wish Seneye could monitor more crucial water quality parameters instead of ammonia (nitrite or nitrates for example)
-no Apple computers support at the time of writing this article
Conclusion:
Seneye is definitely an innovative and interesting device, no doubt about it. The user-friendliness sets it apart from any similar devices on the market and puts it in it’s own category- a plug&play aquarium monitors. The software and web interface, while still having minor issues here and there, are extremely easy to use and constantly updated to meet users’ expectations. On the downside, I wished it had a built in wi-fi, but I understand it would add to the cost of the device. I would also like to see if Seneye could monitor other important parameters like nitrite, nitrate or phosphate. Seneye team made the unit and it’s dedicated software expendable, so I wouldn’t be surprised to see add-ons coming out in the future.
My final thoughts are: Seneye is a cool new gadget for the aquarium industry. You can’t compare it to the advanced reef controllers, but it offers quite a lot of functions for a relatively low price (not considering the costs of replacing slides). If you are in a market for PAR meter, purchasing Seneye is a no-brainier decision in my opinion, it is an accurate 3 in 1 light meter (LUX, PAR and light temperature) and costs a fraction of what you would have to pay if you decide to get each meter separately ( as far as I’m concerned, there is no other device on consumer’s market that offers measuring three different light characteristics in one little package). If you already have an aquarium controller capable of monitoring pH and temperature, you can probably live without Seneye, at least until you see it expanded to monitor other water parameters. The device is a very attractive solution for people who just started in the aquarium hobby and are looking for an easy to use, trouble free aquarium monitor capable of much more than just checking a fish tanl’s water temperature.
Finalizing, Seneye offers something no other aquarium equipment up to date- a “cool factor” while being an useful tool for a serious reefer at the same time. A DIY LED light builder myself, I welcomed Seneye with opened arms and fully used what it is capable of. In times when everyone is looking forward for new cool gadgets, Seneye is a temptation hard to pass. Plus the light meter. I am looking forward to what Seneye team is working on to expand their device’s capabilities, meanwhile let me put a period at the end of this sentence as I have to check how many LUX does that little CF bulb screwed into my nightlight fixture really produces.
Oh, and a little update. I just checked seneye facebook page http://www.facebook.com/seneye?ref=stream and read that the update for making the alert system adjustable has been applied. You can now set the low and high points by clicking the little padlock to “open” position and adjusting the parallel lines on the graph. Also, the android application is now available to download on google play market. I’ll keep you updated of any new changes to Seneye as they appear.


This is great in concept. However, it has been my experience that their web portal is often hours to days behind so it is impossible to remotely monitor your system using this. They upgraded their servers but it still lags behind frequently.