
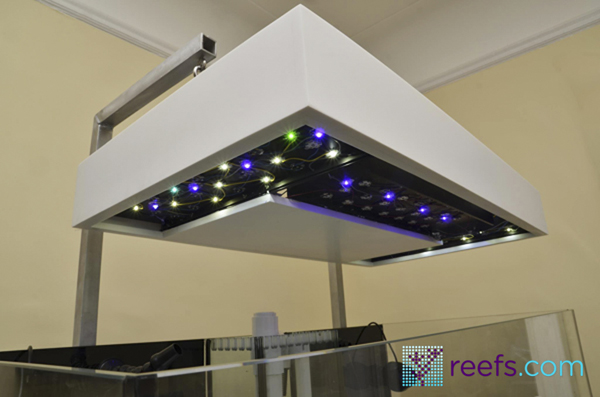
High power light emitting diodes quickly became the new standard in providing an artificial light source for photosynthetic animals in our reef tanks. Most emitters output enough light to grow almost any coral in captivity, thus aquarium LED manufacturers shifted their focus to the software part of their lights in order to sell their product. Therefore, it’s all about control now…
All images by author
From sunrise & sunset dimming to thunderstorms, cloud passing and various other lighting effects, there are endless possibilities to control LED panels. Add to this several emitter color options and you end end up with a true 70’s disco experience…
Having the possibility to fine tune your light temperature and intensity is undoubtedly a desirable feature in aquarium lighting. Where do DIY LED projects place themselves in terms of control-ability? Are we left behind? Well, thanks to controllers like Neptune Systems apex , we are not. Better, thanks to apex’s simple programming code and variable speed ports, fine tuning LED circuits is on par or could even be superior to commercially available fixtures.
Before I proceed with the rest of this article I need to take a brief pause and state two things:
a) first of all, the apex code I will present to you later in the article is a slight modification of an existing code written by another reefer that asked to remain anonymous; I found this particular code to be both ingenious in it’s simplicity and quite complex in it’s abilities. Therefore, my personal “thank you” to that person for letting me modify and present that code in the article
b) at this point, I am assuming you have the required skills to build a dimmable LED light and the ability to wire in a rj45 socket to connect with the apex main unit. I also assume you have the basic apex programming knowledge necessary to understand and use the code I’m about to write.
I had to made those two assumptions in order to focus on the topic of this article and keep it reasonable in length. If you wish to learn about building a DIY LED light, refer to my build journal or countless other manuals found on various reef forums. For apex programming, I recommend reading the great Comprehensive Reference Manual. http://www.neptunesystems.com)
OK, we are past the legal stuff, let’s continue with the hardware part of the process.
Things you need
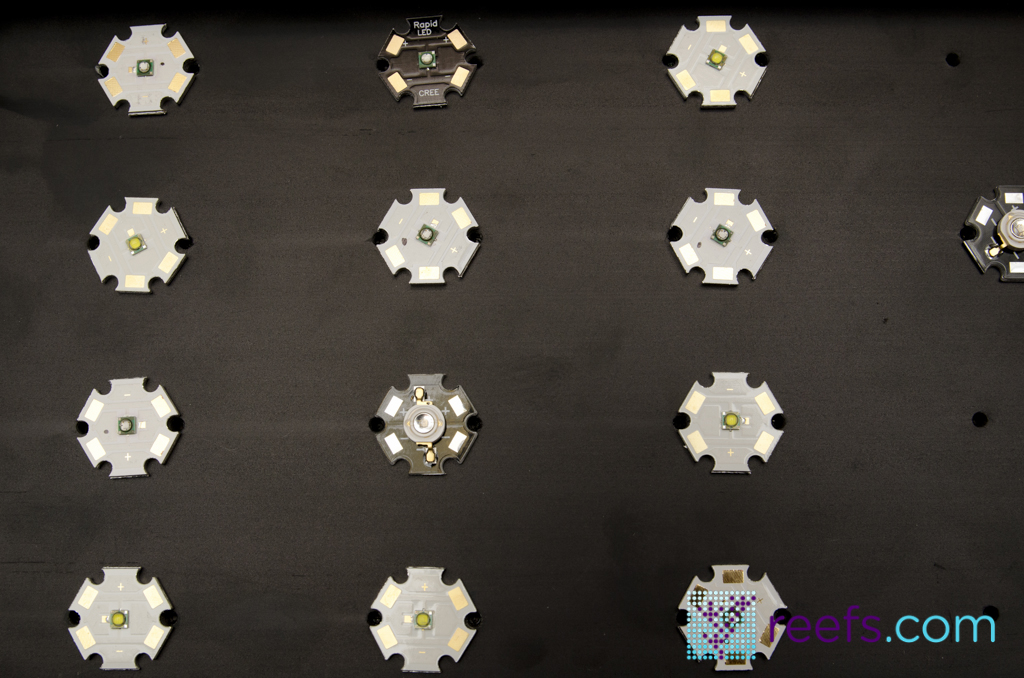
1. At least one LED string wired to a dimmable driver; two strings if you would like to have separate channels for white and actinic diodes. You can go even further and have separate strings for various color LEDs if you wish to. Sky’s the limit ( or rather number of different color variations LED manufacturers introduce to consumer’s market). When it comes to the LED driver, and this is very important, you need a dimmable driver that can receive a 0-10V analog signal. My build uses MeanWell 60-48D drivers (please note the “D” at the end of this driver’s model number, this is the one that uses an analog signal to dim LEDs. Meanwell sells this model in a 60-48P version, where the dimming is handled using a digital signal called PWM and it’s not suitable to be dimmed by an apex controller (unless you convert the PWM signal into an analog one, but that’s additional electronics to purchase and the build becomes over-complicated, in my opinion). Meanwell is the most popular choice for DIY LED builders, but if you have another driver that can be dimmed using a 0-10V analog signal, you can use it as well.
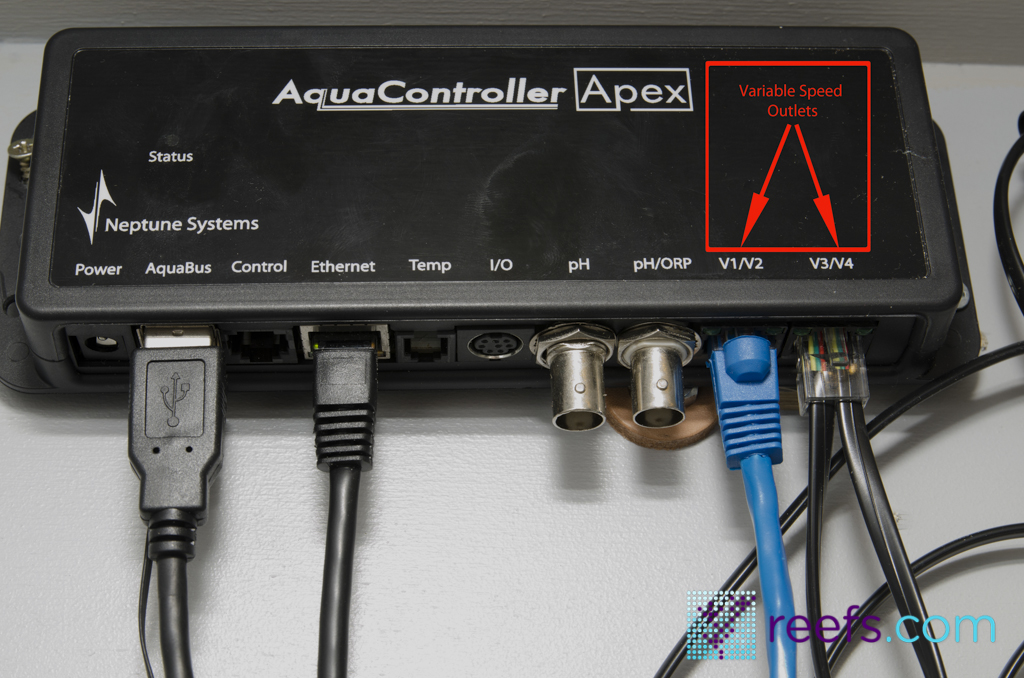
2. Neptune System apex Aquacontroller. On the base unit (the one where you plug in all other expansions and probes), there are two ports labeled V1/V2 and V3/V4. Those are variable speed ports that output the earlier mentioned 0-10V signal required to dim the LED strings. One port is capable of controlling two individual LED channels, so if you have only white and actinic LEDs in your build (or mix in color LEDs with whites and near UV ones with actinics as I did), you need only one port & one cable to dim them both independently.
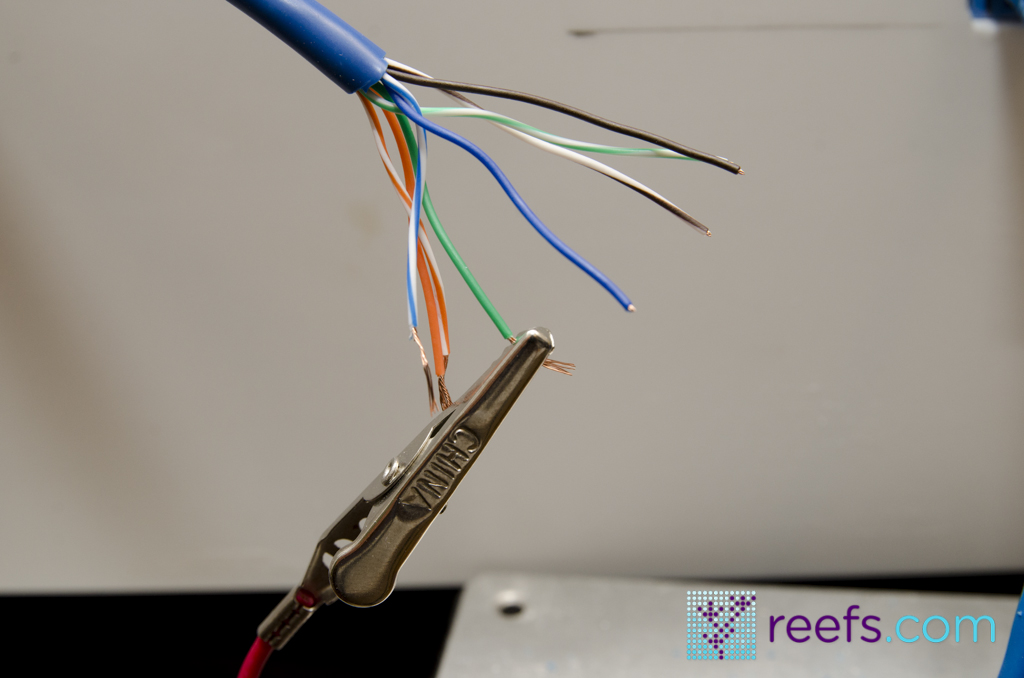
3. Ethernet socket and cable. In order to make a connection between your LED unit and the apex controller, you need to buy an ethernet socket that has either solderable points or push in pins to attach wires from the drivers. It should cost around $1-2 and it can be purchased many places online as well as at your local home improvement store. The ethernet cable is another few bucks (depending on the length). If you happen to have a spare one from an old router or modem, it will work just fine too.
The hardware part
As I mentioned before, I’m assuming that you have all the necessary equipment and skills to wire in an ethernet socket with your drivers so let’s skip to the actual process. The ethernet socket has 8 pins and the cable has 8 wires, respectively. apex uses only 4 of them, 2 for each dimming channel. When you look on the front of the socket so the little notch is facing upwards (see drawing), the pins are numbered from left to right 1-8 (if they aren’t, try to write down where pins number 1 and 8 are).
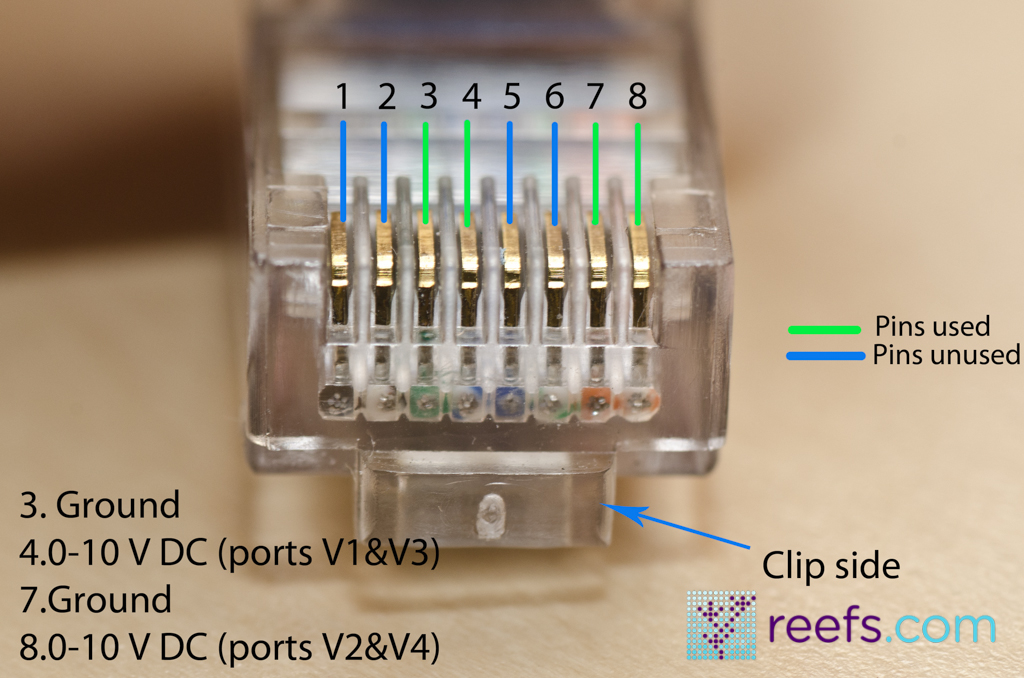
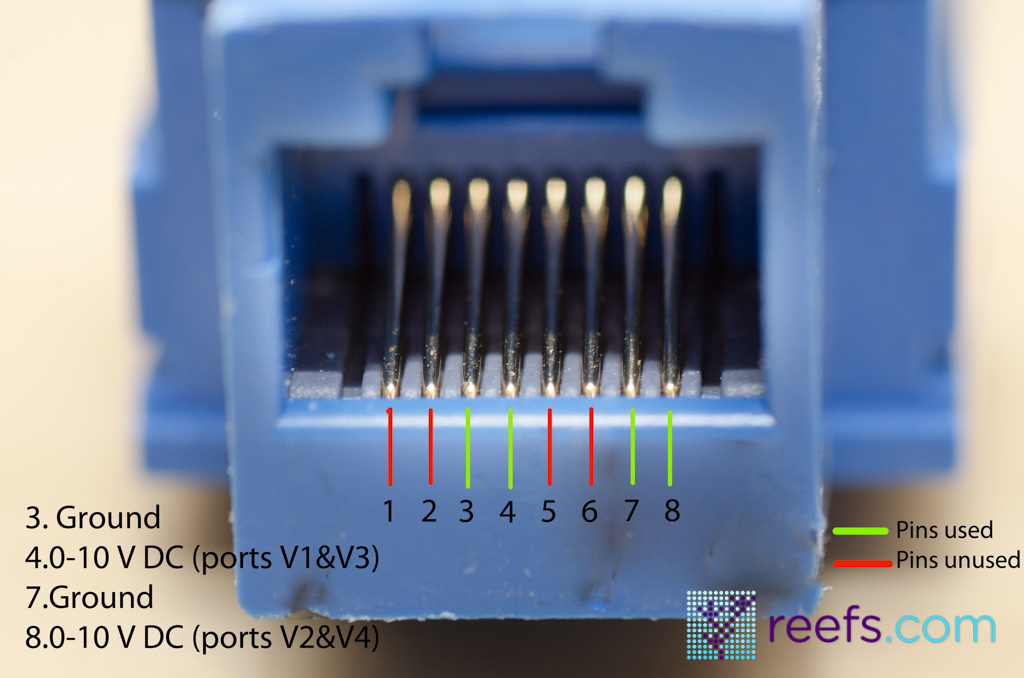
The Meanwell 60-48D has two dimming wires:Blue colored DIM (+) and White colored DIM (-), those are the ones that have to be spliced with ethernet socket pins. You can splice driver dimming wires together and use only one dimming signal for all of them (as many as 8 Meanwell drivers have been hooked up to one dimming channel without any problem) . Refer to the diagram below for the correct connection schedule. Quick reminder, one physical port on the apex can dim two separate channels, which sums up for the total of 4 channels per module. If your build requires more than 4 channels, you can purchase additional expansion modules from neptune Systems. Check all connections twice and when you’re sure everything’s correct, you can proceed to the software part of the build.
Apex programming
I have to say upfront that the apex programming language is brilliant and allows very simple on/off programs to sophisticated ones like sunrise/sunset effect, lunar cycle simulation to cloud passing and thunderstorms if you’re into that. My point of view is that sunrise/sunset effect is a very usable function allowing your tank inhabitants to slowly acclimate to the change in light brightness and it effectively simulates nature, while things like thunderstorms and color shifts are unnecessary light effects only stressing fish, so I skipped them in the program. However, if you really need to impress your friends with a little storm in your aquarium, apex is capable of controlling your lights in that fashion.
There are three parts of the code necessary to fully control your LED panels: the Profiles code, the Outlets programming codes and the Variable Speed (or virtual as they are also called) outlets. I will present each section of the code with a brief description of their function. If you need help finding where each of the settings are on the apex interface, once again I recommend checking the apex Manual and the reference screenshots I took. The below code is usable for two channels, let’s call them White & Actinic. For more than two channels, just copy & paste one of the previous channels’ code and adjust it to the needs of the other ones.
a) Profiles setup
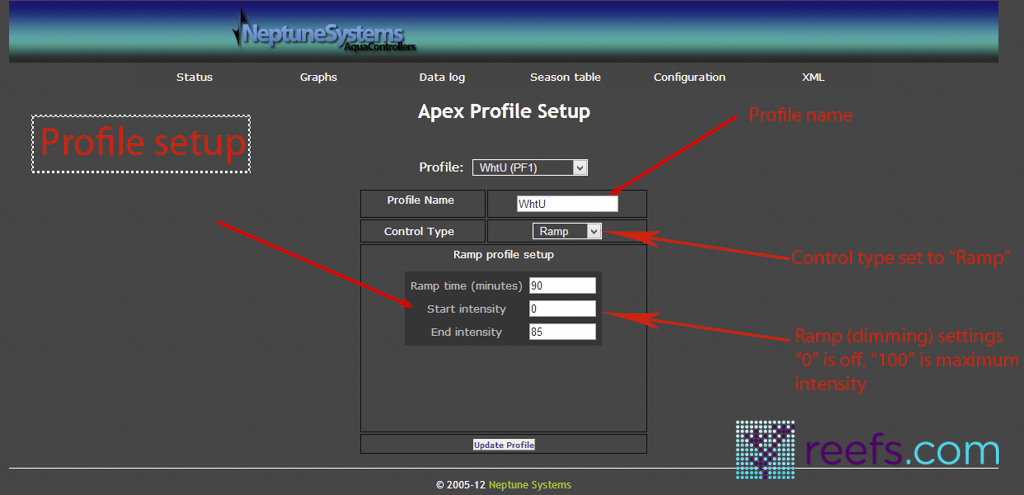
Two channel dimming requires 6 profiles, three for each dimming channel. I named them WhtUp (sunrise) WhtDay (light intensity during the day) and WhtDown ( sunset) and for actinics, they are ActUp, ActDay and ActDown, respectively. You can name them however you want, just remember which profile translates to which outlet. Here’s the three profiles codes for the White channel:
WhtUp
Ramp time (minutes) 120
Start intensity 0
End intensity 85
Description: the Ramp Time commend is the time (in minutes) your light is going to brighten up from your Start intensity to End intensity. In this example, it’s going to take two hours for your white LEDs to get from 0-85% of the maximum intensity. The intensity can be any number between 0-100 and apex calculates that range over a given time, allowing for a very smooth transition from total darkness to whatever you set your End intensity. After reaching the set intensity, it will stay at said intensity unless you tell it otherwise in the following profile.
WhtDay
Ramp time (minutes) 0
Start intensity 85
End intensity 85
This part gets a little confusing for those of you familiar with programming their lights. WhtDay profile is used for the period of time where you want your light to stay constant at given intensity, which for most of us is throughout the major part of the aquarium’s photoperiod. You may ask yourself “why not using a simple ON command for that part of the photoperiod?”. Using the Ramp function has one major advantage here- you can set your daylight at any intensity you’d like, not just 100% and change it quickly to your liking. More than that, by playing with the WhtDay and ActDay profiles, you can fine tune the color of light you are trying to achieve for your tank. By lowering the intensity of blue over the white channel, you end up in less blue output (lower Kelvin temperature) and with an opposite situation you’re increasing color temperature. Ramp time 0 value tells apex that after the WhtUp profile expires, it takes virtually no time for the light to jump into daylight intensity. When changing the intensity of WhtDay profile, make sure you change both Start intensity and End intensity at the same time and with matching values, otherwise apex may send out an error code.
WhtDown
Ramp time (minutes) 120
Start intensity 85
End intensity 0
WhtDown profile (sunset effect) is very similar to WhtUp profiles, only this time around you Start with a higher intensity (85% in our example) and the apex dims the light for the period of 120 minutes to completely shut it off when it reaches 0% intensity. Just for your information, I found that Meanwell drivers turns off automatically at about 5% intensity instead of 0%
Here’s the whole code for white channel Profiles:
WhtUp
Ramp time (minutes) 120
Start intensity 0
End intensity 85
WhtDay
Ramp time (minutes) 0
Start intensity 85
End intensity 85
WhtDown
Ramp time (minutes) 120
Start intensity 85
The actinics channel profiles are exactly the same , only with different names in order to avoid conflicting codes. Here’s an example of the three codes for the actinics channell:
ActUp
Ramp time (minutes) 120
Start intensity 0
End intensity 85
ActDay
Ramp time (minutes) 0
Start intensity 85
End intensity 85
ActDown
Ramp time (minutes) 120
Start intensity 85
b)outlet programming

The EB8 outlet program is very simple, as it only controls when your LED drivers receive 110V power. Every outlet program is based only on a ON/OFF commands and time values in which the outlet has power. Here’s a ample code for both Actinics and White Channels:
White 3_4 EB8
Fallback OFF
If Time 10:00 to 22:00 Then ON
If Time 22:01 to 10:00 Then OFF
Actinics 3_5 EB8
Fallback OFF
If Time 9:00 to 23:00 Then ON
If Time 23:01 to 9:00 Then OFF
Description:
Let’s look at the white channel (as the actinics are exactly the same). FALLBACK statement tells apex controller what happens in case of power outage- if you set it to OFF then after power is restored, apex won’t switch on given outlet until you do it manually. I recommend setting it to OFF to prevent coral shock from sudden change of available light ( especially when power is off for extended time). The next two statements program when the given outlet ( in our case White 3_4 EB8, but you can change its name to your liking) receives power and when it’s off. Make sure that your program covers the whole 24h of a day and that it matches the commands in the Var outlets code (I’ll explain that in a minute).
c) var speed outlets program
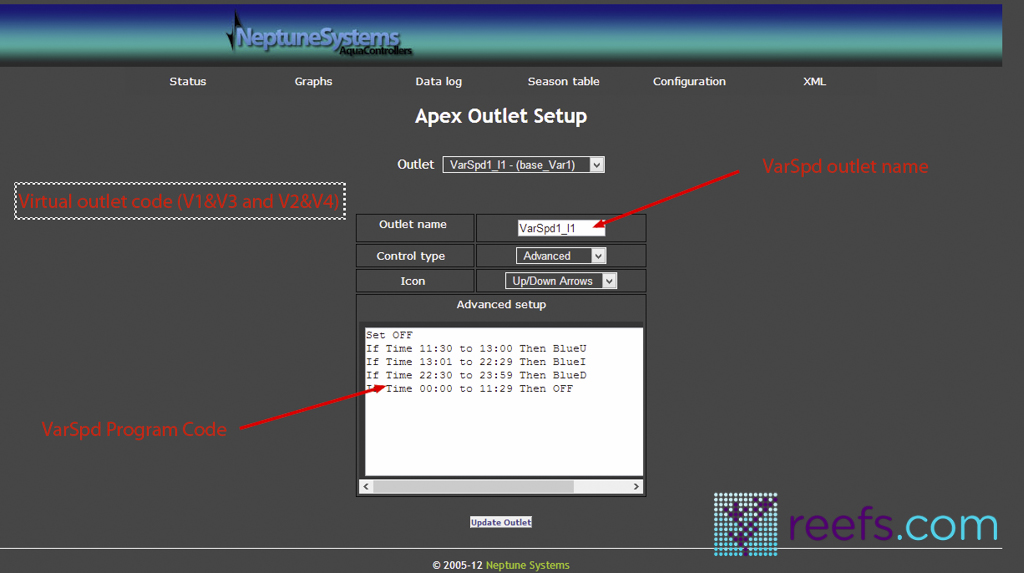
As I mentioned in the beginning of this article, apex main module has two variable speed outlets (please note that apex Lite and Apex Jr. lack those two ports, although they can be added via an optional expansion module named the Variable Speed/Dimming Module or VDM) capable of sending a 0-10V analog signal to output devices (in our case DIY LEDs). The two ports are labeled V1/V2 and V3/V4, respectively. Each port is capable of dimming two separate channels (four total, more with expansion modules). The dimmable drivers accept the 0-10V and translate it to power output on the LEDs. It’s important to mention that dimmable drivers won’t work without a dimming signal, because no voltage on the dimming circuit is translated by the driver as a “0” value, which is simply an OFF position. 10V on the dimming circuit means full power on the LEDs
You could write a simple code that would control the intensity and time frame of your DIY light, but thanks to profiles, we are able to write a more sophisticated piece of code that would create sunrise and sunset effects as well as a smooth transition from actinics to full spectrum light output.
Here’s the complete program for white channel (description below):
White Cycle baseVar1
If Time 10:00 to 12:00 Then WhtUp
If Time 12:01 to 20:00 Then WhtDay
If Time 20:01 to 22:00 Then WhtDown
If Time 22:01 to 10:00 Then OFF
If we go back to the profiles programming, we created three separate profiles for white channel: sunrise (WhtUp), daylight (WhtDay) and sunset (WhtDown). Those profiles control the start and end light intensity ( Start intensity, End intensity values) as well as time frame in which the LEDs are going to change the intensity of light they output (Ramp time command). What var speed outlets program does is control the 0-10V signal sent to the driver using the earlier created profiles. It’s very important to check three things when writing Var outlets program:
-Check if profiles names (in our case WhtUp,WhtDay and WhtDown) inside the program code match the actual names of the profile, otherwise apex is going to display an error.
-Check if the Ramp time in sunrise (WhtUp) and sunset (WhtDown) profiles match the time frame in var speed outlets program; for example, in our case the ramp time for WhtUp is 120 minutes, so the code in var speed outlet program matches it by executing profile WhtUp from 10:00 to 12:00; the same is true for WhtDown.
– Check if the total photoperiod time matches the time frame in the EB8 outlet program; in our case, the cycle starts at 10:00 when the WhtUp profile starts and ends at 22:00 when the WhtDown profile finishes, which matches the white channel outlet code exactly.
All of the above statements are true to the Actinic’s code as well.
Here’s full code for both channels:
White Cycle baseVar1
If Time 10:00 to 12:00 Then WhtUp
If Time 12:01 to 20:00 Then WhtDay
If Time 20:01 to 22:00 Then WhtDown
If Time 22:01 to 10:00 Then OFF
Act Cycle baseVar3
If Time 9:00 to 11:00 Then ActUp
If Time 11:01 to 21:00 Then ActDay
If Time 21:01 to 23:00 Then ActDown
If Time 23:01 to 10:00 Then OFF
Conclusion
Witth dimmable LED drivers and apex’s programming capabilities we were able to build and program a versatile, fully controllable LED fixture. You can tweak the light intensity and color temperature to your liking, create a smooth transition from total darkness to midday sun brightness and adjust “the blues.” More than that, nothing stops you to go one step further and modify the code to simulate moon phases, cloud passing and lightning storm effects. All that by adding new and modifying existing profiles. You can also add more channels using color LEDs to further expand the light spectrum. I hope that this article helped you understand and use the apex programming language to build LED lights. Don’t hesitate to contact me directly or comment here with any questions or suggestions you may have. Happy DIYing!!!
Note: There is an upcoming update to apex website, once it’s released I will point where to look for the programming parts with the new interface.
apex is a trademark of Neptune Systems.


Really awesome article, your best yet.