

By Sanjay Joshi
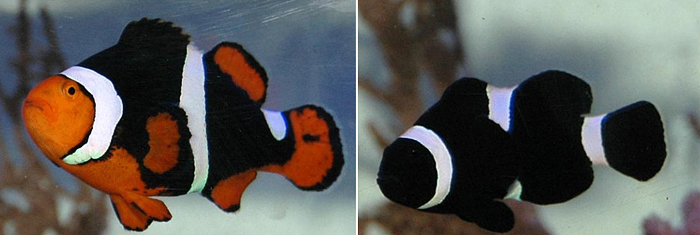
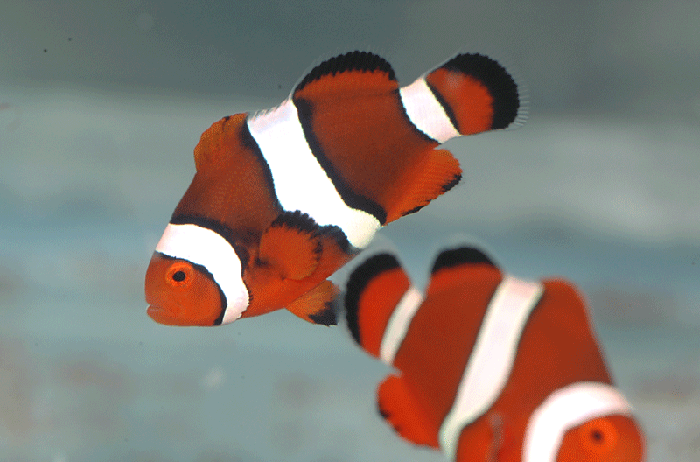
The parent clownfish, Onyx on the left and Darwin on the right.
Even after nearly 17 years of reef keeping, the hobby still never gets old. There is always something new, or untried that grabs my attention and provides a well needed distraction and challenge from the “been there done that” sense that eventually catches up with any long term endeavor and interest.
While in Colorado early this year, visiting a friend for the grand opening of his store “Front Range Aquatics”, I came across a “pair” of clownfish – a beautiful femaleAmphiprion percula (“Onyx”) and a male black Amphiprion ocellaris (“Darwin”) in one of the tanks at the store. I was told that these fish had been together for a long time. Intrigued by the “Odd Couple”, I acquired them and brought them to Pennsylvania for my 29G reef that had been sitting fishless for several months.
I had heard of people having spawning hybrid pairs of the normal variants of A. ocellaris and A. percula called “percularis” and wondered if there would be any remote chance of this odd couple spawning. If they did, it could likely be one of the first such crossings of these variants, and just the thought of what the resulting offspring might look like was worth keeping the fish together as a pair. I had raisedA. ocellaris and A. percula fry several years ago, so I felt that raising the fish themselves would not be much of a challenge. It was the excitement of seeing how the hybrids might develop that piqued my interest.
Hybridization of fish is a topic for debate. Whether man made fish have a place in the hobby is ultimately for the hobbyist to decide. While purists may frown on hybridization, hybridizations have produced interesting variants in plants, flowers, and freshwater fish among others. In the marine world, hybrids do occur in nature and also in clownfish. In fact, both Amphiprion leucokranos and Amphiprion thielleiare recognized as variants of crosses between Amphiprion chryopterus andAmphiprion sandaracinos and such hybrids have been experimentally created in captivity according to Bruce Carlson (Carlson, B. The Amphiprion leucokranosmystery. Aquarium Frontiers. 1996; 3:34). ORA has produced the Indigo Psedudochromis which is a hybrid between Pseudochromis fridmani and thePseudochromis sankeyi. Personally, I have no problem with this with the caveats that man made hybrids should never be released to the wild, and when sold they should be clearly labeled as hybrids.
For the next few months, the fish were happy in the 29G tank, not showing any outward signs of spawning but still hanging out together as a pair. Around early March, I was starting to see the Bellus Angels and Joculator Angels in my 500G reef going through courtship rituals. I decided it was time to start feeding the fish in my 500G reef with a variety of foods to encourage spawning. I started feeding all my fish with live bloodworms, fish eggs, live brine shrimp in addition to the standard food I was using – spectrum pellets and frozen E. pacifica mysis shrimp. Feeding is important in breeding as it impacts the size of the nest, quality of the eggs and health of the parents. The daily duration of light and tank water temperature can also impact breeding. I increased the duration of light from 9 hours to 10.5 hours and also increased the water temperature slightly from the typical 78F to 82F. The angels spawned in late April (see the videos on MR here.)
The clownfish also spawned for the first time on April 1st, 2008. I suppose it was piscine kind of April fool’s joke as I was not prepared for it. I did not have the food for the larvae, and additionally I was going to be out of town around the time they were going to hatch. Clownfish eggs typically hatch in around 7-9 days. I decided to use this batch of eggs as an experiment to determine when the larvae would hatch, and to get better prepared for the next batch of eggs. My past experience with clownfish suggested that they would lay eggs every 14-16 days, so I had about 2 weeks to get ready for the next batch. Preparations involved 3 primary activities:
Procuring a culture of rotifers and propagating them to large enough quantities so to be able to feed the larvae for about 7 days. The best source for rotifers and phytoplankton to feed the rotifers is Reef Nutrition (www.reefnutrition.com).
Getting the larval tank and equipment ready. A 10G tank, a light source, timer for the light, heater, thermometer, airpump and airstone is required. Black construction paper and velcro was used to cover the sides of the aquarium, and white paper was attached to the bottom pane of the aquarium. The clownfish larvae are sensitive to light and it helps to have all the sources of the light coming in from the top. The white bottom makes it easier to see contrasts against a white background, making it easier to clean the aquarium and see the larvae.
About a third of the aquarium was filled with water, and the heater was placed in it. It is important to monitor the heater to make sure that the temperature is maintained between 80-83 degrees (the range at which I like to maintain the larval tank). The timer was adjusted so that the light was on for about 16hrs a day as the larvae will only feed when they can see the prey.
The final piece of the preparation is to plan the capture of the larvae. This is especially critical if the eggs are going to be hatching in the tank with the parents and the eggs cannot be removed from the aquarium before they hatch. Clownfish eggs hatch in darkness, typically within 30 minutes to 2 hours after the lights turn off. The larvae are phototrophic (attracted to light), and larval catchers can be used to capture them. There are several different designs of larval catchers. The one I use and like was designed by one of my friends and is shown in the picture below. Using a larval catcher makes it easy to collect the larvae, but it may take a couple of tries to perfect the technique and master the nuances of its operation.
Once the larval tank was debugged, it was time to wait for the eggs to hatch. Unfortunately the first batch hatched while I was out of town and no larvae were retrieved from it. With my travel schedule in April, the second batch of eggs which were laid on April 16th also could not be collected. It turned out that pair was not on any sort of reliable schedule and the next batch of eggs was laid on May 4th. Based on my observations of the previous batches of eggs, they were hatching on day 8 or 9 with most batches hatching at day 8. Things did not go according to plan, and due to some technical difficulties with the larval catcher (pump refusing to start), yet another batch was lost. With the end of the semester, and travel plans in June/July there was no good window of opportunity to try to raise the clownfish babies. Vacations and travel just do not mix well with fish breeding!
The next window of opportunity did not present itself till July. In the meantime, the clownfish were laying eggs on a rather erratic schedule and it was difficult to predict when the next batch of eggs would be laid. Due to the travel and vacations, I had to develop a plan to keep the rotifer culture alive. I attempted to concentrate a large amount of rotifers and put them in the fridge with the hopes of slowing down the metabolism while keeping enough alive to restart the culture. This turned out to be failed experiment. I was unable to get the culture going again after coming back from vacation, so it was back to the drawing board with reordering the rotifers from Reef Nutrition.
On July 12th another batch of eggs were laid, and this time all the ducks seemed to be lined up right. I had a long stretch at home without any travel, and this batch of eggs presented the best opportunity so far. Waiting for the eggs to hatch also presented the perfect opportunity to photograph the daily development. The pictures below show the daily development of the eggs.
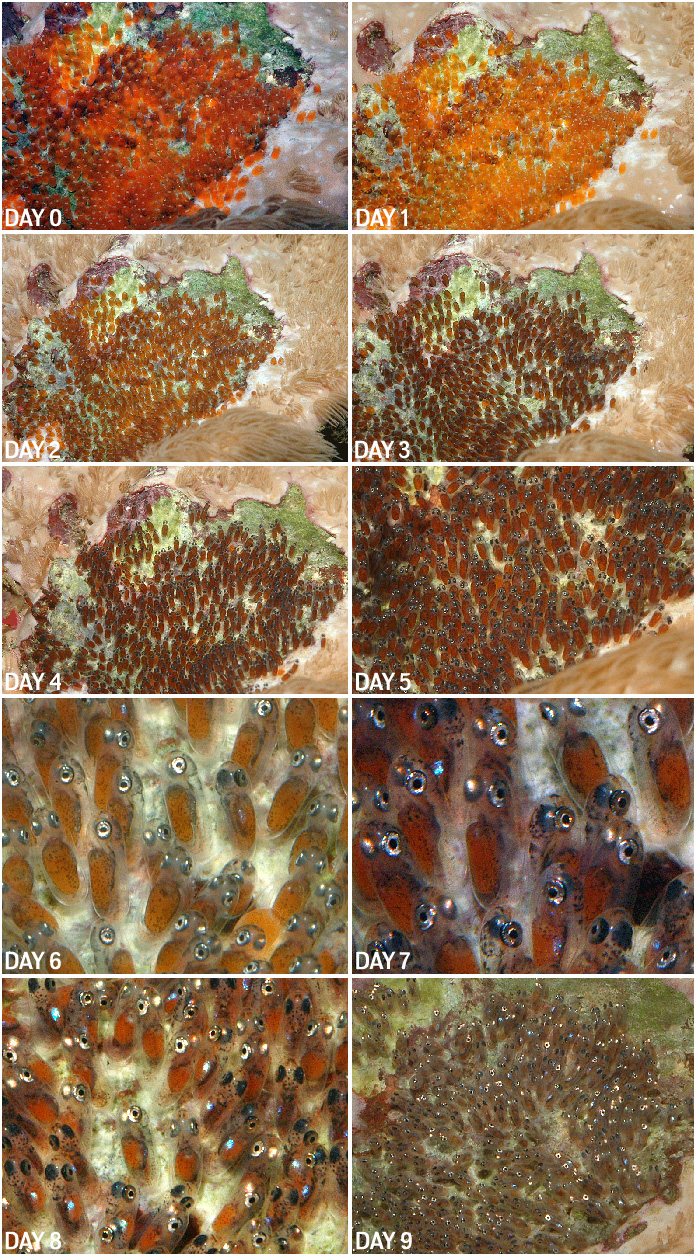 On day 8, I set up the larval catcher and of course as luck would have it, after two hours of waiting, only a few eggs hatched. This time they were going to hatch mostly on day 9. Excitement level was high on day 9, since I had visitors from Manhattan Reefs – Randy Donowitz and Jonathan Hale were here to interview me for Reefs Magazine. At night, after the lights went out I set up the larval catcher and sat with Randy and Jon to continue the interview. Throughout the interview they were amused at me dashing out of the room to keep checking on the progress of the hatch and making sure that the larval catcher was working. Around midnight, an hour or so after the lights had turned off, the larval catcher was full of newly hatched larvae… success at last!
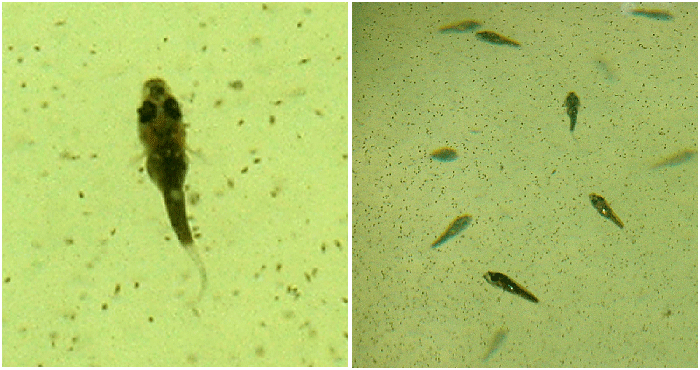
The larvae along with about 3 gallons of water from the tank were added to the 10G rearing tank. The technique used to raise the larvae is basically the green water culture approach that is commonly used by clownfish breeders. In brief, phytoplankton is added to the larval water until it turns slightly green, and then rotifers are added. The phytoplankton acts as feed for the rotifers and thus they are co-cultured with the larval fish.
 The green water also helps in adjusting the light reaching the larvae. By adjusting the amount of phytoplankton in the water, and hence adjusting the ‘greenness’ of the water, the light intensity can be adjusted so that the larvae swim in the mid levels of the tank. Husbandry at this point involved making sure that adequate amounts of rotifers were available to the larvae, and siphoning off the debris from the bottom every other day. The siphoning also necessitates regular small water exchanges that help maintain water quality in the system. To prevent any shock from changes in the water, the water is slowly dripped in.
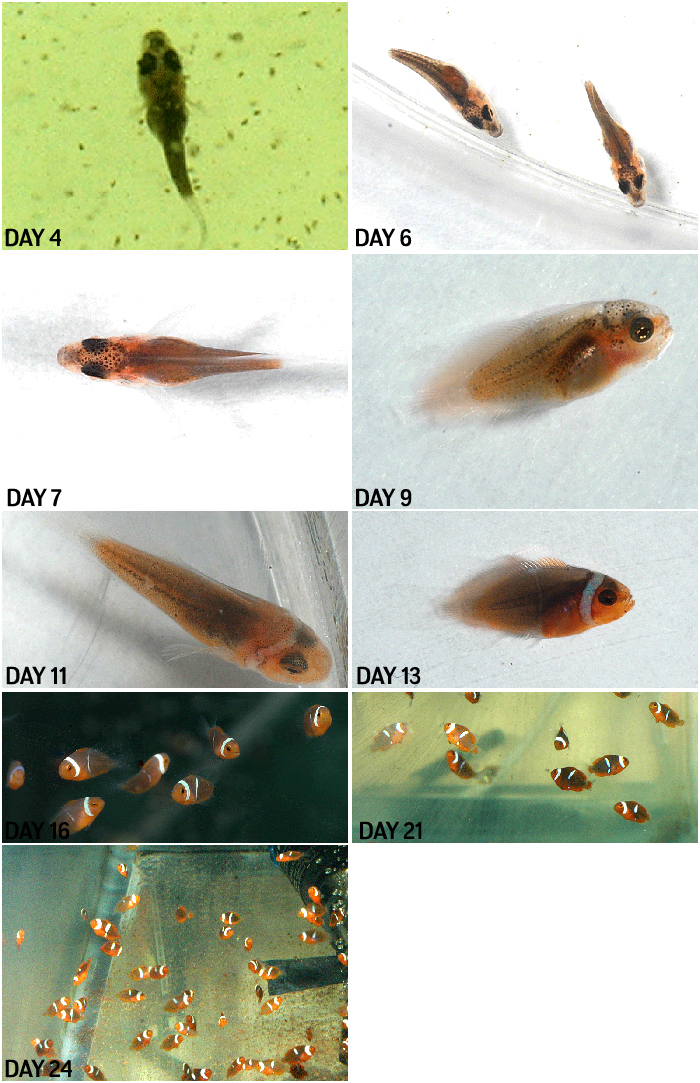
As the larvae develop, they start getting better at capturing the rotifers. By day 5, they are large enough to start feeding on newly hatched brine shrimp. By day 7, the larvae feed only on live baby brine shrimp. Once the larvae start metamorphosis, I also start feeding the Otohime dry food. These are also available from Reef Nutrition and come in a variety of sizes. The first one I use is the Otohime A along with the baby brine shrimp. As the larvae grow I switch to Otohime B1, which is the next size up. The pictures below show the larval development over time.
 Not everything went smoothly with this batch. On day 4 I noticed that the heater was keeping the temp around 79F and I adjusted it slightly. It had stabilized around 85F around the time I went to bed. In the morning when I went to check on them, I noticed the temperature in the tank was at 95 F! The light had not turned on and it was still dark in the tank. I saw a mass of fish sitting at the bottom and my heart sank, thinking I had killed them all with my stupid move of adjusting the heater at night when I could not monitor it regularly. I was braced for the worst, but as soon as I turned the light on they started to move, giving me some hope that I might save a few of them. I quickly unplugged the heater, and filled up two zip lock bags with ice and put them in the tank; this brought the temperature down to 85F. A few fish died, but a majority of them still lived. I dodged the first bullet.
After a week with no mishaps, the heater did it again. Once again the water temperature reached 95F, and this time with no adjustment to the heater. The heater was stuck in the ON position. Frantically, I went through the zip lock bags with ice routine and got the temperature back to normal levels. Once again there was minimal loss of fish. I was getting impressed with the resilience of the larvae. Not wanting to risk it again, I unplugged the Ranco controller from my reef tank and plugged the heater to it. Never again will I trust a heater’s internal controls. I quickly got on Ebay and purchased 2 Ranco Single Stage controllers and made sure all my heaters are controlled in this far more reliable manner.
Unfortunately, despite my best efforts this story did not have a happy ending. Around day 25, the fish came down with ich. I was unprepared for this and did not have any preventative medication or plan in place. I lowered the salinity to 1.015 to start a hyposalinity treatment hoping that it would result is at least saving some of the fish. Alas, that was not the case. Within three days all the fish were dead!
 During the time while this batch of clownfish were being raised, the parents laid another batch of eggs. I had not planned to raise these, but quickly decided that I should have a backup plan in case something went wrong with the first batch. So, I collected these larvae as an insurance plan in case things went south with the first batch. In retrospect it turned out to be a prescient move, since I did end up losing all the fish in the first batch. I am happy to report that this batch has been progressing well and is now almost 4 months old, with 85+ survivors now ranging from .75”-1.25” and getting ready for new homes.
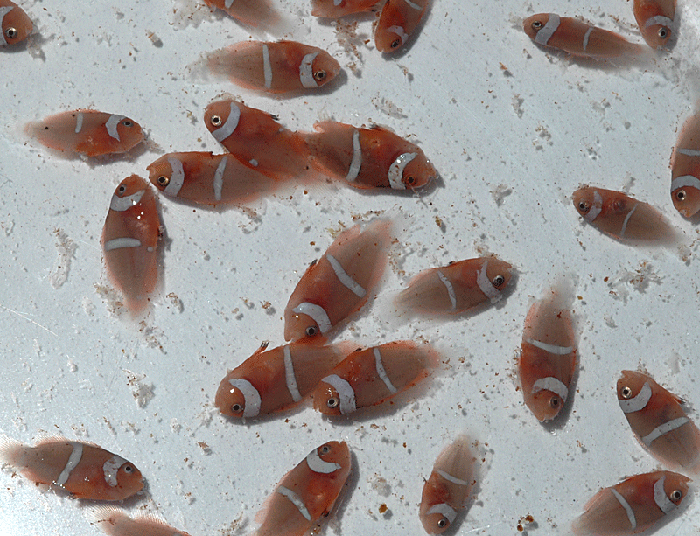
Here are some pictures of the 2nd batch, now moved to a 29G grow out tank:
 It is already interesting to note the influence of the ocellaris gene in the development of the third stripe. For true A. percula it often takes 9-12 months before the third stripe develops. In this case, the third stripe appeared as quickly as it does with A. ocellaris. There are a few fish showing signs of black coloration, but it is not developed enough to the point of appearing dark black, but rather a muddy burnt orange coloration.
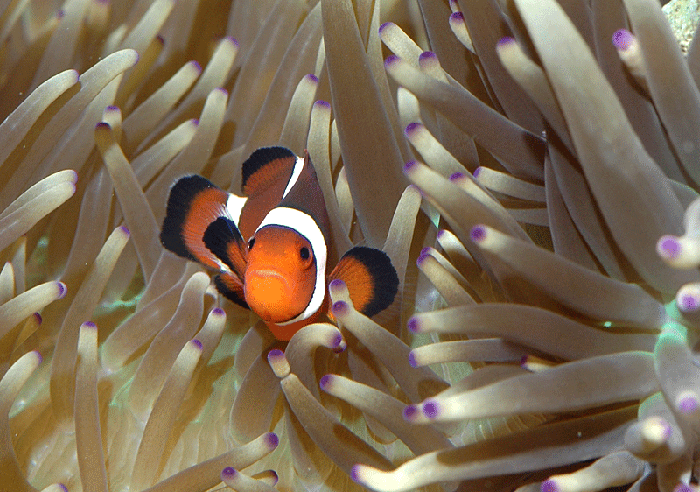
In early November I picked up a healthy sebae anemone (Heteractis malu) at our frag swap and added it to a corner of my 55G soft coral reef tank with the intent of adding some of the clownfish babies to this tank and to see if the hosting in the anemone has any impact on the rate at which the black color may develop. I added four of the baby clownfish to the 55G aquarium on Nov 14th, placing them right into the anemone. Within 15 minutes, the fish were completely nestled into the anemone. I was very surprised at how quickly the fish hosted in the anemone. I was expecting this to take a while. Interestingly, they have not left the anemone since, and are always playing within the tentacles of the anemone. I doubt if they even know that there is 4 ft more of swimming space available! Another interesting observation was that the squabbling between the fish has increased considerably, with constant chasing and aggressive behavior among them. Here is one of them very happy in her anemone home.
 Overall, breeding clownfish is a very rewarding experience and I would definitely encourage people to try it. As these special fish mature and develop, time will tell what final color they end up with and what mutations may develop in future generations. Hopefully this experiment will add to our knowledge base of clownfish genetics.

0 Comments