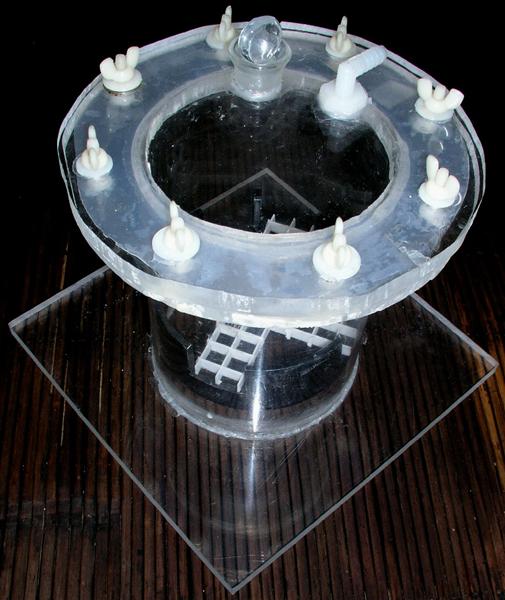
We’ll begin our discussion:
Cutting Glass Panes
Caution: Tempered glass can not be cut with common glass cutting tools, and it can not be drilled. Tempered glass when broken will shatter into many small cube-like pieces.
Cutting glass is kind of like fragging your favorite Acropora for the first time. Once you’ve done it, you’ll wonder what all the initial reluctance was about.
Cutting glass requires a glass cutter (available at hardware stores for ~$5.00). Some stores offer glass-cutting kits consisting of a cutter and ‘special lubrication oil’ (you can use vegetable oil from the kitchen). You’ll also need some sort of square in order to get straight cuts. A builder’s square is good (either metal or plastic) or a draftsman’s T-square can be used.

Figure 1. Cutting glass is easy after you’ve tried it a few times. Make sure the cut is straight and true using a square to guide the glass cutter.
Measure your glass carefully – the old craftsman’s saying ‘Measure twice and cut once’ takes on special meaning when you’re attempting to cut an expensive piece of thick glass! Once you’re sure of the dimensions, place the square on one edge of the class and align it with your mark. Place the glass cutter’s wheel at the edge of the glass and firmly, deliberately pull the cutter to you. If there are small shards of glass along the cut, you’ve made a ‘hot cut’ that indicates excessive pressure. Score the glass only once.
There are various methods in snapping the glass. The instructions with many cutters suggest tapping the glass beneath the cut in order to stress it and make the break easier. I generally skip this and simply place the glass cut directly over the edge of a workbench and quickly apply pressure. The glass will break into the desired shape beautifully.
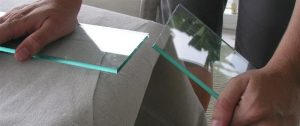
Figure 2. After scoring the glass with a glass cutter, place the cut on an edge. Firmly and quickly snap the glass.
It is best to make a few practice cuts and snaps to get the feel of this technique. It quickly becomes second nature.
Taking the Edge Off
Once you have cut your glass, you’ll want to bevel the edges slightly so that you can handle the sheet safely. This can be accomplished with wet-dry sandpaper (I use a 120-grit wet-dry paper). Make sure you wear appropriate hand protection when doing this.
Drilling Holes in Glass
Unless you plan to drill many large holes (1″ or greater) in glass, you’ll need to buy a specialty bit, so this is usually best left to a professional glazier. If you want to pursue this, a specialty bit and electric drill motor are needed, as well as coolant (a little antifreeze mixed in water is used by many). A steady hand and a ‘feel’ for the glass are also required if the drill motor is handheld. Many glaziers use a drill press with suction cup feet to drill thick glass (such as doors, aquaria panes, etc.).
Most glass shops charge $25 or so for drilling a large hole. However, most will not warranty against glass breakage unless you’ve purchased the glass from them. (I recall nervously watching a glazier drill a 2″ hole in the bottom of a 6 foot long aquarium).
However, if you must:
Small Glass Drill Bits
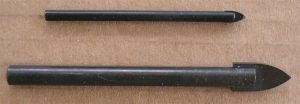
These can be found in any reasonable well-stocked hardware store. They’re usually not hard to find since roofing contractors often use them to drill through ceramic or slate roofing materials. Drilling these small holes is easy even for a beginner. First, determine where you want the hole, and then take a large nail and gently rotate it into the glass to make a pilot hole. Then place the drill bit in this starter hole to prevent the bit from ‘walking’. Work slowly and lubricate the drill bit with water from time to time to keep it cool. These small holes can usually be drilled in just a few minutes’ time. Glass as thin as 1/32″ can be drilled provided that the glass is held firmly in place, mild pressure is exerted by the drill (preferably by a drill press) and the drill revolutions per minute (rpm) are at or below 600 rpm.
Large Glass Hole Bits
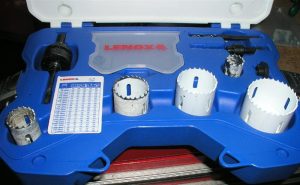
These glass bits are different from the smaller bits we just discussed. These are hole saws that cut out a plug of glass and are relatively expensive. See Figure 4.

Figure 4. A hole saw for glass. Ace Hardware, Home Depot and others offer these in various sizes.
Acrylic Sheets
Most any home improvement store has clear acrylic sheets for sale. These are generally sold as an upgrade to broken glass windows, and are available in a variety of sizes and thicknesses. I often opt for acrylic because it is much easier to cut into irregular shapes and to drill. Another advantage is that some of the larger retailers have the ability to cut the sheet to size for you. But don’t expect them to make multiple cuts for you. If you need to cut a sheet into 3 or 4 pieces or more, you’ll probably have to cut it yourself.
Thin acrylic can be cut with a special hand tool designed for the purpose – all you have to do is lay out your sizes, score the acrylic with the hand tool and snap it. It takes a little more practice before you’ll make good clean straight breaks (in this respect, cutting glass is easier since it doesn’t bow and bend before snapping like plastic/acrylic does).
Thicker acrylic is, at least in my opinion, better cut with a saw. I can be done with a manual handsaw with a blade designed for general purpose cutting. Even better is a jig saw equipped with a blade specifically designed to cut plastic or acrylic. These blades chip the plastic away and give a reasonably smooth cut without a lot of heat build up that melts the plastic and could bind the saw blade. For really critical cuts, use a table saw equipped with a fence to get that professional straight edge. Remember the edges of the material as you purchased it are already straight and square – use those edges whenever possible!
If the plastic panel is not used immediately, it is best to remove the protective sheathing before it becomes bonded to the panel and becomes difficult to peel away. Use ‘painter’s tape’ to protect the panel when cutting it if the manufacturer’s protective coating has been removed.
Cutoff Bin
Firms that specialize in plastics will often sell acrylic sheets by the square foot, and rods or tubing but the linear foot. Often, they have scrap material left over from a customer and will sell smaller, irregular pieces at a discount. This ‘cutoff bin’ is a hobbyist’s dream come true.
You never know what you’ll find in there. I’ve picked up 1″ thick acrylic, colored acrylics, various sized tubes, and Schedule 80 PVC sheet for just a few dollars. If you see something you think you might even have a use for, buy it! It won’t be there next time!
Common Acrylic Sheet Thicknesses
Acrylic sheets are available in a variety of thicknesses. Most hardware stores carry a limited selection. Spot checks found two thicknesses: 0.22″ (~14/64″), 0.25″ (1/4″) and .096″ (~3/32″). The thin sheet has use as an ultraviolet filter for lamps and a few other applications. The thicker material can be used to build smaller aquaria, but is more expensive than glass.
Gluing Acrylic
Gluing acrylic pieces together is fairly easy. Usually, the acrylic solvent/glue is dispensed through a special bottle with a needle-like tip. A solvent made for acrylic is recommended, although if the job is small you can use cement made for PVC or aquarium-safe silicone to bond the pieces together.
Vacuum Forming
Vacuum forming is a technique where plastics are heated to the point that they elastic and a vacuum is then used to pull the plastic to the shape determined by a mold. There is an excellent booklet available entitled Do It Yourself Vacuum Forming for the Hobbyist by Douglas Walsh. It is available on eBay for ~$15, or on Amazon.com or from a variety of sources online.
Plumbing
Oddly enough, I detest plumbing although I would much rather plumb an aquarium than I would repair a leaking faucet. I actually knew next to nothing about plumbing when I became an aquarist in the mid-1960s and have grudgingly picked up a knack for it along the way. The introduction to the US from Europe of the overflow in an aquarium in the 1980’s necessitated me learning a new skill.

Figure 5. Measuring inside diameter (ID) and outside diameter (ID) of pipe is a straight forward but important procedure.
| Pipe Size | Gravity GPH | Pressurized GPH |
|---|---|---|
| ½ | 420 | 1,260 |
| ¾ | 660 | 2,160 |
| 1 | 960 | 3,510 |
| 1-¼ | 1,500 | 5,940 |
| 1-½ | 2,100 | 7,560 |
| 2 | 3,300 | 12,000 |
| 2-½ | 4,800 | 17,550 |
| 3 | 7,200 | 25,650 |
| 4 | 12,000 | 36,000 |
| 6 | 30,000 | 48,000 |
Polyvinyl Chloride (PVC) Pipe
Polyvinyl chloride (PVC) pipe is a godsend for do-it-yourselfers. It is inert in seawater, readily available, and is easily cut and solvent-welded. It is available in a great number of diameters ranging from 1/8″ to 24″. Most home improvement stores carry ½” through 4″ diameter piping.
There are different grades of PVC pipe – some are approved for using with potable drinking water while others are not. In my opinion and practice, I’ll use only PVC pipe labeled with the approval of the National Sanitation Foundation (marked
PVC is available with different pressure ratings which are defined as ‘schedules’ which indicate the pipe’s wall thickness. Schedule 40 has the lowest pressure rating and Schedule 120 has the highest, with Schedule 80 being in the middle (See Tables 2 and 3). PVC pipe is also available with thin walls for use in non-pressurized situations (such as a gravity drain). Schedule 40 is suitable for just about any home aquarium application, but personally I think its white coloration makes it appear cheap or inexpensive and prefer the gray coloration of Schedule 80 (it looks ‘industrial’). However, Schedule 80 is more expensive and it is difficult for me to justify the added expense simply for aesthetics. Note that PVC pipe is also available in a transparent form (though this pipe usually has a bluish tint and is not crystal clear like some acrylic tubing). Pressure-rated PVC pipe is approved for use with drinking water by the National Sanitation Foundation (NSF).
If you’re designing a high-pressure system, be aware of the pipe’s pressure rating as well as the fact that threaded fittings can reduce the system’s pressure rating by as much as half. Use of reducing fittings will also reduce it. Generally, it is not a good idea to mix different schedule fittings and pipe in the same system.
Warning! Plastic pipe (PVC, CPVC, ABS, etc.) should not be used with compressed air or gas as explosive failures can result.
| Pipe Size | Outside Diameter (OD) | Inside Diameter (ID) | Wall Thickness | Maximum Water Pressure (psi) |
|---|---|---|---|---|
| ½ | 0.84 | 0.602 | 0.109 | 600 |
| ¾ | 1.05 | 0.804 | 0.113 | 480 |
| 1 | 1.315 | 1.029 | 0.133 | 450 |
| 1-¼ | 1.66 | 1.36 | 0.14 | 370 |
| 1-½ | 1.9 | 1.59 | 0.145 | 330 |
| 2 | 2.375 | 2.047 | 0.154 | 300 |
| 2-½ | 2.875 | 2.445 | 0.203 | 280 |
| 3 | 3.5 | 3.042 | 0.216 | 260 |
| 3-½ | 4 | 3.521 | 0.226 | 240 |
| 4 | 4.5 | 3.998 | 0.237 | 220 |
| 5 | 5.563 | 5.016 | 0.258 | 190 |
| 6 | 6.625 | 6.031 | 0.28 | 180 |
| Pipe Size | Outside Diameter (OD) | Inside Diameter (ID) | Wall Thickness | Maximum Water Pressure (psi) |
|---|---|---|---|---|
| ½ | 0.84 | 0.526 | 0.147 | 850 |
| ¾ | 1.05 | 0.722 | 0.154 | 690 |
| 1 | 1.315 | 0.936 | 0.179 | 630 |
| 1-¼ | 1.66 | 1.255 | 0.191 | 520 |
| 1-½ | 1.9 | 1.476 | 0.2 | 470 |
| 2 | 2.375 | 1.913 | 0.218 | 420 |
| 2-½ | 2.875 | 2.29 | 0.276 | 400 |
| 3 | 3.5 | 2.864 | 0.3 | 370 |
| 3-½ | 4 | 3.326 | 0.318 | 350 |
| 4 | 4.5 | 3.786 | 0.337 | 320 |
| 5 | 5.563 | 4.768 | 0.375 | 290 |
| 6 | 6.625 | 5.709 | 0.432 | 280 |
CPVC
Chlorinated Polyvinyl Chloride (CPVC) is, as the name states, a modified form of PVC pipe. It is rated for use up to 200°F, although I have difficulty in imagining an aquaria application with temperatures even approaching CPVC’s rating. However it is of use in situations where a smaller diameter pipe is required. CPVC is a beige color for those concerned with aesthetics.
ABS (Acrylonitrile Butadiene Styrene)
ABS pipe sold in most hardware stores is usually intended for drain, waste or vent (DWV) lines. It does not meet the NSF standards for potable water use and on this fact alone I would not recommend its use. However, ABS is in some cases used in the aquarium industry for pump housings.
Flexible PVC Pipe (White)
At one time, flexible white PVC piping was very popular for aquarium plumbing applications. It offers a lot of advantages, and although I’ve never used it personally, I’ve been told that it degrades over a period of time and must be replaced. Therefore I would not recommend its use. This pipe is white in color (just like rigid Schedule 40 PVC) and should not be confused with flexible clear vinyl or PVC tubing.
Cutting PVC and CPVC Pipe
How you cut PVC and CPVC pipe is not critical as long as the cut is square to the axis of the pipe and has no burs. Use of a hacksaw is OK but will usually require burr removal. De-burring tools are available, but a piece of cloth held with the thumb and forefinger inside and out of the cut will remove most burs when the pipe is twisted in a rotary manner. Use of a small knife will also trim away burs. If you plan on a lot of cuts, investment in a ratchet cutter is recommended. A ratchet cutter cuts with little burring of the cut and thus saves time in assembly.
Drilling Plastics
Fortunately, drilling acrylic, PVC, CPVC and other plastics is very easy if you’ve got the right tools.
Standard drill bits work just fine for small holes. You’ve got some options for larger holes. Hole saws work very well (see Figure 7), but spade bits can do the job and are less expensive See Figure 8). If you’ve got a larger but oddly sized hole to cut out, consider using a jig saw with a blade designed to cut plastic – simply drill a starter hole large enough for the saw bit and carefully cut it out with either a jig saw or hand saw utilizing a hacksaw blade.
Another useful tool is a spanner bit. It can be used in a hand-held drill, but is perhaps best suited for a drill press. A spanner bit is adjustable and can cut holes of various diameters. A chuck is at the center, and a horizontal bar with a bit that can be adjusted to varying diameters is attached. The bit is a piece of steel with an angled edge – place the bit with the cutting edge facing the chuck to get a nice, clean cut. These are usually best suited for plastics, but can cut metal if a reduced useful life is acceptable.
PVC Fittings
PVC fittings are available in staggering varieties, with new types of fittings becoming available every year. There are t-shaped fittings (appropriately called tees), y-shaped fittings, ‘elbows’ comprised of 45° and 90° bends in short and long radii, internally threaded fittings, externally threaded, reducers, connectors, barbed fittings, plugs, caps, crosses, and on and on. See Figures 9 and 10 for examples.

Figure 9. Various PVC fittings. From top left: ¾” 90° ‘elbow’; a ½” 45; a ½” CPVC 90, and a ¾” to ½” 90 with male threads. Bottom, from left: ¾” slip x male thread adapter; a ½” slip x male thread; a ¾” x ½” threaded reducer, and a ½” slip coupler or connector.

Figure 10. Even more fittings. Clockwise from top left: 1″ to ½” reducer, with female threads to accept a ½” threaded plug; a ½” cap; a ¾” cross; a 1″ tee, and a 1″ coupling with female threads that has been cut so it can act as a 1″ nut.
Making Fittings Fit
PVC and CPVC fittings are machinable, and this is very useful when performing custom work. Use of sandpaper is fine if a small amount of material needs to be removed. Using a grinder is a quicker way to more than just small amounts of material.

Figure 11. Sanding a PVC fitting to conform to the shape of the pipe to which it will be attached. The curved surface will offer much more surface area for the glue and will be more firmly attached than a fitting with a flat surface.

Figure 12. This CPVC reducer (right) was reduced in diameter by grinding, and now fits inside a PVC slip coupling.
Fittings can be sanded to conform to the outside of pipe, and this is especially useful when making penetrations through pipe walls – the fitting will ‘fit’ the pipe and allows for a much larger surface area for solvent welding.
Specialized PVC Fittings
The number of PVC fittings available at most home improvement stores is but a hint of what is available. PVC fittings to perform any number of functions are available through vendors supplying irrigation supplies as well as those catering to industrial concerns.
Y-Strainers
A y-strainer is useful when removal of suspended particulate matter is important. Liquid flows through a fine mesh strainer and returns to the liquid train. A small ball valve is situated at the end of the strainer to facilitate manual flushing. Occasionally, the device must be disassembled for cleaning.
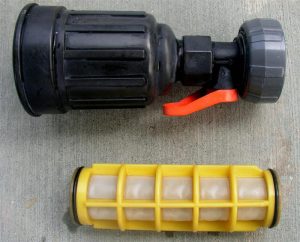
Figure 13. A Y-Strainer removes larger suspended particles. The strainer (below) fits inside the black housing and is available in a number of micron sizes.
Unions
Unions allow disassembly of piping without cutting it, and should be installed at either end of inline pumps, reactors, etc. Threaded couplings allow disassembly and an or-ring is sandwiched in between to prevent leakage.

Figure 14. A PVC union consists of 4 parts – a receiver for the pipe with male threads, a flange with a receiver for the pipe, a female thread nut and an o-ring to keep the whole leak-free. Note that this union is rated fro use with high-pressure PVC pipe (Schedule 80) but is acceptable for use with Schedule 40 as well. Schedule 80 is usually gray in color.
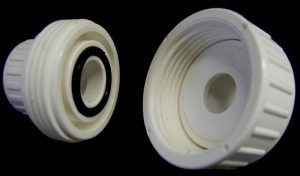
Figure 15. The guts of a union. If the o-ring is lost, Teflon tape around the male threads will keep the unit in service until a new o-ring is obtained.
When installing the union in vertical piping, it is a good idea to install it so the o-ring is held in place by gravity. For horizontal and improperly installed vertical applications, a dab of aquarium silicone cement will hold the o-ring in place.
Ball Valves, Globe Valves and Gate Valves
You’ll often want to place a valve inline in order to regulate or stop flow. PVC valves are available in a number of configurations, and each has a specialized use.
Ball Valves
A ball valve is aptly named as it consists of a snugly fitting valve within the housing. This valve has a hole in it that, when aligned parallel to the flow, allows water to pass. When closed, this hole is perpendicular to the flow and lets no water to pass. Best used as a simple off/on valve since they are not particularly well suited to regulate flow. They are a less expensive alternative to a gate valve.
Globe Valves
Globe valves usually appear very similar to a gate valve. The differences are internal. Flow moves through a globe valve in a convoluted manner, as opposed to straight-through for a gate valve. Globe valves are very good for flow regulation, but add a lot of head pressure to the pump system due to the internal z-shaped configuration.
Gate Valves
Gate valves are often used for flow regulation (though they are recommended for on/off applications). A gate valve creates less head pressure (less flow loss) than a globe valve due to its design.
Union Ball Valves
Union ball valves should be installed on the intake and discharge of every external centrifugal pump. This allows removal of the pump for service or replacement without draining the vessel pumping the feed water. See Figure 17.
Some union ball valves have unions only on one side. These are slightly less expensive than ‘true’ double union ball valves.

Figure 17. Lowes carries these inexpensive true union ball valves. Note that there is an arrow indicating the direction of flow. An in-line pump using rigid pipe should always have a union ball valve on the intake and discharge.
Bulkhead Fittings (or Through-Wall Fittings)
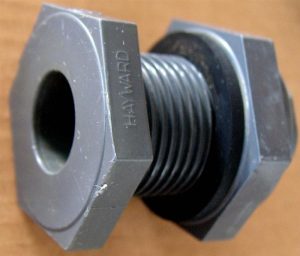
Bulkhead fittings allow a permanent penetration through a wall. An appropriately sized hole is cut or drilled through the wall, and the bulkhead is inserted and secured.
Making Bulkhead Fittings from PVC Fittings
This is really quite easy to do, and can be done with PVC or CPVC fittings. Careful sizing of the penetration hole is the key to success. Measure the diameter of the male thread and select a drill bit that is just slightly larger, but not larger in diameter than the outside of the receiving female fitting. Drill the hole and test fit the fittings by screwing them together. If it is difficult to thread the fittings together, take them apart and clean the threads. Try again. The fittings should thread together until the shoulders of the fittings are tight on the pane of glass or acrylic. Sometimes a dab of silicone will lubricate the threads and allow easy assembly. It is a good idea to have proper size wrenches or two set of pliers to aid in assembly if the fittings are difficult to join. Aquarium-safe silicone applied to the mating faces of the fittings will ensure a water-tight seal.
Glues for Various Plastics
Warning: Primers and Solvents are highly flammable. Do not use or store near heat or an open flame. Fumes may accumulate in pipe work. Fumes are heavier than air. Wear appropriate safety equipment (gloves, goggles, etc.). Obtain a Material Safety Data Sheet and follow all instructions and precautions.
Most cements made for plastic bond pieces through a process known as solvent-welding. Solvents strong enough to chemically melt plastics (such as methyl ethyl ketone and tetrahydrofuran) allow softened plastic pieces to weld together thus creating a very strong bond. Pipe and fittings are made to close tolerances and simply slip into each other (they’re called ‘slip fittings’ for a reason. Duh!). Threaded fittings can also be solvent welded.
Solvents used for different plastics vary in composition of solvent formula, the type of plastic resins, etc. In short, it is recommended that solvent welding of a particular type of pipe use the glue formulated for that specific purpose. However, if you’re in an emergency situation, use of, say, a glue made for CPVC might be of use for bonding PVC if the system pressure is low. Proceed at our own risk.
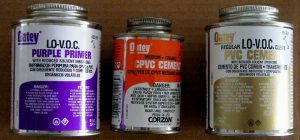
The procedure for bonding plastic pipe usually involves either a one-step or two-step process. For most solvent welds, you’ll use the two-step process that includes initially cleaning the pipe and fittings’ sockets with a chemical primer. This solvent removes printed lettering on the pipe, crud in general and just about anything else. The proper glue is then applied to the pipe and fitting. Slip the pipe into the socket with a slight twisting action and hold the pieces firmly together for about 30 seconds.
A Recap: Solvent Welding Procedures for Plastic Pipe
Note: The pipe should be clean and dry (although special PVC cement is made for wet applications).
- Cut the Pipe: Make sure the cut is square. Use of a ratchet cutter, cutoff saw or wheel cutter is acceptable, providing the ratchet cutter or wheel cutter is sharp. Dull tools can crush and slightly deform the pipe and might prevent a snug fit. Use of a hacksaw is acceptable is the cut is de-burred properly.
- Remove Burs: Burs can be removed with a knife or special de-burring tool. Small pipe can be de-burred by twisting small diameter pipe inside of a rag. Be sure to de-bur the Inside and outside of the pipe. Chamfer (bevel) the end of the pipe 10°-15°.
- Test Fitting: Test fit the pieces. Make sure the slips or threads are clean. Sometimes fittings are difficult to fit together (especially threaded fittings). If the test fit is difficult to make, use another fitting.
- Primer: Apply primer using an applicator that is ½ the pipe’s diameter. Too large of an applicator will apply too much primer or cement, forcing some into the fitting. An applicator that is too small will not apply enough primer/cement. Following the same recommendations of applicator size, apply cement after shaking the contents of the can. Don’t be timid – apply cement rapidly and aggressively around the circumference of the pipe, and ½” past the depth of the fitting. Without re-dipping the applicator, apply cement to the internal portion of the slip fitting.
- Glue and Assemble: Quickly assemble the pipe and fitting with a ¼ turn twisting action. Hold the pieces firmly together for 30 seconds.
Cure Times
The amount of time required for PVC glue to cure depends upon a number of factors including pipe diameter, temperature and humidity. Table 4 lists cure times of common pipe sizes and temperatures (humidity is assumed to be less than 60%).
| Temperature | 1/2″ to 1-1/4″ diameter | 1-1/2″ to 3″ diameter | 4″ to 8″ diameter | 10″ to 16″ diameter |
|---|---|---|---|---|
| 60-100° F | 1 | 2 | 6 | 24 |
| 40-60° F | 2 | 4 | 12 | 48 |
| 0-40° F | 8 | 16 | 48 | 216 |
How Much Glue?
Primer and glue for plastics have a limited shelf life once opened. Although the purchase of a larger can might seem the best value, the hobbyist can estimate his or her needs by consulting Table 5 for general a recommendation. In most cases, purchasing the smallest amount of glue and primer is the best bet.
| Pipe Diameter | Number of Joints |
|---|---|
| 1/2″ | 300 |
| 3/4″ | 200 |
| 1″ | 125 |
| 1-1/2″ | 90 |
| 2″ | 60 |
| 3″ | 40 |
| 4″ | 30 |
| 6″ | 10 |
Nylon Fittings
Nylon fittings are generally for use with flexible tubing, but some threaded fittings are useful in making a transition from rigid plastic pipe to flexible tubing.
Acrylic Tubing
Rigid acrylic tubing is available from various manufacturers, and is the material of choice when we need visual satisfaction or confirmations (such as ‘Is my protein skimmer bubbling?’).
Rigid PVC Pipe (Clear)
Rigid PVC tubing is useful in construction of protein skimmers, deionization columns, reactors, air dryers, or any application where visual confirmations are needed. Clear PVC fittings are available as well. Larger industrial supply houses such as Graingers or McMaster-Carr sell sticks of clear PVC pipe and individual fittings. PVC is generally much less resistant to cracking than acrylic tubing.
Getting a Square Cut
There are a number of methods available to make sure you get a good square cut on thicker wall rigid tubing. Most involve having access to a power tool (such as a cut-off saw), but I’ll describe a method here that requires little more than a few sheets of paper, tape, and a hacksaw.
Determine the outside circumference of the pipe. Tape an appropriate number of sheets of paper (printer/copier paper works fine) together end-to-end, making sure there is enough overlap (usually 3 or 4 inches) to ensure the edge is true. Wrap this around the pipe and align the edges and tape the paper ends together (but not too tightly, you’ll want to be able to slide this sleeve into place). Once you’ve aligned the edge at the appropriate place, use a Sharpie marker to draw a line around the tube. Remove the paper sleeve, and you’ll have a cutting line that is extremely close to square. Smaller pipe (4 inches in diameter) can be cut with a hacksaw. Larger pipe or pipe with thick walls are better but with a circular saw and fine tooth blade.

Figure 21. A simple method to mark larger tubing with a line used as a guide for making a square cut. See text for details.
Thin Wall Acrylic Tubing
Pet shops often sell rigid acrylic tubing intended for use as rigid air line, dip tubes, or replacements for air-lifts such as under-gravel filters. With some imagination, some of the can be used to make small reactors such as air-dryers, or media containers. Some of these tubes fit nicely into PVC or CPVC fittings or pipe, thus making a number of configurations possible.
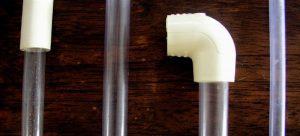
Figure 22. Rigid acrylic tubing is often available in pet shops. Note that two of these tubes fit nicely into CPVC fittings, presenting all sorts of possibilities.
Thin wall acrylic tubing can be cut with a utility knife or a hacksaw. It can also be bent into various shapes using heat and an inexpensive tubing bender.
Fluorescent Lamp Sleeves
These clear plastic tubes are intended for use as a protective sleeve around T12 (1.5″ diameter) fluorescent lamps and also serve to contain the mess in case of lamp breakage. They are not particularly rigid and can be easily bent, but if you’re looking for a really inexpensive clear tube for low pressure applications, you might want to consider one of these.
Flexible Tubing
In many cases, flexible tubing is a viable alternative to rigid pipe, and in certain cases is the preferred conduit. We should be aware that not all flexible tubing is created equal and care should be exercised when choosing tubing for specialized situations (high pressure, chemical resistance, etc.).
Vinyl Tubing
Most of us are familiar with small diameter (1/4″ OD and 0.170″ ID) tubing almost universally used as air supply tubing. It is available in a variety of diameters but has a relatively low bursting strength (sometimes less than the 60 psi seen on many household systems). Hence it not recommended for potable water supply, but should be fine in low-pressure applications.
Flexible PVC Tubing (Clear)
PVC is, as we know, inert in seawater and therefore multiple applications. Avoid thin-wall PVC as it has a tendency to kink thus preventing full utilization of its carrying capacity.
Silicone Tubing
It has been my experience that standard aquarium tubing does not fare well after a lengthy exposure (days to weeks) to carbon dioxide gas used in many calcium reactors. I have not seen similar problems when using silicone tubing. Silicone tubing is usually available in well-stocked pet shops. It should be used only in very low pressure situations as its rating can be as low as 8 psi.
Polyethylene Tubing
This translucent white tubing is flexible yet more rigid than un-reinforced vinyl or PVC tubing. It is easily cut with a utility knife and can be used with quick-disconnect fittings, making for much quicker assembly than the cut-and-glue routine of PVC and other rigid plastic pipes. It is available in a wide variety of diameters, with 1″ being about the largest you’ll see in hardware stores. There is a new medium to high-density polyethylene tubing on the market. It is a ‘cross-linked polyethylene’ marketed under the name of PEX. It is recommended for use with specially designed connecters. PEX is rated for household hot and cold water pressures, and is available in diameters ranging from ¼” to 2″.
Neoprene Tubing
Neoprene is another ‘specialty’ tubing and should be used as a conduit for O3 in situations where the use of ozone gas is beneficial.
Flexible Tubing Pressure Ratings
Flexible tubing used as a conduit for air, ozone, carbon dioxide, etc. should be chosen carefully. Some tubing has low pressure rating, while others are resistant to aggressive gases. Pressure ratings are dependant upon a number of factors including construction material, wall diameter, and temperature – the pressure ratings given below are based on a temperature of 70°F (21°C).
| Type Tubing | I.D. | Wall Thickness | Pressure Rating (psi) @ 70°F | Comments |
|---|---|---|---|---|
| Norprene | 1/8″ | 1/8″ | 34 | UV, Ozone resistant |
| Tygon R-3400 | 1/8″ | 1/16″ | 60 | UV, Ozone resistant |
| Silicone, reinforced | 3/16″ | 1/8″ | 312 | CO2 Resistant |
| Silicone, reinforced | 1″ | 3/16″ | 112 | CO2 Resistant |
| Silicone, not reinforced | 1/8″ | 1/16″ | 21 | CO2 Resistant |
| High Density Polyethylene | 1/8″ | 1/16″ | 456 | |
| High Density Polyethylene | 1″ | 1/8″ | 152 | |
| Low Density Polyethylene | 1/8″ | 1/32″ | 125 |
Air Line Fittings
For our purposes here, air line tubing refers to vinyl hose with an inside diameter of 0.170″ and OD of ¼”.
Fittings can be saved from wooden airstones. Simply break the wood away from the plastic fitting. Some disposable air diffusers come with separate individual connectors of the proper size and are reusable.
1/4″ Irrigation Fittings
Intended for use with drip-feed irrigation systems, these fittings work fine with air or very low volume water flows. These are usually sold in a bag of 10 or so. These fittings usually have a barbed end and tubing can be firmly secured by use of small nylon cable ties.
Gaskets
Occasionally, you’ll need a custom gasket, and you’ll be faced with a choice – buy some commercially available gasket material and cut it, or make the gasket yourself. It is certainly easiest to run down to the auto parts store and purchase a sheet of gasket material (usually some sort of ‘rubber’ with unknown chemical properties… Do you really want to risk the possibility that the material will leach toxins into your aquarium? Seawater has a ‘minor’ effect on natural rubber after only 48 hours).
I’ve always been a little wary of automotive gasket materials’ use in aquaria, so I developed a method to make custom gaskets from a material I know to be inert – silicone.
And it’s easy. We devised this method in the late 1990’s using wax paper to prevent silicone from sticking to the glass forms.
Here’s what you’ll need:
- Two pieces of glass larger than the size of the gasket.
- A roll of Wax Paper: Brands of wax paper vary in quality. Inspect the paper before use, and make sure that you use the waxed side when making the gasket. Coat both pieces of wax paper with vegetable oil to create a non-toxic non-stick surface. This will aid greatly in the release of the dried gasket material from the wax paper later. To be sure your brand of wax paper is ‘safe’, make a small test gasket and allow it to cure for at least 24 hours before attempting to separate it from the wax paper. ‘Aquarium-grade’ silicone cement (or silicone that does not contain any biocides such as anti-fungals).
- Spacers, if the gasket is thick (coins are good for relatively thin gaskets).
- A template of the gasket (drawing a rough outline of the gasket on a piece of paper is enough)
Make sure you do the following procedure on a firm, flat surface as you’ll be applying pressure to two sheets of glass.
Once you’ve gathered these materials, place the outline of the gasket under a sheet of glass. On the top of this glass, place a sheet of un-wrinkled wax paper. Apply enough silicone on top of the wax paper to cover the outline of the gasket as seen through the wax paper and glass. Place another sheet of wax paper over the silicone and on top of this the second piece of glass.
You now have a sandwich of (top to bottom): Glass, oiled wax paper, silicone, oiled wax paper, glass, gasket template, firm and flat surface.

Figure 23. Pressing the silicone flat to make a custom gasket. See text for details.
Without delay, firmly press the top glass downwards to compress the silicone and cause it to spread outwards. Stop compression once the silicone has spread to cover the template below it.
Let the silicone cure for at least 24 hours. Remove the silicone/wax paper sandwich and peel the wax paper away. You now have a gasket – but it needs trimming and perhaps some holes. Use scissors or an X-Acto knife to trim the gasket. If necessary, carefully cut circles out of the gasket in appropriate places with the X-Acto knife. Silicone is too soft to be drilled, but a drill bit will punch a rough hole through it.
Gasket material suitable for use with seawater is available through many of the on-line hardware retailers (such as Grainger, McMaster-Carr, etc.).
Compression Fittings
I have a certain loathing for compression fittings, based on years of poor experiences with copper plumbing. Of course, we don’t want to use copper plumbing on aquaria. Instead, we can use plastic compression fittings. Compression fittings are composed of three parts: A male-threaded fitting, a female-threaded fitting and a compression ring (fitting nicely on the tubing) sandwiched in between. When installed properly, compression fittings offer leak-free performance. However, any misalignment, debris or malformation caused by repeated disassembly can result in frustrating leaks. Use them if you wish, but I much prefer:
John Guest, Watts and Other Quick-Disconnect Fittings
Manufactured by (you guessed it) John Guest and Watts, these fittings offer a quick disconnect feature that makes them convenient for use where hoses or pipes have to be disconnected on a routine basis. All you’ve got to do is push the appropriately size hose into the fitting and its connected until you push a retaining ring to disconnect it. Rigid pipe or hose simply slips in but you’ll need an additional piece called a ‘soft tube support’ for use with some flexible materials such as silicone tubing. These fittings are available from a number of manufacturers and are available in a staggering number of options (crosses, splitters, elbows, reducing bulkheads, etc.) and can be found in all larger home improvement centers. Based on my experiences, these fittings do not leak even after repeated tubing removal and insertions.
Nylon Nuts, Bolts, and Spacers
Nylon is inert in most applications, and unless you’re planning something outrageous liking feeding ammonia to your tank or controlling pH with acetic acid, you are safe in its general use around seawater aquaria. Nylon is available in white or black color, and in standard or metric sizes.

Figure 25. Well-stocked hardware stores can supply almost any sort of nylon nut, bold, spacer, washer, etc. imaginable.
Teflon Tape
Teflon tape is convenient to use when a leak-tight seal is needed on threaded fittings that will be disassembled at a later date. It is really not a tape per se (it is not ‘sticky’), but is tape-like in appearance and conforms easily to threaded fittings when pulled tight. It should be wrapped around the pipe with only a slight overlap and should be wound counter to the thread direction to prevent ‘unwrapping’ when securing fittings.
Optional Tools
Access to certain tools will make your projects proceed at a much quicker pace.
- Drill Press: A drill press is a drill motor mounted on a rack-and-pinion drive which allows the operator to lower the drill in a precise, easily controlled manner. An adjustable platen allows positioning of the material to be drilled at various distances and angles.
- Circular Saw: Normally used to cut wood, a circular saw can be equipped with different blades to make coarse or fine cuts of wood, PVC and acrylic pipe, acrylic sheet, etc. With specialized blades, this saw can also cut metal and masonry.
- Table Saw: A table saw offers advantages over a hand-held circular saw. A guide called a fence allows accurate and true straight cuts to be made to a variety of materials.
- Jig Saw: Jig saws allow curved and straight cuts of various materials. Make use to use the proper blade – a wood bit usually melts acrylic sheet into a sticky, ragged mess.
- Sander, Orbital or Belt: A great alternative to hand sanding. These will quicken almost any sanding job.
- The motivation for making things can be manifold. Perhaps the device is your own creation and is simply not available, or it is available and is too expensive to purchase. On the other hand, even when money or availability are not issues, a great deal of personal satisfaction can be derived from successfully completing a do-it-yourself project.
Questions? Comments? I’m best reached at [email protected] or leave them here in the comments section below.






0 Comments