In the previous installment, I introduced the Google SketchUp software to the reader, went over installation, basic usage, and created a 120 gallon aquarium. In this installment, we will continue building models for our 120 gallon aquarium and will build a simple Deltec kalkwasser stirrer. This kalkwasser stirrer was chosen due to its straight-forward design which should make it relatively easy for the reader to model as they read through this article.
For reference, you can download both the individual parts and the completed model and look it over while you’re reading through this article. I’ve omitted some of the detail in the stirrer in order to keep this article easy to follow along. Scroll and pan around both model files to see it from different angles to get a feel for how things look in the software.
If at any time things don’t quite make sense on what’s being presented, please refer to the previous article or look around the SketchUp Help Center . They can go into a lot more detail than what I can in this short article.
Scripting
A new topic that we will learn about in this article is the use of scripts and plugins in SketchUp. Scripts and plugins are very powerful and they are used to automate various tasks and add new functionality to the program. There’s a lot of useful scripts out there that can be used to create all sorts of different designs. I won’t go into detail on how to create your own in this article as there’s plenty of tutorials on the web. I will, however, introduce two scripts that I’ve found to be very useful when working with aquarium modeling. The first is called “Pipe Along Path” and the second one is called “Centerpoint.” The “Pipe Along Path” script is an awesome script that allows you draw anything that looks like a pipe or a rod. You essentially draw a line (or series of lines) and then using the script you can either create a cylinder out of it or create a pipe with a specific outer and inner diameter. It can be used for creating plumbing diagrams, modeling skimmers or just about anything that requires a tubular component. You can even set the number of sides that your pipe/tube has when rendered so if you wanted to make rectangular tubing you could do that easily with this script. The “Centerpoint” script is a nice helper script that
plots a centerpoint on any surface that’s selected — square, circle, triangle, etc. This is useful when you want to place an object in the exact center of another object. We will use both of these scripts extensively in this article.
Installation
Let’s go over getting and installing the two scripts. It’s really pretty simple. For the “Pipe Along Path” script, download (right click, SAVE AS) the script from The Ruby Library Depot and save it to the Plugins directory of your Google SketchUp installation. On my system, the path is “C:Program FilesGoogleGoogle SketchUp 6Plugins”. Next, let’s download the “Centerpoint” script from Smustard and save it to the same location that you saved the “Pipe Along Path” script to on your computer. After you’ve saved both scripts to that directory, start SketchUp (or re-start it if you already have it running). Now if you navigate to the Plugins dropdown menu, you’ll see an entry for “Pipe Along Path” and another one for “Set Center Point.” Once that’s complete, we’re all set to go.
Let’s Dig In
Here is a photo of the stirrer that we will be creating in this article:
I chose this kalkwasser stirrer for its relatively straight forward design and ease of modeling. Per Deltec’s website, this unit is 6″ L x 6″ W x 19″ H. I’ve had to do some estimations on the dimensions for certain items (baseplate thickness’, tube heights, etc) as they were not readily available from their website but they should be close enough for this article.
Generally, the easiest way to go about creating a model like this is to make each of the components separately and then stack them together later in the process. The one thing that we will not model in this installment is the power cord. Having it in the model would finish it out, but it’s really not necessary for what we’re working on here, which is to roughly model a piece of aquarium equipment.
Since it’s been a while since the first article, please skim over the previous article to get a feel for the interface again and what each of the icons mean and do.
Let’s Get Started
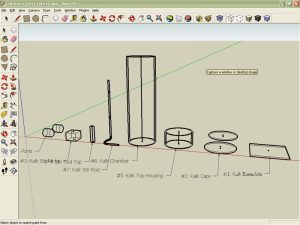
The first thing we will do is make our components. I’ve already measured out what needs to be made in the below components list:
- Baseplate (1): Square, 6″ L x 6″ W x 0.25″ H
- Caps (2): Circle, 5.5″ diameter (2.25″ radius), 0.25″ H
- Motor (1): Box, 2″ L x 2″ W x 1.5″ H
- Stir Bar Top (1): Cylinder, 2″ H, 0.75″ diameter
- Motor Housing (1): Tubing, 2 5/16″ H, 5″ diameter
- Kalkwasser Chamber (1): Tubing, 15 5/16″ H, 5″ diameter
- Kalk stir rod (1): Tubing, 3″ W x 12.5″ H, 0.25″ diameter
- Freshwater Input (1): Cylinder (on its side), 1.5″ long, 1.5″ diameter
- Kalkwasser Exit Nozzle (1): Cylinder (on its side), 1.5″ long, 1.5″ diameter
Using what you learned from the previous installment, make components 1, 2, 3, 4, 8 and 9 from the above list in a new SketchUp project window. If you’d rather not make each of the shapes, again the finished individual components can be downloaded instead.
After you’ve made the components, we’re going to add center points to each face. Using your Select arrow tool, select the top of your shape by clicking on it. Now click the Plugins dropdown menu and select “Set Center Point.” A center point should now be added to your surface. Now using the Orbit tool, rotate your view so that you’re now looking at the bottom of your shape. Again, using your Select arrow tool, select the bottom of your shape and setting a center point on that face as well. So far, so good.
After you’ve completed each shape, use the “Select” arrow tool to select the shape (mouse click and hold at the upper left of the shape and drag down to the lower right to select the entire shape or triple click on the shape to select all of it), right click on the selected shape and choose the “Make Component” menu item, and then Name it and click the Create button. This binds the shape into a complete unit that is easier to work with later.
When completed with this step, you’ll have six shapes created: one baseplate, two caps, one motor, and two ports each with center points on their top and bottom faces. Next, we will get to making some tubing.
Making Tubing
Items 4 and 5 will require us to use the “Pipe Along Path” script in order to make the desired components. In order to get started on these two items, we need to move the components that you made in the previous section away from the origin (the point where the red, green, and blue lines intersect). Again using your Select arrow, click and drag across all of the components that were made in the previous step to select all of your shapes near the origin and then use your Move/Copy tool to move them away from the origin.
Now that that space is clear, let’s make our Kalkwasser Chamber. Using your Pencil tool, start by clicking at the origin of the three axes in your interface. Drag that up a bit and then type the following into the window:
15 5/16″
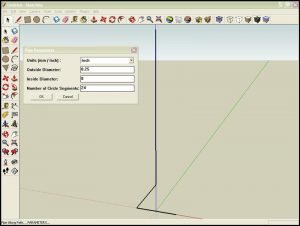
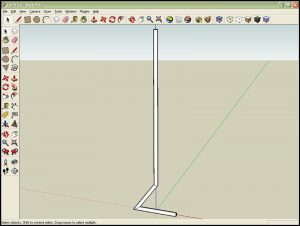
This creates a line 15 5/16″ tall. Next, select the line with your Select arrow tool and then click on your Plugins dropdown menu and select Pipe Along Path from the menu items (Photo 4). Make sure your units are in “Inches” and that your tube has an outer diameter of 5 inches and an inner diameter of 4.5 inches. Leave the Number of Circle Segments at 24 and click OK. You now have a tube (Photo 5).
Again, either triple-click on the tube or use your Select tool to drag across the entire tube to select it and then make a component out of it. With that done, move it away from the origin so we can make the Motor Housing.
Now, create the Motor Housing the same as you did above. The motor housing is the same inner and outer diameter as the Kalkwasser Chamber except that it is only 2 5/16″ tall.
The stir rod was created in a similar fashion as the above tubes except that its outer diameter is 0.25 inches and its inner diameter is zero inches. A lot of smaller line segments were pieced together to make it. Use your Line tool (pencil) to make line segments that are attached per the dimensions mentioned in the above components list and then triple click on the line with your Select tool to select all of the line segments. Now use your Pipe Along Path plugin to make it 0.25 inches outer diameter and 0 inches inner diameter.
Now your stir bar is created! Make a component out of it and we can proceed to the next step.
Putting It All Together
Now that all of the components have been made, we need to put them all together. The first step in this process is to fill each of the components with color/transparency. To do this, click you Paint Bucket icon on your menu or select the Tools menu followed by Paint Bucket. Fill items 1, 2, 8, and 9 from the above list with either a dark black or a gray color. Items 4 and 7 should be filled with a red color. Item 3 can be filled with a light gray. For items 5 and 6, switch to “Translucent” from the Paint Bucket dropdown box and fill these two items with “Translucent_Glass_Blue.” I have done so with the individual components file that you downloaded earlier and you can get it here in case you’d like to see how I’ve done it.
The next step is to start assembly. The easiest way I’ve found to assemble everything is to switch into Wire frame mode (View – Face Style – Wire frame menu items) and then begin the moving and stacking process.
Next, switch to your Move/Copy tool (Tools – Move menu items) so that we can begin assembly. The first thing we will do is assemble the completed Stir Rod. Grab item 4 (Stir Rod Top) by the bottom centerpoint and drag it up and place its centerpoint on top of item 7’s centerpoint (Stir Rod). You may need to switch in and out of Pan and Zoom modes to get in close enough to see the centerpoints and how they line up. When done it should look like Photo 11.
Continue assembly by stacking the components using their centerpoints as a guide until you end up with what the completed model looks like. It may take a while to get the hang of it, but by switching between Pan mode, Orbit mode, and Move/Copy mode, you’ll get all the pieces together into one unit. You will end up with something that looks like Photo 12 after you’ve switched out of wire frame mode.
Conclusion
And there you have it, a model of the Deltec KM kalkwasser stirrer. If you have time to play, you can go into much greater detail than I have been able to in this article. You could add the extension cord as well as make the infeed/output ports more realistic or whatever your heart desires.
Again, I’d like to challenge any and all of the aquarium manufacturers to provide SketchUp models of their equipment for hobbyists like us to use when mocking up our “dream systems.” We could quickly switch in and out various pieces of equipment and see what works and doesn’t work for our specific needs. I’d also like to challenge the other hobbyists to create SketchUp models and share them with others so they can also benefit. Again, reefs.org has a repository setup for it or else share it on Google’s repository. The big thing is to get them out there for people to use.
Further Reading
If you’d like to dig deeper into SketchUp, there’s an excellent book available from Amazon.com on the subject:
Google SketchUp for Dummies
Chopra, Aidan, Wiley Publishing, Hoboken, NJ, 2007
ISBN: 978-0-470-13744-4
$25 (list price)
$16.50 (street price)
Website: Click here
A review of the book can also be found at PC World’s blog for those wanting to read some additional information on the book before purchasing it: http://blogs.pcworld.com/communityvoices/archives/2007/11/book_review_goo.html.
Acknowledgements
I’d like to thank Adam Blundell for encouraging me at this past MACNA XIX to continue with this series.


0 Comments