

By Simon Garratt
 I will say right now that I have absolutely no intention whatsoever of shouting about how we should all be making our reefs out of fake live rock to save the environment. Or at least I didn’t when I started writing this article; let’s just see how it goes and we’ll come back to that bit later.
I must admit that after being a quite vocal advocate of all things diverse and natural within a reef tank for a great many years, and after running sand and LR filtration for about as long as I can remember, I even managed to shock myself when I started building my current 400 gallon reef two years ago with the idea of using nothing but fake rock to create the reefscape. Being a Capricorn, I do like a challenge.
In most cases it is widely accepted that good quality live rock forms the backbone of most successful reef systems. Unless you are running a dedicated system such as ULNS (Ultra Low Nutrient System), or a biotope such as a sea grass and sand bed system that has sufficient habitable bacterial surface area, then chances are your system will require live rock. Live rock and its many inhabitants are the first line of defence in both the processing of waste material, and in cycling harmful by-products such as ammonia and nitrite through to less harmful or harmless nitrate and nitrogen gas.
The main concerns commonly expressed over fake live rock generally fall into three areas:
1: The chemical traits of any materials used in the production of the rock, and its long term affects on life within the system.
2: A perceived lack of porosity leading to a reduced surface area for bacterial colonisation and a perceived lack of flow or diffusion throughout any inter-spatial regions leading to reduced filtration capacity.
3: The inherent lack of diversity and bacterial populations that you get compared to using conventional live rock, including the possibility of monoculture bacterial populations leading to imbalanced filtration symptoms.
To solve these three main issues, I came up with what I think is a good approach, which over time led to the results you see in the following images.
The first rule of thumb when making your own rock is not to cut corners. Trust me, you’ll be saving enough money as it is. Sticking to materials that are known to be safe in salt water is a wise choice. Not only that, you need to consider what happens to those materials under the suppressed pH environments that are found inside and under the rock once bacterial action starts taking up available oxygen. Fake live rock generally consists of three main materials: cement, sand, and something that helps generate or leave a porous honeycomb structure once set and hardened. White Portland cement has been widely used in the creation of rock structures in a variety of reefs and public aquaria for years, so is known to be safe after initial curing. For the sand constituent, I would recommend aragonite sand, which although slightly more expensive than more commonly available substitutes such as silica or play-pit sand, it is of reef origin, and will generally only give off elements that are desirable under suppressed pH conditions that can lead to low levels of dissolution. It can’t be stressed enough the need to use materials that you know are reef safe. Long term leaching of undesirable chemicals from unknown or impure substrates can have serious repercussions, and not only to any corals or fish that we add. They can also hold back the development of micro fauna populations which go a long way towards creating a stable environment for the remainder of the system’s life. In many cases these chemicals or elements may be un-testable with average hobby kits, so you will be working blind in the event of long term issues.
The third constituent has varied over the years, from coarse coral gravel, to oyster shell, and even in a few cases, foam packing chips (I kid you not). In this case, I decided to try the salt crystal method, which utilises large (5mm+) granular salt crystals that are commonly sold in 25kg sacks for use in dish washers and water softeners. Although there are some concerns expressed about the chemicals used in manufacturing, a short internet search will answer most questions on any particular brand. Obviously the salt part is quite simply sodium chloride (NaCl) with an extra anti-caking agent included to prevent it absorbing moisture during storage which would cause it to stick and solidify into a large lump. The caking agents used for non commercial applications in the home are usually inert and non toxic as far as aquatic life goes, and under law have to be ensured food grade with regards to toxicity in humans. They will usually be highly hydrophobic thereby making them even less of a concern as far as dilution into a systems water body is concerned. They usually come out as a buoyant, waxy, powdery residue that floats to the surface and makes its way over any weirs and into the skimmer or some filter matting for removal.
The mix ratios will vary slightly depending on the type of structure being formed, but the same process will always apply. First, the cement and sand must be mixed to the consistency of thick porridge. We then add the salt crystals. From this point forwards there should be no further water added under any circumstances as this will dissolve the salt into the mix irretrievably. What we really want to do is add the salt to a mix that has little residual free water – more like a paste than a runny slush – so that the crystals stay intact within the mix and dissolve out later once submerged. In all cases, the use of RO water is highly recommended due to its known low nutrient content.
For standard rock structures and single rocks, the mix is: 1pt. Portland Cement – to – 2 pts. aragonite sand – to – 3 pts. salt crystals.
For branch rock, the mix is: 1pt Portland Cement – to – 2 pts. aragonite sand – to – 2 pts. salt crystals. This is done to avoid having a structure that is too porous, which can weaken it considerably in the case of long narrow branches.
Stage one consists of deciding what kinds of structures and volume of rock you want, taking into account both the base area available in the tank and its height. You can then proceed to building the rock structures directly in the empty tank, or on a flat surface of the same base dimensions. Drawing the rock’s footprint onto this area is a good idea, as it will give you a better perspective on how the rock will dominate the tank once complete, offset against any substrate areas required. Once the layout is decided, you can then start building the molds. A very good method is to use chicken wire mesh and plastic sheeting. The chicken wire is laid and moulded over an underlying supporting structure such as house bricks or other objects to give height. This is then overlaid with thin plastic sheet which protects the metal mesh from becoming imbedded in the setting cement mix. Leaving a good overlay of surrounding plastic onto the base board or tank base means that once set, the rock structures can be easily lifted off the base, and the plastic sheet and chicken wire can be removed with little if any fuss.
You can use anything you like as a support as long as it is strong enough to support the weight of the cement mix once placed on top.
Once you have your mix ready, you simply dollop it over the mold allowing a small amount of the mix to spread around the base onto the surrounding flat surface. This will form a smooth footprint that spreads the weight of the structure evenly across the base of the tank once installed. Generally it is better to dollop the mix over the molds to an even depth of around 2-3” first, and then build up irregularities from there. If the mix isnt quite stiff enough and is settling, simply leave the building up of sections till later once the main structure has semi-set after a few hours. Doing the structures in stages is fine, as long as you don’t leave the original mix to go off too much before adding more. If you want to make caves, you simply leave holes in the mix so that the underlying mold is exposed. Once removed, these will form entrances that fish can swim in and out of when seeking refuge. Remember though that nature rarely makes a round hole, so random sizes and shapes are far more realistic.
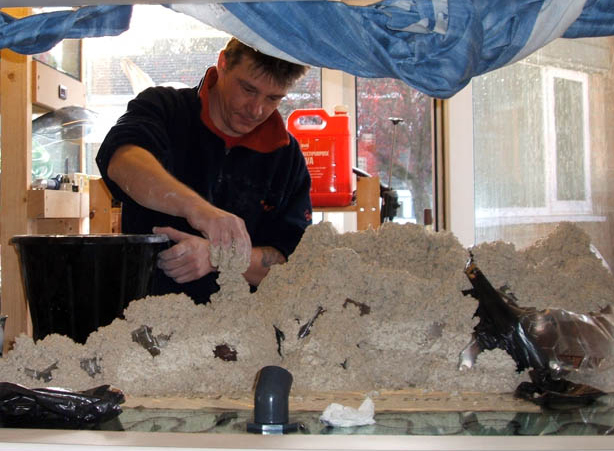
Getting your hands dirty is what it’s all about. The more irregular the shape, the more natural it will look.
The final finishing touch that creates the best overall surface effect is to sprinkle the entire structure with a very random spattering of mix. This will create an irregular and natural look. Remember this hard and fast rule though: never, ever touch the structures with your hands if you want to avoid a ‘manipulated’ look. The only exception to this rule is if you need to remove or move a feature you don’t like, but even then make sure you cover it with a fresh sprinkling of mix to disguise any obvious surface marks afterwards.
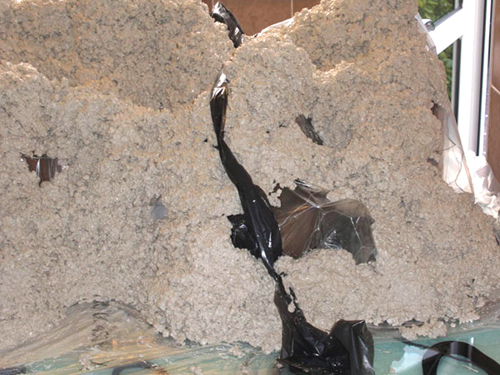
A barrier join that will become invisible once the separator sheet is removed after curing.
Instead of forming very large structures that would prove difficult to physically manage whole, you can make them in inter-locking sections that can be split apart and reconnected later. This is simply done by placing a barrier or strip of plastic sheet of a single thickness at the periphery of where you want your join to be, and then butting the next batch of mix against the other side of it whilst the whole structure is still wet and pliable. Once hardened, the sections can be split and the plastic strip removed so that the two pieces can sit together. Making its path irregular will disguise this joint later making it virtually invisible to the naked eye.
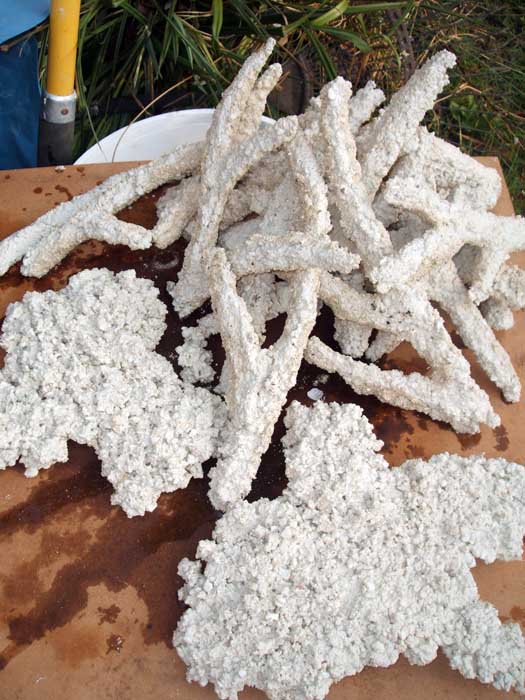
In the case of branch rock, the same rules apply in terms of handling the mix as little as possible once in position. By spreading out a 2” deep layer of aragonite sand over a flat surface, you can indent its surface with branch like channels. The mix is then arranged along these grooves like cement sausages, with the surrounding sand pushed up around them to retain a circular cross section once cured.
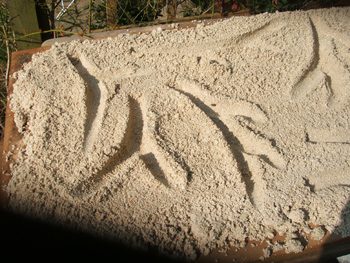

A branch rock mold and the finished article after the supporting sand was removed.
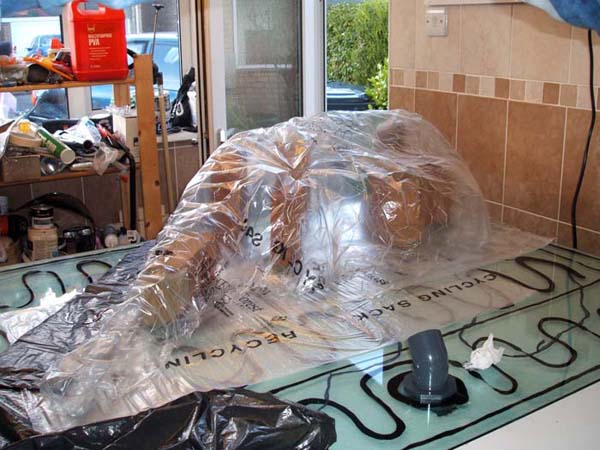
If you are happy with your live rock structures or branch rock, then its time to cover them gently with a large plastic sheet and leave them to harden for approximately 24 hour per 1” of thickness. The sheet is important as it prevents the mix from drying out too quickly which would weaken its integrity.
Once initially hardened, you should remember that the structures may still be slightly weak internally, so they should handled with care whilst being transferred to a curing container or the tank. Which ever way you decide to cure the rock, it will still take on average of 6 weeks to become completely inert. By far the best method is to use RO water for curing, as it will pull the salt out by diffusion far quicker than tap water and there is the added advantage that you won’t be introducing any unknown contaminants or nutrients into the rock before it’s even seeded. Heating the water and adding a power head also helps speed up the process. Three things will generally happen during curing:
1) The salt level within the free water volume will rise as salt dissolves out of the rock. With a decent level of salt in the mix, each grain will be touching the next. So as one grain dissolves away into the surrounding water, it exposes the next and then the next until a nice honeycomb structure is left.
2) The pH will climb drastically because of the lime that is released from the cement.
3) You will notice a growing amount of scum on the side walls of the container or tank as well as a layer of surface scum as the anti-caking agents are released and float up to the surface. Changing the water out regularly will help speed up the process, but as a minimum it is suggested that the holding water be changed at least once per week during the first three weeks without fail, if not twice.
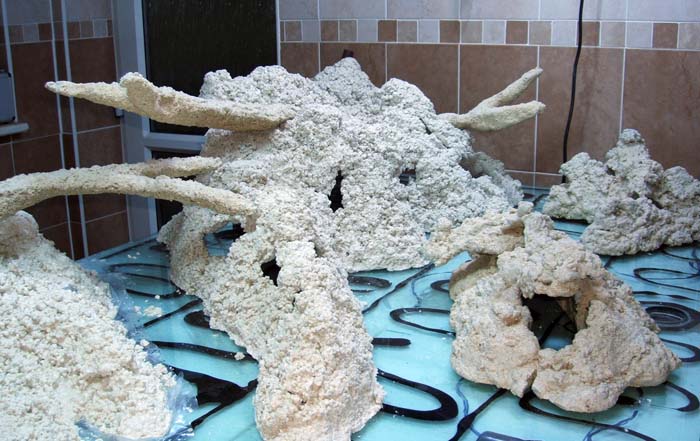
Completed rock structures after curing, and a batch of branch and plate rock.
The best way of seeing when the rock is close to being ready is to do a complete water change on the 5th week and then use a pH monitor and refractometer to monitor the water over the 6th week. If there is no more salt being released, and the pH value doesn’t continue to climb above desirable or neutral levels then this tells us that the rock has released what it can, and is ready to be used.
Whilst admittedly some minor releases may occur over time from random pockets of un-dissolved salt deep inside the rock as boring worms work through, they will only be minor and offer no risk to the main system or stock when offset against a sensible water change regime and regular testing schedules. Some minor dustiness may occur occasionally from anti caking agents released by heavy grazers such as urchins etc, but this will easily make its way out via the weirs to be skimmed out as a waxy residue in the collection cup and is no different to the borings released by worms in normal live rock.
Initially the rock will appear extremely barren and white, but this won’t last for long with a bit of patience and a good biodiversity boost. Seeding the rock couldn’t be easier once you have the system salted to the correct salinity and up to temperature, plus, compared to normal live rock, you have the added advantage that you can pick and choose what you want to add rather than unwittingly introducing pests such as predatory crabs, and mantis shrimp that are commonly hidden inside larger imported real live rock pieces. Remember though that diversity is still a major key to success with any live rock over the long term, so we shouldn’t be too fussy. As seed stock, you can use live rock rubble (usually found in abundance at the bottom of LFS live rock tanks or live rock shipping bags), mixed with a small percentage of cured high quality rock pieces to get things going. Scattering these across the rockwork will help transfer not only mobile organisms to the virgin rock such as copepods, worms, mini stars and numerous other families, but it will also introduce larvae and bacteria, and allow the spread of more beneficial sponges and micro fauna over time. In general, the better quality and more diverse the seed, the faster the colonisation is over time, and the more satisfying the results. Additional diversity will usually arrive over time on the bases of any corals that are placed into the system.
When you add a solid substrate into any biologically active marine environment with a very low but traceable pool of free nutrients, a fairly standard course of events happens. Initially you will see an explosion of diatoms across the surface which die back quickly (dependent on available silicates), quite often followed by first stage bacterial films and occasionally minor cyanobacteria blooms. You will then see a growth of micro algae or very fine short turfs that are only just visible to the naked eye, shortly followed by the start of coralline growth if conditions are favourable. Once this process starts, you can initially speed it up by extracting coralline scrapings from a friend’s tank, and then grinding, or pulverising them into a sort of coralline milkshake which can be poured into the tank and left to settle for a short while so that it gets a chance to fall into crevices and holes where it will grow and spread.
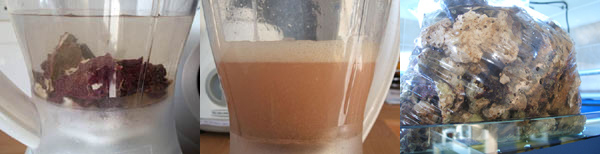
A good starter seed, consisting of liquidised coralline algae and live rock rubble.
Just the same as any live rock, you should still consider the use of grazers and scavengers an essential part of good maintenance from the earliest stages of visible algae growth. By doing so, we keep the rock structure free of accumulating or smothering growth and the porous structure open to diffusion. This also allows the spread of more beneficial coralline algae over time.
The rate of colonisation can be quite staggering in a well run system, but as with any substrate or live rock, stability is the key to success. Remember here you aren’t building a reef as such, you are ‘growing one’ from scratch. So stocking needs to be kept sensible and at a rate that matches the rocks development as a filtration media and coral growth platform.

Week 1 after seeding.

Week 2 after seeding.
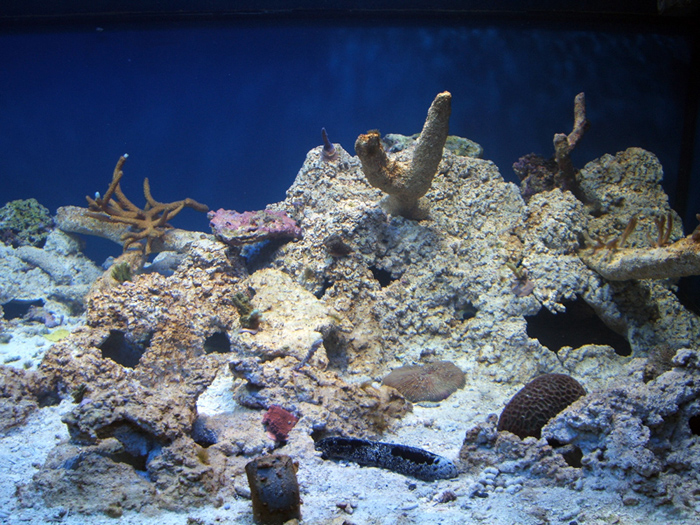
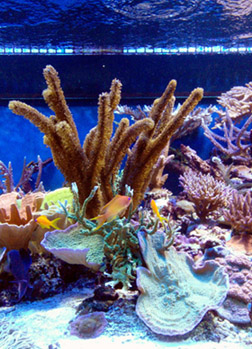
2 months after initial seeding.
12 months after initial seeding.
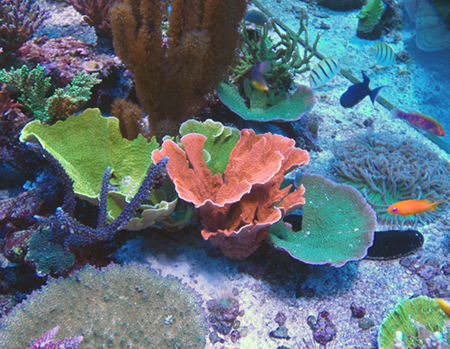
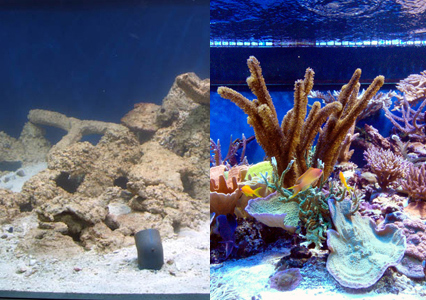
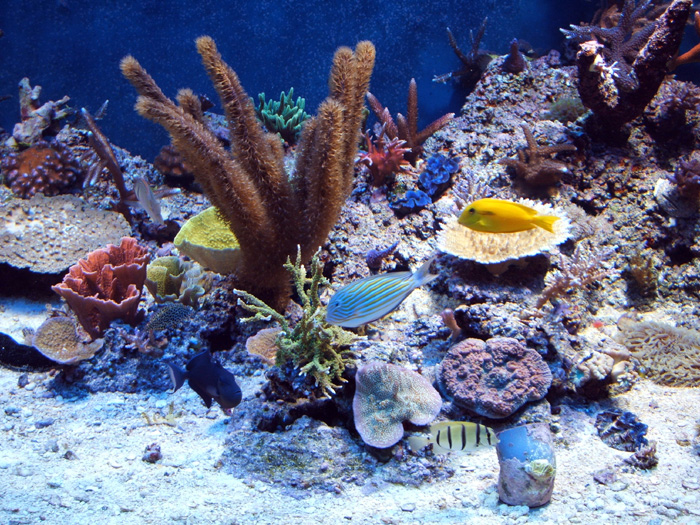
2 years on, well grown over with solidly attached healthy corals, low free nutrients and a thriving diverse micro fauna population helping things along.
So, there you have it – your own custom made slice of reef. I will say now that if you are into a more rapid or instant form of reef creation in the home, then this method may not be for you because you really are tied to the rate at which the rock will colonise. However, if you are just as interested in learning from practical experience how the micro-fauna establishes itself under captive conditions just as much as the larger life we add to our systems, and you have the patience to control initial stocking to sensible levels that doesn’t tax the establishing micro-fauna and bacterial colonies essential for effective waste and nutrient management in a closed system, then this method may be just the ticket.
As far as limits go, there really aren’t any. Only your imagination will hold you and your system back. Using images of natural reef structures as a model for your fake reef will go a long way towards creating that final illusion of realism once its grown out and established. The sky really is the limit on what you can do.
And as for the environment…
Remember at the very start of this article, I said that I wouldn’t preach – or at least I said I would try not to. Well it wouldn’t be right of me to slope away without showing some consideration to the issue.
In 2001 the Cites quota for live rock shipped from Fiji was 800 tons with three quarters of that designated for the United States. By 2007, it had risen to 1432 tons. In 1986, the World Wildlife Fund estimated that there were ten million marine aquarists world wide. In 1999 the Pet Industry Advisory Council estimated that in the United States alone, there were over 622,000 marine aquariums, of which ninety percent were coral reef aquaria holding a total of 50,000 tons of live rock.
Consider this if you will: if we as hobbyists could learn that with a little patience, creativity and understanding, a realistic reef could be built from scratch with far less of an impact on the wild reefs, whilst still creating both realistic and biologically effective environments for the animals we keep, then what really is stopping us from digging out that bag of cement and getting our hands dirty for a change, rather than just wet? And whilst admittedly there are still environmental aspects to consider even with the materials used in fake live rock production, I am sure most would agree that if zero impact isn’t feasible, then less should always be the next course of logical action.
Many thanks for reading.
Simon.
References
http://www.cites.org/eng/resources/quotas/index.shtml

0 Comments