

By Bruce York
I developed the Kalk / Calc Combo Method of maintaining stable water parameters in my reef aquarium over a 6 year period from 2008 to 2014. At this point I am pleased with the minor amount of maintenance, excellent coral growth, and excellent coral color I have achieved. In order to demonstrate the results of the method, I have included pictures of my display tank during a one year period immediately following a tank break down to remove some nuisance corals.
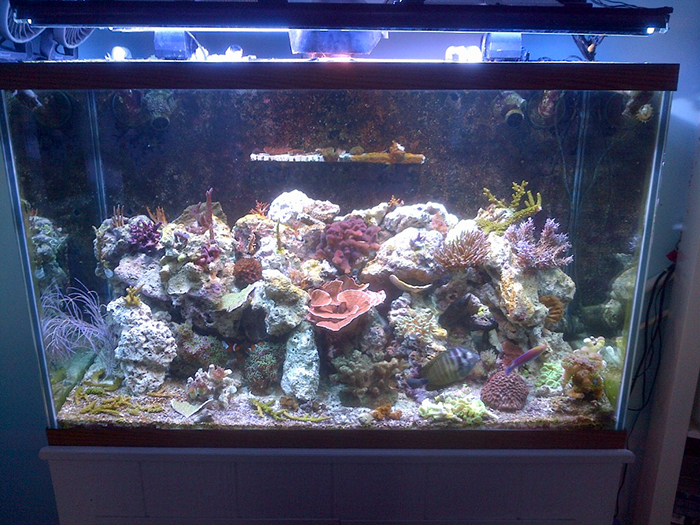
The tank on 11/12/2013. Photo by Bruce York.
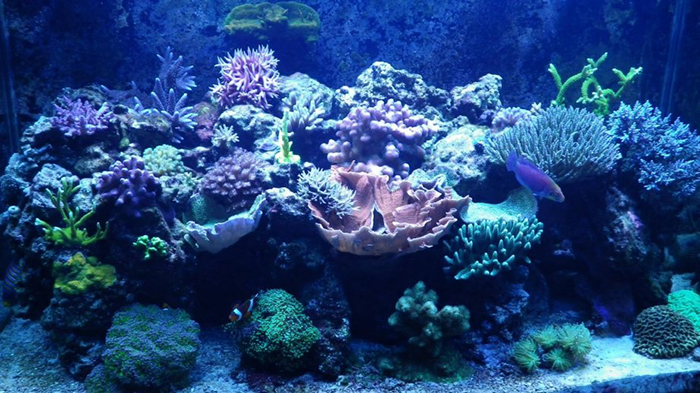
The tank on 6/23/2014. Photo by Bruce York.
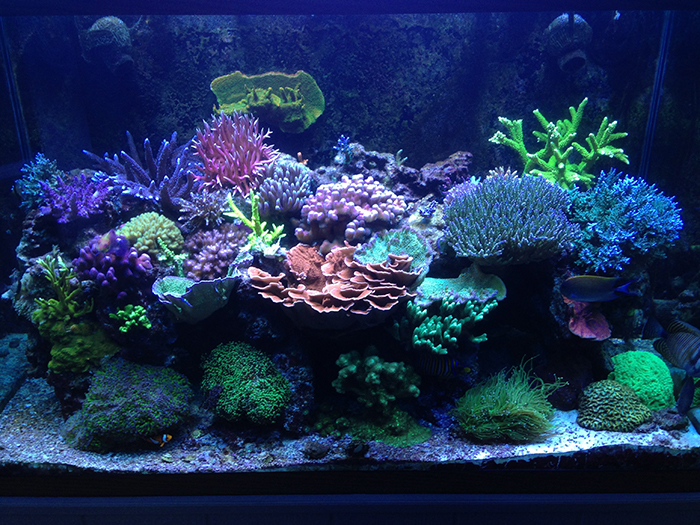
The tank on 11/10/2014. Photo by Bruce York.
In general, the Kalk / Calc Combo Method involves maintaining proper water parameters by maximizing the addition of kalkwasser to the tank and supplementing with a calcium reactor if needed. This provides the benefits of kalkwasser including reducing phosphates, and raising pH, but also results in having to dose magnesium. The most important benefits are that once you get it set up and running, adjusting your water parameters is as simple as turning a knob, and maintenance is reduced to almost nothing.
The following article describing the Kalk / Calc Combo Method assumes you are running a sump in your aquarium system and that your alkalinity/calcium demand is so high that you cannot meet that demand with kalkwasser alone. If you are starting a new tank or otherwise do not have a high demand for alkalinity and calcium, I recommend that you only implement the kalkwassser part of this method and as your demand grows, add the calcium reactor part.
I recommend you read the entire article below before getting started on the setup. If you have any questions, feel free to send me a message at Reef Central my user ID is bbyatv.
Part I – Kalkwasser Dosing System
The first part of the Kalk / Calc Combo Method involves setting up the kalkwasser dosing system. I highly discourage adding kalk with top off water due to the very high risk of over dosing. I have personally seen this happen to many tanks resulting in a loss of all corals. Instead, I recommend an overflow style technique. This technique is described below.
Step 1 – Determine/Maximize the Tank Evaporation Rate
In order to add kalkwasser to the tank (it can only be mixed and added with fresh water) you have to evaporate water out of the tank. To maximize the amount of kalkwasser that can be added, you want to evaporate as much water as possible from your aquarium. I have 2 fans over the display (they also help keep the tank cool), one fan over the refugium, and one fan over the frag tank. I evaporate about 3 gallons of water a day from a 170g system. Once you have fans in place (where you can fit them), place a mark of some sort (using a piece of tape or a Sharpie) to indicate the water level in the sump. Stop adding any water to your system for 24 hours. Then, after the 24 hour period, measure the amount of fresh water required to bring the water level in the sump back to the mark. Do this for a few days in a row to get a solid average evaporation rate.
Step 2 – Set up a Simple Auto Top Off System
The auto top off system described here does not require any electronics, switches etc. and as a result has a low likelihood of failure. To build this system, mount a float valve in the sump. To do this, drill a ½” hole in a plastic box like the PVC outlet box shown in the picture. Now install the float valve through the ½” hole and connect a line from a RO/DI water source. This line can come straight from the RO/DI unit or from a RO/DI water reservoir. Using a clamp of some sort – clamp the box inside of the sump. In this case, I used a c-clamp. Make sure not to break the glass with the clamp. I used a block of wood to prevent damage. The c-clamp may rust over the years, but the one in my tank is not bad as it never gets wet. I have been running a setup exactly like this on my display tank and my water change tank for over 8 years and have never had a problem. The total cost for this setup is less than $25.
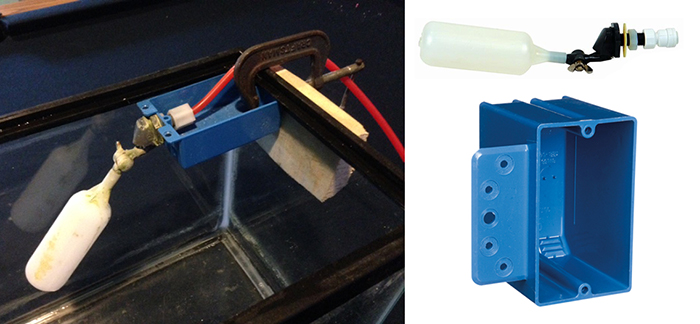
An easy and cost-efficient auto top off system can be made from a float valve and PVC outlet box.
Step 3 – Determine the Alkalinity/Calcium Demand of your Tank
After determining how much water evaporates from the tank and you set up the auto top off system, the next thing to do is determine how much alkalinity/calcium the tank demands. To do this, turn on your auto top off system so that the water level in the tank stays constant. Measure the alkalinity and calcium in the tank and adjust these parameters to desired levels. To adjust the parameters, visit the Reef Chemistry Calculator and use one of the products in the drop down boxes to adjust whichever parameter needs adjusting. I recommend using baking soda (inexpensive) to adjust alkalinity and Seachem Reef Complete (it has the highest concentrations of calcium per volume) to adjust calcium. For this first set of adjustments, I also recommend adjusting these parameters independently instead of using a product like limewater that adjusts them both at the same time. Re-test the parameters after you think you have them where you want them to get a solid reading. Now wait 24 hours and measure them again. Record these values and adjust them again to the desired levels. Wait 24 hours and measure and record them again. Do this at least 3 days in a row to get a good set of average values. So if you have your alkalinity adjusted to 10.0 dKH and it drops to 9 the next day, you know your tank is demanding 1 dKH per day.
Step 4 – Add the Kalwasser Dosing System
Once you know how much water evaporates from the tank in a day and the alkalinity/calcium demand, you can add the kalkwasser dosing system. Using the alkalinity section of the Reef Chemistry Calculator web site, enter the alkalinity level that the tank dropped down to after 24 hours as the “Current Alk” and the desired alkalinity level as the “Desired Alk”. This time instead of picking baking soda, pick Limewater (saturated). This will tell you how much kalkwasser needs to be added in 24 hours. If you evaporate more water in 24 hours than the amount of kalkwasser that needs to be added, then you do not need to add the calcium reactor part of this method at this time. With more corals added the tank, demand will go up and you may eventually need it. If on the other hand you do not evaporate as much water as you need to add in kalkwasser, you will also need to add the calcium reactor part of this method.
To add the kalkwassser, you will need a kalkwasser stirrer, an adjustable peristaltic dosing pump (capable of delivering the volume of kalwasser you need in 24 hours), and a tee fitting. I suggest placing the pump up stream of the kalk stirrer and pumping the RO/DI water into the stirrer and have it overflow into the sump (as shown in the schematic below). Placing the pump downstream of the stirrer will also work, but results in the kalkwasser mixture flowing through the line at the pump head and this often clogs. There is far less maintenance and risk in having RO/DI water flowing through the lines at the pump head. To plumb the RO/DI water supply line for the kalk stirrer, use a T fitting to tap into the top off supply line running to the sump.
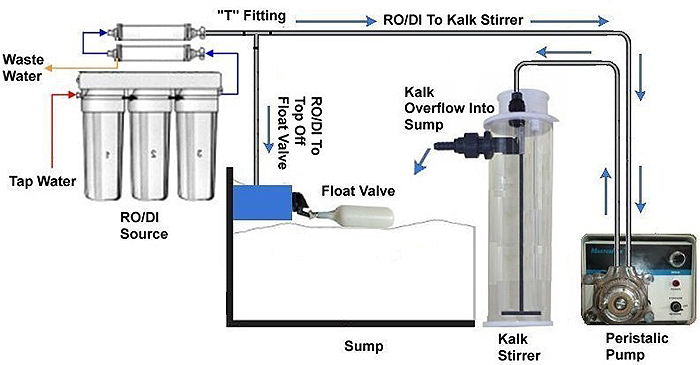
Schematics for the auto top-off and kalk stirrer system.
Once you have the hardware set up, adjust the pump to deliver the volume of kalkwasser determined earlier in step 4. This volume will be the smaller of either the amount of kalkwasser demanded by your tank in 24 hours or the amount of water your tank evaporates in 24 hours. So if your tank evaporates 1 gallon and only demands ½ gallon of kalkwasser, set the pump up for ½ gallon. If on the other hand your tank demands 2 gallons of kalkwasser a day and it only evaporates 1 gallon a day, set the pump for 1 gallon. To do this, place the line coming out of the pump into a small container for one minute. Use a syringe to measure the volume of water in the container and multiply that amount by 1440. That will give you the amount of being delivered in 24 hours. If your syringe measures milliliters, do not forget to convert to gallons after you do the multiplication. Once the pump is adjusted to deliver the desired amount of kalkwasser, re-attach the line from the dosing pump back to the stirrer and have it start overflowing into the sump.
Kalkwasser Mixture
The next step in setting up the kalk stirrer is determining how much kalkwasser to add to the stirrer on a weekly basis. Saturated kalkwasser requires 2 teaspoons of kalkwasser per gallon of water. So if you are pumping 2 gallons of kalkwasser into your tank per day, your stirrer will require 4 teaspoons per day or 28 teaspoons per week of kalkwasser. I add the kakwasser to my stirrer once a week when I do my water changes.
Kalkwasser Drip Rate
The last step in setting up the kalk stirrer is to ensure the dosing pump is set right. If you are dosing less kalkwasser than your tank evaporates, you need to check the alkalinity levels each day and adjust the dial on the pump until you get the desired alkalinity level. If you are dosing the amount of kalkwasser that your tank evaporates each day, monitor the water level in the sump and make sure it is not rising after 24 hours. If it is, you are dosing more than the tank evaporates and you should dial it down until you are dosing just under your evaporation rate.
My tank demands more alkalinity and calcium than I can deliver using only kalkwasser (I do not evaporate enough water) so I have my kalk stirrer set to add about 90% of the evaporated water from the kalk stirrer and the remaining evaporated water is added by means of the top off float valve. I add the remaining alkalinity and calcium with a calcium reactor as described in the next step. With this setup, I never have to worry about a kalk overdose or having to add water to the system.
Part II – Calcium Reactor Dosing System
The calcium reactor part is only required if your tank demands more alkalinity and calcium than can be delivered with kalkwasser due to tank evaporation limits as described above. If you determined that, after adding the maximum amount of kalkwasser you can to your tank as a result of evaporation, your alkalinity and calcium parameters are still dropping, you will need to add the calcium reactor.
Step 1 – Add the Calcium Reactor Dosing System
There are many articles on the web that outline how to set up a calcium reactor. In general, they sound complicated. I have found that setting up a calcium reactor is much easier than it sounds.
In order to set up the calcium reactor, you will need a calcium reactor, calcium reactor media, a cylinder containing CO2, a pH controller (I use a Milwaukee SMS 122), a small pneumatic check valve, and a CO2 regulator assembly including a bubble counter, solenoid and fine adjustable needle control.
A calcium reactor works by reducing the pH of the water in the reactor to below 7.0 at which point the water is acidic and dissolves the reactor media. The pH needed to ‘melt’ the media will depend on the media used. Typically an internal reactor pH of between 6.1 – 6.5 is required. There are two key reactor settings that will need adjusting to tune the reactor and to maintain your systems demand for Calcium and alkalinity.

This schematic shows how I recommend you set up your calcium reactor.
Effluent Rate (Drip Rate out of Reactor)
To tune the reactor for best performance you first need to set the effluent rate. I suggest adjusting the peristaltic dosing pump to deliver a slow drip rate of around 1 drop every 4 seconds (15 drops a minute). Once the reactor is set up the effluent rate can be increased to match the demand of the tank.
Internal Reactor pH
Once the initial effluent rate has been set we need to look at the internal pH of the reactor and CO2 bubble rate. First, set the pH controller to switch the C02 supply solenoid off at a pH of 6.4. Using the needle controller, adjust the CO2 bubble count to around 30 bubbles per minute to begin with. Leave this for two hours then check the pH controller display, the pH inside the reactor should have dropped down to the desired pH i.e. 6.4. If you find the pH has not dropped sufficiently, slowly increase the bubble rate leaving an hour between each adjustment until the pH has dropped to the setting on the controller. Calcium reactors work best with a steady constant supply of CO2 so don’t be tempted to crank up the bubble rate to reduce the pH quickly. Also, if the solenoid becomes stuck open and you happen to have the bubble count cranked up, the media in the reactor will turn to mud and be worthless. Once the desired pH has been reached in the reactor, check the effluent alkalinity, the ideal alkalinity should be between 35-50 dkh. If the effluent alkalinity is low drop the controller pH setting by 0.1 and leave for an hour and check the effluent dkh again. You may find you have to increase the bubble rate with each adjustment of the pH controller to achieve the new pH setting. When you find the effluent dkh is between 35-50dkh your controller will be set at the correct pH required to ‘melt’ the media you have purchased. Remember to calibrate your pH probe (see probe manufacturers calibration instructions) before set up.
Final Adjustments
Once the reactor has been set up to achieve the optimum effluent alkalinity you will need to tune the reactor for system demand. With the reactor running check your systems alkalinity, write down the results and check the systems alkalinity again 24 hours later. If your systems alkalinity has dropped you will need to increase the output of the reactor to match demand. To increase the alkalinity, adjust the peristaltic dosing pump to increase the flow rate by 1 drip per minute more than the current drip rate. Check the aquarium alkalinity again 24 hours later and if needed follow the steps above to increase the reactors output again. Repeat these steps until you find the aquariums alkalinity and Calcium demands are being met by the reactor. It is important to test the aquariums alkalinity 24 hours after any adjustment so demand can monitored and the reactor adjusted to suit as above.
Key Points
If you make adjustments to increase or decrease the calcium reactor effluent rates you might also need to make appropriate adjustments to the CO2 bubble rate to maintain effluent pH. Set the effluent flow rate and effluent pH to keep up with system demand, if the system alkalinity decreases then increase the effluent drip rate and visa versa. Always specify the correct size calcium reactor for the aquarium, when you reach the maximum effluent rate for the reactor the effluent dkh will drop regardless of pH or CO2 input. It’s better to over spec a reactor and run it at half duty if need be than choose one that’s too small and struggle with it. Adjust the CO2 bubble count as low as possible to achieve the desired reactor pH if using a controller to prevent frequent on/off cycling of the solenoid. Leave at least an hour after adjusting the reactor to test effluent dkh. Make sure all CO2 fittings aren’t leaking and a check valve is in place to stop tank water entering the solenoid.
After running this setup for a couple of weeks, measure the parameters weekly to determine if the tank demand has changed. In order to adjust the parameters up or down, just turn the knob on the calcium reactor dosing pump. This setup is very stable and easy to maintain. I rarely touch mine and it has been running this way for years. I have to add a cup of kalk once a week to the kalk stirrer, I add media to the calcium reactor every 2 months or so, and I re-fill the CO2 tank every 4 months. One thing I will say is, buy good peristaltic dosing pumps that have adjustable flow rates. They can be found on Ebay for less than $150.
Potential Low pH Problem and How to Fix It
If after running the Kalk / Calc Combo Method for a few days, your tank pH is below 7.9 during the day, I would recommend doing a couple of things. First, I would add a second reaction chamber to the calcium reactor if it does not already have one. The second chamber contains reactor media, is very simple and only has one in and one out. You run the effluent out of your calcium reactor and into the secondary reactor. This reactor removes CO2 from the effluent by dissolving additional media. This increases the pH of the effluent entering the tank. Another thing you can try is to drip the effluent into a container that has an air stone in it and then overflows into the sump. This again degasses some of the CO2 and further increases effluent pH before entering the tank. Here is a schematic of a system including the second chamber and degassing container.
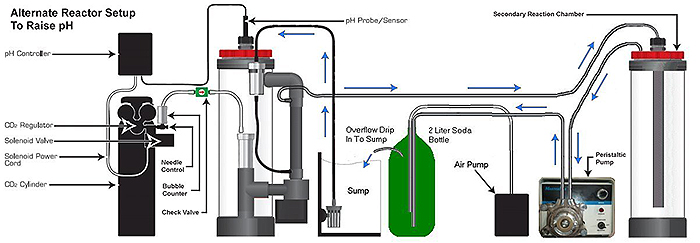
This schematic shows an alternate calcium reactor setup that helps raise pH.
Part III – Magnesium
Other than the two reactors described above, the only thing I dose is Randy Holmes Farley’s recipe for magnesium as needed to maintain the tank magnesium demand. The recipe below comes straight from Randy Holmes Farley and is specifically for use with a calcium reactor.
*** Note this recipe is different from that given in Randy’s two-part recipe. In that recipe more magnesium sulfate is necessary to offset the rise in chloride that is provided by both the calcium chloride and the magnesium chloride.
Using both Epsom salts and MAG flake, dissolve 7¼ cups MAG flake and ¾ cup Epsom salts in one gallon of water, and use the mixture to supplement magnesium in amounts determined using the magnesium section of the online calculator, using the drop down entry “Randy’s Recipes 1 and 2 Versions A and B.
Note that combining the two materials in solution can result in some precipitation of calcium sulfate (calcium and sulfate are impurities in the MAG flake and the Epsom salts, respectively. To assure yourself that the two materials have fully dissolved, dissolve each separately in some freshwater before combining them. Some calcium sulfate precipitation is acceptable, and it is okay to let the solids get into the aquarium, assuming you can dose in a way that prevents them from landing on delicate organisms.
All of Randy Holmes Farley’s reef aquarium related articles can be found here. I have found this series of articles to be priceless and owe the success of my tank to his work.
Part IV – Hardware
The hardware required to implement the Kalk / Calc Combo Method follows:
Auto Top Off
1. PVC outlet box
2. Float valve
3. Clamp
4. Wood block
5. RO/DI system
Kalkwasser Stirrer
1. T fitting
2. Kalkwasser stirrer
3. Kalkwasser
4. Parastalic dosing pump
For the kalk stirrer, I recommend a pump similar to a Masterflex model 7520-10 with a 07014-21 stainless model pump head and 06404-14 or 06402-14 model Norprene tubing. Alternative Masterflex pump models include 7520-00, 7553-50, 7535-10, 7520-35.
Calcium Reactor
1. Calcium reactor
2. Calcium reactor media
3. CO2 Cylinder
4. pH controller (I use a Milwaukee SMS 122)
5. Small pneumatic check valve
6. CO2 regulator assembly including a bubble counter, solenoid and fine adjustable needle control
7. Parastalic dosing pump
For the calcium reactor, I recommend a little larger tubing than the kalk stirrer setup. I suggest a pump similar to a Masterflex model 7520-10 with a 07015-21 stainless model pump head and 06404-15 or 06402-15 model Norprene tubing. Alternative Masterflex pump models include 7520-00, 7553-50, 7535-10, 7520-35.
Alternate Calcium Reactor Setup Components
1. Reaction chamber
2. 2 Liter bottle or similar
3. Air pump and air stone

0 Comments