

When I was designing my new 400g system, I knew well in advance that this time I would use a walkboard. No more would I grab a chair, stepladder, or a couple of salt buckets to work in the tank. This time would be different. My goal was to have a removable walkboard, something I could use from either side of the tank. Playing around with a few ideas including a free-standing framework to some type of hinged apparatus, I decided the best choice was to have the welder fabricate my idea into a component of the stand.
I had him come over to discuss exactly where the tank would be situated, and emphasized the need for reliable strength to support the full weight of the aquarium, water, sand, & rock. I explained how I wanted to insert a walkboard into some type of holder, and that it had to be a little shorter that the full length of the tank, taking into account where a wall was going to be. He took his measurements and got to work.
A month later, the stand and walkboard arrived. It was powdercoated as requested, to deter rust issues. The walkboard itself was heavy, more than I expected but still quite practical. During fabrication, he made sure that it would slide in and out of the holding rails easily. He welded a cross bar that runs beneath the 2″x12″ board, not only supporting the full span but also keeping the two portruding insertion rails perfectly perpendicular and completely straight. Had they been off by one degree, it wouldn’t have been possible to slide it into place.

This stand was custom made for my tank, including the removable walkboard.
The part that holds the walkboard in place is a pair of 2″ square tubing sections that span the stand’s 36″ width. These were welded to the framework, with openings on both sides to accept the walkboard’s inserts. During the testing phase, he said it installed perfectly, but after it was powdercoated, it became more snug. Ideally, it would have been nicer if it wasn’t quite so snug, but in the end I’m very happy with the end product.
The 2″ x 12″ board is screwed to its frame, and a couple of square flat pieces were welded to the top side of the insertion rails as stoppers to provide a small gap between the board and the edge of the tank.
I painted the board with some epoxy-based floor paint to protect it from water damage, the same color as the fishroom’s floor.
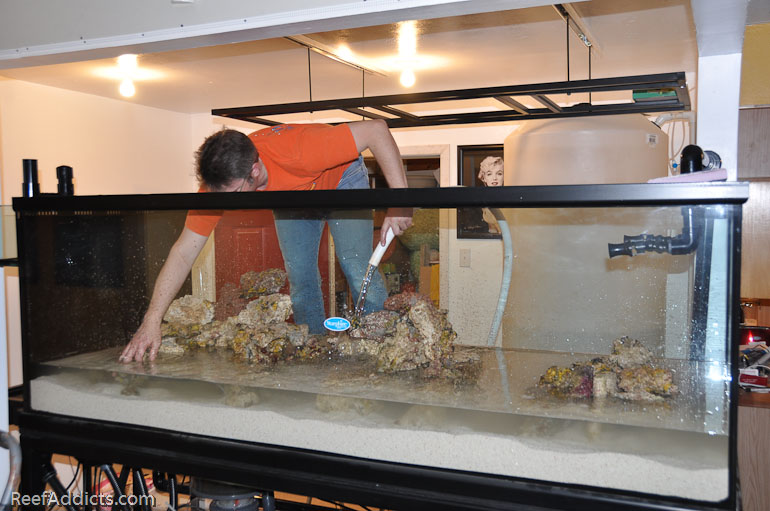
I could reach in and get the job done more easily from the walkboard.
When setting up the tank, the walkboard made aquascaping so much easier. I was able to stack bags of sand on the board, then hop up and pour it into the aquarium. Two of us worked off of it when arranging the rockwork. Placing corals was convenient, both free-standing and when securing them in place with putty or glue. Being able to walk the full length of the tank instead of stepping down from the step ladder, moving it over a foot and then ascending once again is priceless. And to have that option from either side is even better. I’m also able to tinker with the light rack above the tank, working from the walkboard. Cleaning the vent fan mounted to the ceiling is a breeze.
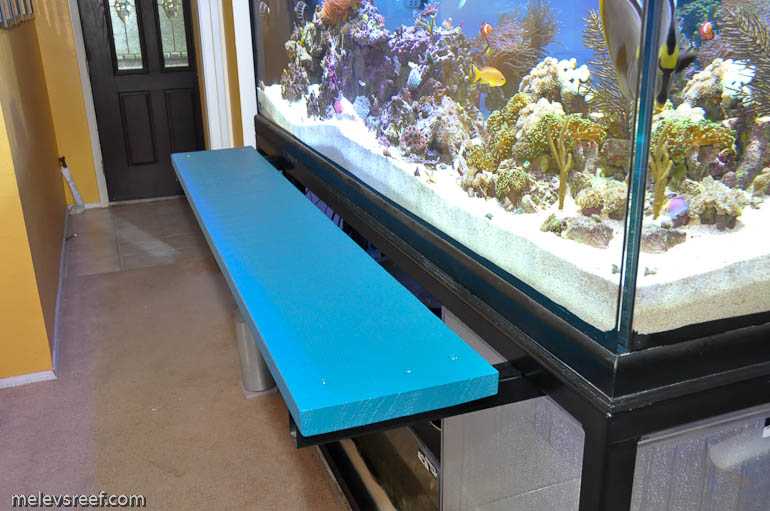
Paint protects it from water damage; pictured installed from the front of the tank.
Of course, my long term goal was to use it for tank photography, specifically top down shots. I love viewing my reef from above, and there are time I stand on the walkboard and gaze at the corals with a viewing box, seeing how each type of coral is growing in. If I see something that needs fixing, I can reach in and correct the situation. The walkboard has also proven useful when refilling the 265g poly tank with salt. I mix up 250g of saltwater at a time, so I can place six bags of salt on the board, climb up and then pour each bag into the mixing vat without having to bring in a 6 foot ladder.

Taking pictures from a safe perch.
It can also be used as a improptu shelf or table for doing water tests, putting things down, or simply to lean upon when chatting with others. Truly, it has made my life so much easier and I highly recommend it to others in the planning stages.
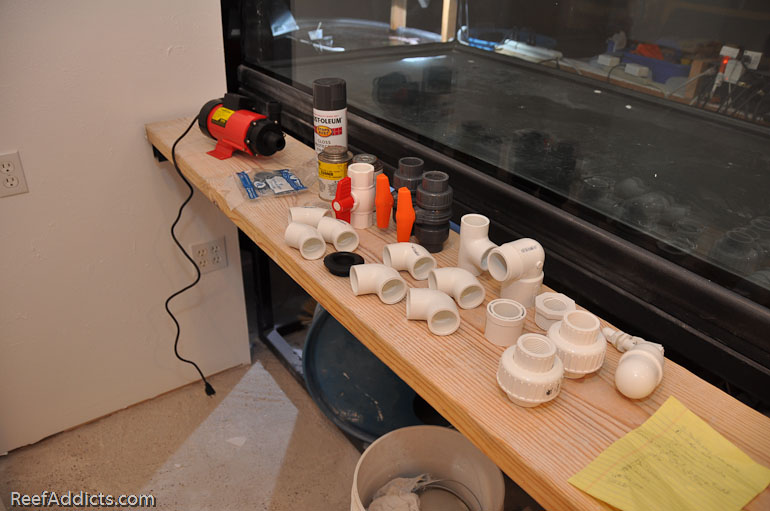
While plumbing, everything was easily within reach.
Once the woodwork is installed, I will still use the walkboard from the front side of the tank. By removing the panels that cover the two accepting holders, it can be installed easily. Here’s a video showing how I can use it from either side. I’m very careful not to slam it into the tank, which would otherwise shock the fish with that impact.
[stream provider=youtube flv=http%3A//www.youtube.com/watch%3Fv%3DXZRuNVKkVY0 img=x:/img.youtube.com/vi/XZRuNVKkVY0/0.jpg embed=false share=true width=640 height=360 dock=true controlbar=over bandwidth=high autostart=false /]


0 Comments