So you want to setup your first Saltwater Reef Aquarium?

Congratulations on taking your first step into the wonderful world of reef aquatics. Owning and managing a reef aquarium is an incredibly rewarding hobby, full of learning and adventure, and we would like to help make your journey as fun and successful as possible.
In this guide we will provide you with the basic concepts needed to get started and point you towards many great resources you can use to learn about all of the things needed for a healthy tank.
But before we begin, let’s review some basic suggestions for owning a tank.
Patience, Patience, Patience. Things on the natural reef change very slowly, so if you see something unusual in your tank you need to determine if this is something that requires immediate action or if you should wait a day or more to see if things improve. This is a very hard part of the hobby, but the general consensus is that doing things slowly will benefit the aquarium inhabitants
The solution is dilution. When dealing with aquatic animals, water quality is one of the most important things to monitor. If you make a mistake related to the water quality, the easiest solution is to “dilute” the water with a moderate water change. We will talk more about water changes later in this guide, but doing a water change is equivalent to opening a window in your home if you accidentally burnt popcorn in the microwave. Changing out the air/water is a temporary solution for a sudden problem.
Flow, Temperature, Chemistry, Light, in that order. If you suddenly lose power or have a major system or equipment failure, the most important thing is to get the water moving to provide oxygen to the tank. After that issue has been resolved, ensure that the temperature is within reasonable levels, then make sure the chemistry has not fluctuated wildly. Lastly, focus on getting the lights back on.
What sort of aquarium do you want?
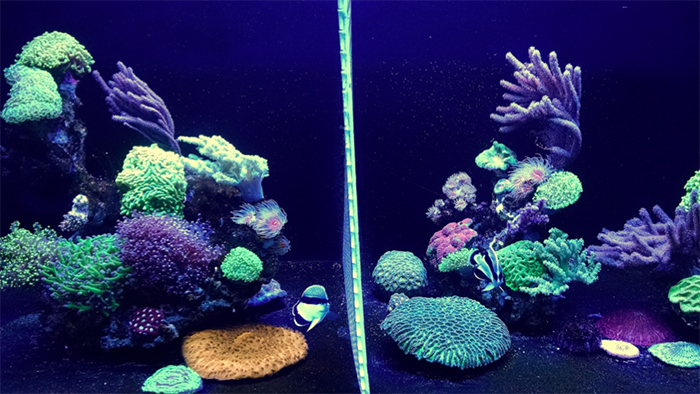
A tank with brightly colored coral, a small school of flashy fish, a bunch of wild invertebrates that are constantly amusing you? There are a number of different types of tanks that are known in the saltwater hobby:
Coral Reef – A coral reef tank includes live coral, fish, live rock, and live sand
Coral Reef with Bare Bottom (BB) – A coral tank that does not include sand. This is a somewhat cleaner or minimalistic look, but the lack of sand presents a few additional challenges for the novice aquarist.
Fish Only with Live Rock (FOWLR) – This type of tank uses live rock and sand for biological filtration and a nice decor, but minimizes or eliminates the use of corals as inhabitants. This is a good tank if you are interested in keeping fish who are known to eat corals.
Fish Only (FO) – Just fish in a tank with a few decorations. This is not very popular with the advent of live rock aquascaping.
Species/Biotype/Regional Tank – This type of tank is a reef tank that focuses on replicating a specific geographical appearance for example a Fijian reef biotype, or is focused on a certain species to highlight, like a hammer coral tank.
Other Tanks – There are a large number of tanks that are beyond the scope of this guide, including seahorses, octopuses, eels, aggressive fish, etc.
What size and shape aquarium do you want?
Aquariums come in a number of different shapes and sizes, and you can even have someone build a custom shape for you. The most common shape is the rectangle or cube, but there are circular, bowfronts, edge tanks, and more. The easiest tank shape to manage is a rectangle, all of the sides are flat and this makes it slightly easier to clean. You don’t want a tank that is too deep or you will have trouble putting your arm into the tank to arrange livestock.
Where will you place the tank?
An aquarium is extremely heavy. Water weights 4 pounds per gallon, so a small 10 gallon nano tank will weigh at least 50 pounds with equipment attached. You want to place the tank in a located where it is not going to get bumped as people walk by, with a strong floor, plenty of room around it so you can view the tank as well as work on equipment, and access to a nearby sink.
Once you place the aquarium, it is incredibly hard to move it (if not impossible). So it is important to think through all of the scenarios before taking the final step of adding the water to the tank during setup.
You can calculate the total volume of a square/rectangle tank with this calculator. Sump and Tank Volume Calculator
Think about the tank inhabitants you want
Plan ahead. Choose which fish, corals, and invertebrates you want before you buy your tank. Research which animals are compatible, and in what order they should be added to the aquarium. Find out if one species of coral you want may eventually become a pest and compete with more desirable species. Put your fish in order of aggression and difficulty. More aggressive fish should be added last, and more peaceful fish should be added first. Species that are delicate or have special feeding requirements like Mandarinfish should be added after the aquarium has been stable and established for a long period of time and you have enough experience and research to attempt them. Plan your aquarium design around the species you want to keep.
Should you buy a new or a used tank?
Many new aquariums come with a warranty. If they are faulty and break or leak, your aquarium may be replaced, but the livestock is not guaranteed by the aquarium manufacturer. Read reviews to find out if a particular brand or style is known for failing.
Used aquariums are nearly always sold as-is. While most used aquariums don’t fail, it is a risk to consider. Each time an aquarium is filled and drained, the silicone seal is put under pressure and then the pressure is removed, sometimes causing it to leak or split at the seam. Acrylic tanks scratch much more easily than glass, and used acrylic tanks are typically scratched and foggy. Very large used glass aquariums can often be found for a low cost because of the great effort involved in moving them. Acrylic tanks are much lighter and easier to move, but cover it to ensure it doesn’t scratch.
What size aquarium should I buy?
Choose the largest tank you are able to accommodate and afford. Measure the area you want to place your tank and make sure to give yourself room to work around the tank. Don’t put the tank flush up against the wall – splashing salt creep isn’t good for your paint, and you want to be able to reach behind the tank should a fish or object fall behind it. Make sure your floor is fairly level and reinforced enough to hold the size tank you want.
What does Reef Ready mean?
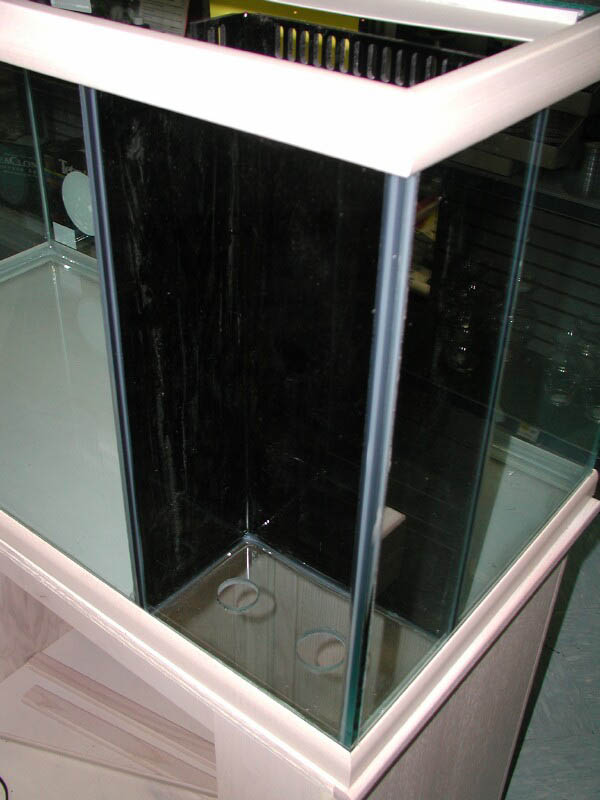
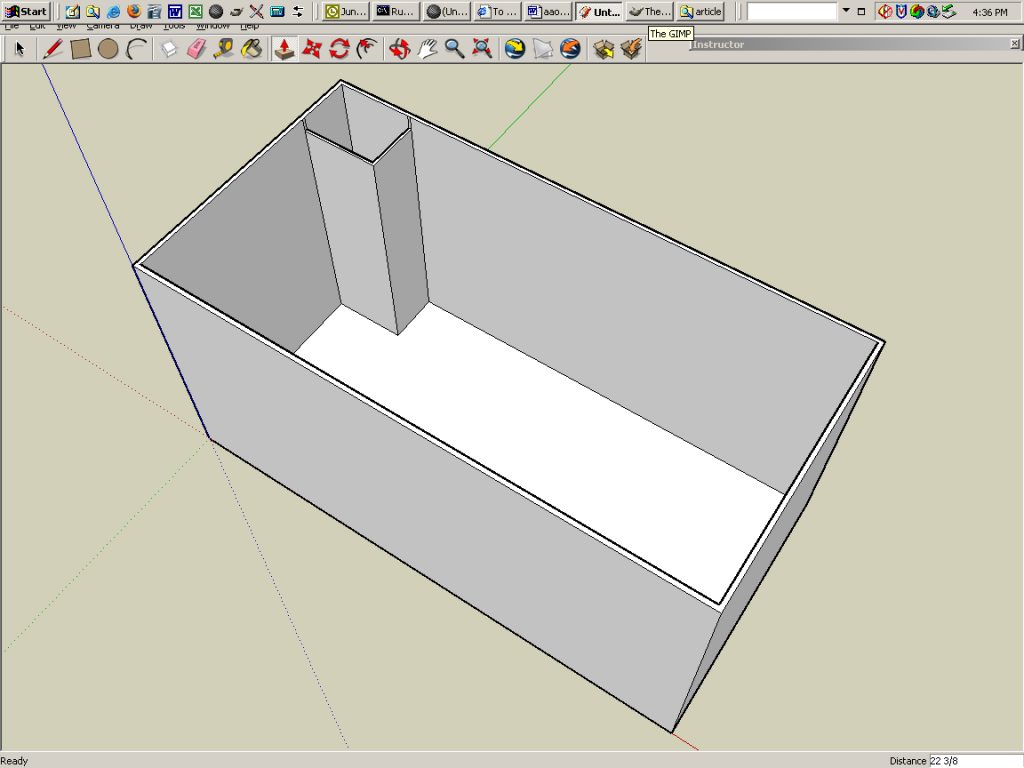
An integrated overflow is a key part of a “reef ready” tank.
Reef ready aquariums are drilled in the bottom and have a built in overflow box and PVC pipes that carry water to the sump below. A return pump in the sump returns the water to the main aquarium, and the cycle repeats. Some tanks may be drilled by the consumer in the back if the glass is not tempered, but this usually takes some practice and expertise. Nearly all reef keepers recommend drilled reef ready aquariums for saltwater and reefs. Some aquarists with tanks smaller than 30 gallons choose not to buy reef ready tanks because they are easier to maintain with frequent water changes than large systems. All-in-one aquariums like Bio cubes have a chamber in the back that acts like a sump. If your aquarium is not reef ready, you can buy a hang on the back overflow box that uses gravity to feed water to the sump, but they are more likely to lose suction and fail than a drilled aquarium. Use an aqualifter pump with the hang on the back overflow box to constantly remove trapped air bubbles, and make sure your tank never loses power during a power outage with a backup generator.
Required Equipment
It is hard to say exactly what is required, but this list represents a “bare minimum”:
- Aquarium – Glass or Acrylic
- Aquarium Stand
- Heater (keeps the water at the proper temperature)
- Thermometer (some heaters have integrated thermometers but it is best to have a separate one to check)
- Powerhead (circulates the water in the main tank)
- Salt (a good salt mix)
- Water (RODI is preferable)
- Test Kits (you need some basic test kits like Ammonia, Nitrate, Nitrite)
- Lights
- Power strip to plug everything in
- Buckets, towels, hoses, tank glass scraper
Note: Prevent fires
Use only GFCI power outlets and power strips made for use in damp conditions to plug in your aquarium equipment. Always create a “drip loop” in the power cords so any water siphoning down the cord does not reach the power strip. If you have a canopy don’t house light fixtures that give off a lot of heat like metal halides. Do not house equipment like chillers which give off a lot of heat inside enclosed furniture. If you must, cut large holes in the sides and install fans. Never allow water to splash or collect on your non-waterproof electrical equipment or lights. Observe equipment daily for failure or breakage and service and clean pumps, lights, and all equipment often. Don’t overload your circuit. Some aquarists with very large aquariums with a lot of electrical equipment hire an electrician to install a dedicated, secure electrical line just for their aquarium.
Aquarium Lighting
There’s not just one type of aquarium lighting that is “best.” You may hear many different opinions, but only you can decide which type of lighting will work for your needs. Some aquarists even choose to run a combination of metal halide, T5, or LED lighting for optimal coloration and growth. The stock t8 tube lights that come with a tank are not bright enough to grow most corals and will need to be replaced with a reef fixture. Compact fluorescent fixtures are inexpensive, but may not be bright enough for deep aquariums or for corals with high light requirements like SPS corals. T5 fixtures are a bit brighter and more modern than CF, but are still not bright enough for deep aquariums. Any money saved on these less expensive fixtures will be spent on replacing bulbs every 9 – 12 months. Metal halide fixtures are one of the brightest fixtures on the market, but they also run the hottest and use the most electricity. They have come down in price since LED lighting technology has advanced, and many aquarists are loyal to metal halides for what they say is better growth and coloration of their corals. 10 years ago LED lighting was not yet bright enough for growing most coral, but today that is far from true. LED lights are now able to produce light that rivals metal halide in PAR (brightness). Some other benefits of LED lighting are the low cost to run them, the low heat output, and small size. Newer LED fixtures come with bells and whistles like complex timers, the ability to change color and intensity, controlling them from your computer, and even simulated dawn/dusk and lighting storms. Many aquarists are attracted to LED’s for their intense actinic blues that make corals fluoresce like no other type of lighting, but others say this color and fluorescence is unnatural and unattractive.
Filtration
There are a large number of filtration methods for saltwater aquariums. The most common methods for beginner tanks are the following:
Live Rock & Sand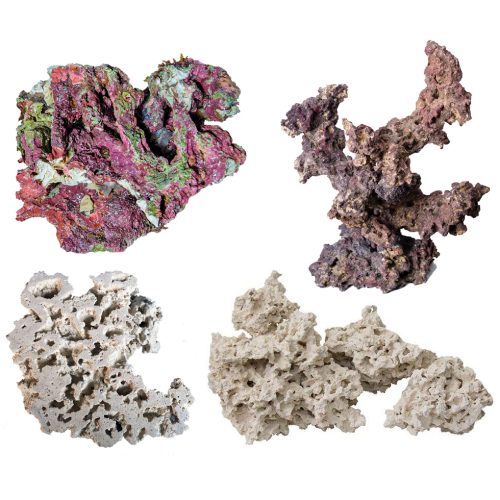
The most common method of filtration, live rock and sand contain microscopic bacteria which convert ammonia and other compounds into slightly less bothersome chemicals. Live rock is a stabilizing element in the aquarium, meaning it will slow down some major problems. For example, if a fish dies the bacteria will consume most of the ammonia in the water and convert it to Nitrate/Nitrite, however there is still a need to remove the nitrates via seperate method. Live rock also contains small zooplankton animals that will actively eat waste compounds like fish excrement and break them down into smaller pieces. Live rock can also frequently introduce pest animals into the aquarium so it is important that the rock is sourced properly.
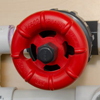
Protein Skimmer
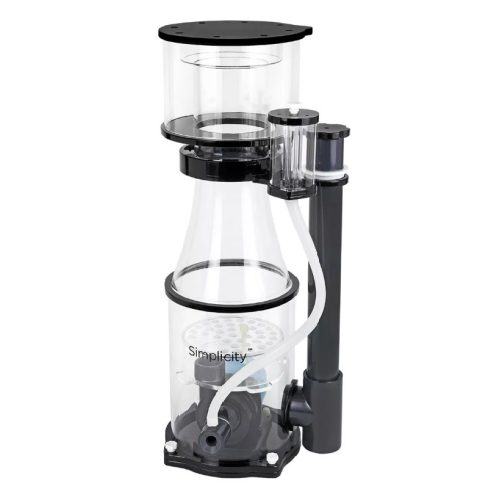 This is a plastic tube or cone that has a powerful pump at the bottom. When the pump is activated, the water swirls around inside of the device causing a large amount of oxygen to be mixed with the water. This mixture produces bubbles which accumulate at the top of the chamber and then overflow into a collection cup. The bubbles contain various proteins that are a common form of waste. You empty the collection cup every few days and effectively remove these compounds from the water. A skimmer typically requires a “sump” which is a small tank that sits underneath the main aquarium, although there are skimmers that are designed to be connected to the back of the aquarium (Hang On Back HOB Skimmers)
Canister Filters
This is a closed chamber that contains various filters including sponges, activated carbon, nitrate reducing rocks, and other components. Every couple of weeks you take the chamber off the tank, remove the media, clean the chamber, replace the media, and reinstall it. Because this system is generally closed, the filter can become dirty or clogged which will have a negative effect on water quality and the health of your animals.
Media Chambers
These are plastic tubes filled with filtration media that the tank water runs through. An example would be activated carbon. The saltwater runs through the carbon and certain waste products accumulate on the carbon. The carbon needs to be removed frequently and replaced.
Water Changes
This is the simplest method of filtration, but rarely used on its own. An aquarium can have waste products removed by simply removing water and having it replaced with freshly made saltwater. Water changes are an important and required part of maintaining a reef aquarium. By changing water you are able to decrease the level of waste products in the water and add back compounds which may be depleted by the natural biological processes of the animals in the tank. Moreso than any other filtration method, water changes are the best way to resolve issues with your aquarium.
Items Needed for Water Changes
- Large bucket for mixing the water with the salt
- Powerhead/pump for helping to mix the salt when you add it to the water
- Tubing/pump for adding the water back to the tank
- Bucket for holding the wastewater that you drain from the tank
- Tubing for draining water from the tank
- Heater for warming the new water before adding it to the tank
- Refractometer/Hydrometer for testing the Specific Gravity before adding the new water to the tank
- Towels because accidents happen
Algae/Chaeto Reactors
These reactors hold live marine algae that can help decrease the levels of nitrate/nitrite in the water. As the algae grows, it consumes these waste products, the aquarist can then easily remove the grown algae. These reactors require lighting for the algae to grow.
Never dispose of algae or any living thing in the toilet or normal waste management. If you need to dispose of algae or livestock, place it inside a ziploc bag and leave it in your freezer overnight. You can then place the bag in your normal trash. DO NOT FLUSH IT DOWN THE TOILET.
Sumps
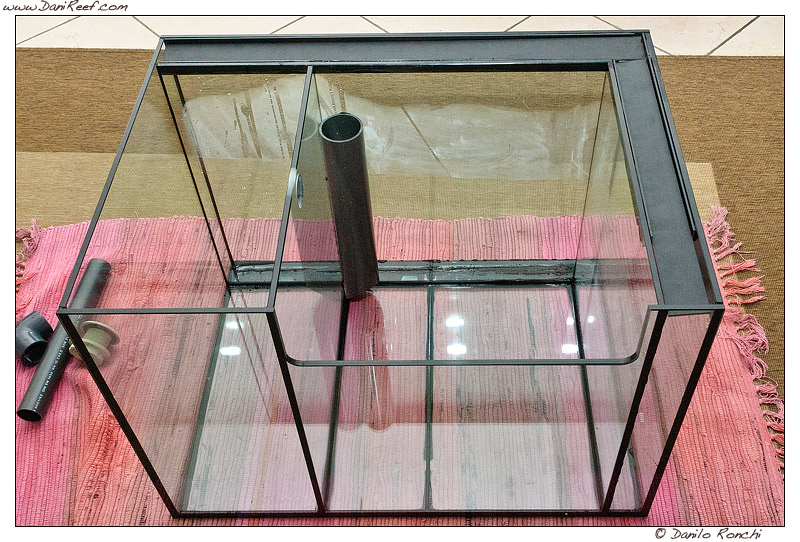
If your tank is not reef ready but is small, you can sometimes get away with a hang on the back filter or a canister filter. Maintaining these often is absolutely necessary to prevent organic buildup and algae blooms. If you have a reef ready aquarium, choose a large sump with enough chambers. Make sure once the sump is in place you still have room to work inside the stand and reach bulkheads and pipes in case you need to service them. Some sumps have a hole drilled in the side where you can add an external return pump. If not you can use a submersible return pump.
The first chamber in a sump usually houses filter socks – long, white polyester material bags with a hard plastic ring built in to keep it in place. All of the water flowing into the sump should flow through these bags first to catch any debris, sand, and even animals to prevent them from being sucked into any pumps. Filter socks may be washed by hand or alone in the washing machine on hot with bleach only and no soap. Dry them completely before replacing and do not use a sock that still smells like bleach. Continue rinsing until the bleach smell is gone; you may use a dechlorinator if you used too much bleach and it’s not rinsing out. Keep enough socks on hand so you can replace them before they become clogged and overflow. For some tanks, this needs to be done daily or a few times a week.
You will likely want to add a protein skimmer which removes organic waste or proteins before it enters the nitrogen cycle and becomes nitrate.Choose a skimmer that will fit inside your sump and make sure you will have room to easily remove the cup for cleaning. Nano skimmers are available for smaller tanks. They’re not a necessity on tanks under 30 gallons, but they help keep the organic nutrients lower.
Another chamber in the sump can house Chaetomorpha algae with a small light hanging above it; this is called a refugium. The algae exports organic nutrients and prevents pest algae from growing in your aquarium while providing a safe home for beneficial microfauna like copepods and worms. Some aquarists use an “algae turf scrubber” – a screen with water gently flowing over it to grow special algae under a light to export nutrients.
Flow: Powerhead & Pumps
Your return pump should pump at least 10x the volume of the tank per hour but not be too strong for your sump and overflow box to handle (check the owner’s manual for this info). The flow of a return pump is reduced for every foot it needs to push water vertically up to a tank (this is called “head height”) and with each turn in the plumbing. If the return pump is submersed, head height is measured in feet from the water surface in the sump to the top of the aquarium. If it is an external return pump, measure head height from the pump output to the top of the tank. Most return pumps include a chart that tells you how many max gallons per hour that pump will pump at each foot of head height to help you choose the right size pump.
Powerheads can be used inside the aquarium to increase flow and target areas of the tank that need more flow. Re-assess flow needs every 6 months or so, since larger corals impede flow. Adjustable powerheads like the EcoTech vortech and Maxspect Gyre are perfect for reef tanks that need varying flow. Wavemakers and SCWDs are great for SPS dominated reefs that need turbulent flow. Maintain and clean powerheads and pumps often, as buildup or broken impellers can cripple the pump’s flow output.
Live Rock
Live rock has many functions in a reef aquarium. It is the physical structure, substrate for growing live corals, and the primary filtration. It provides the surface area for the nitrifying bacteria that consume toxic ammonia. A reef tank without live rock would be considered to be experimental and unusual. Plan on adding approximately two pounds of live rock per gallon of water, depending on the density of the rock and desired aquascaping result.
What is the difference between cured and uncured live rock? When live rock is harvested, it sometimes sits on the beach for a period of time and then has a long travel time before reaching the retailer. The bacteria, sponges, algae, and other life on the rock dies back and needs to be removed or exported through water changes before being added to the display tank or it can cause a deadly ammonia spike. Uncured live rock can be cured in a separate aquarium, bucket, or other food safe vessel with a heater and a powerhead for movement. Change the water frequently to export the nutrients. Once the ammonia and nitrite levels are stably measuring zero parts per million, the live rock is cured and ready to move into the display tank. If the aquarium is very large, some reefers may choose to cure the rock right in the display tank.
Live rock from a local fish store is often already cured. Ask the store employee if the rock is cured. If they’re not sure, ask them how long it has been in the tanks and to check the ammonia. When in doubt, always quarantine and test your live rock before putting it in the display. Any time you get live rock shipped to you, even if it is advertised as cured, you should re-cure it. It’s also a good idea to dip your live rock in a super saline solution to try to remove any unwanted pests like mantis shrimp or coral eating crabs.
Live rock is graded by the size, shape, density, collection location, and the amount of coralline algae and other benthic life forms growing on it. Premium grade live rock is more porous, more colorful, and houses a greater variety of species. “Base” live rock is less expensive, less colorful, and is meant to be used on the bottom section of the aquarium to prop up the more attractive pieces of rock. Some aquarists use dry base rock.. It doesn’t have any life on it at all (including pests, which is a bonus) and may take more time to culture the necessary nitrifying bacteria. It tends to be the least expensive type of rock.
Another exciting type of live rock is sustainable, eco-friendly man-made rock. Maricultured live rock is made with aragonite chunks and cement then placed in the ocean for a long time to encrust with bacteria and life forms. Another type of man-made live rock is made with aragonite and cement mixed with purple dye to simulate coralline algae then cured in large indoor vats and seeded only with beneficial copepods and other clean up crew animals. Man-made rock tends to be a bit more dense and heavy than natural live rock, but the benefits speak for themselves.
Aquascaping with Live Rock
Arranging live rock and corals in a reef tank is an art, but you also need to design the structure to suit the needs of your fish. Create plenty of caves and hiding places for your fish to have their own territories while keeping enough open water for swimming. Some fish need deep sand for burrowing, and some fish like eels may appreciate some hidden PVC piping under the rocks. Try to envision where you plan to place your corals and give them enough room to grow and expand in the coming years. Larger, bare rocks make a good base for more colorful rocks and rocks that have flat areas or indents that can support corals. Branches can be accents or bridges, and some corals can even be glued to branch rocks and encrust them.
If you have a small tank and few pieces of rock, they may be simply stacked. Large aquariums with complex and unstable rock work may need to be secured with epoxy and acrylic rods inserted into holes drilled into the rocks.
Some reefers choose not to use sand or substrate in their reef tanks; these are called “bare bottom” reefs. These reefers say it is easier to keep the bottom of the tank clean and the organic nutrients lower. Others choose to use a deep sand bed that is so deep, the bottom layers lack oxygen and favor the growth of nitrate-eating anaerobic bacteria. Most choose a shallow sand bed for aesthetics and for animals and fish that sleep or burrow in shallow sand like pistol shrimps and and some wrasses.
Saltwater
Prepare the water ahead of time in a large vessel like a rubbermaid trash can or other food grade container. Some people who have very large reef tanks choose to mix saltwater right in the tank before putting the live rock in. The vast majority of reefers use Reverse Osmosis or RO + Deionized water. You can buy this at your LFS or the grocery store, or you can buy a RO or RODI machine and make it yourself at home. A few reefers choose to use tap water, but there are a lot of drawbacks. Even if you have requested an analysis from your water authority and your tap water tends to be very low in phosphate, nitrate, chemicals and total dissolved solids, tap water is unpredictable. The composition of tap water varies depending on the season, storms, rain, farm runoff, dams, etc. Sometimes the water company uses harsher chemicals to clean the pipes that won’t hurt humans, but can destroy corals. Tap water can be contaminated during work on the pipes or road work. It could work for you for years, but one unpredictable event can crash your tank.
Fill the tank about halfway and gently put the sand in. Use a razor blade to cut a slit in the entire top of the bag. Submerge the bag and carefully slide the sand out without creating too much dust. Wait until your tank has all the rock and sand in it before filling it all the way. Pour or pump the water in slowly so you don’t disturb the sand. Pouring the water over a large plastic salad bowl submerged in the tank can help prevent the sand being disturbed.
Mixing Saltwater
Start by filling a food safe container or bucket with RO or RODI water. Always follow the manufacturer’s instructions for the particular brand of salt you are using. Generally, you need about a half cup of salt per gallon of water to make water with a salinity of 1.020. Use a powerhead or pump to mix the salt with the water. This can take about an hour depending on which salt mix you use. Many reefers like to let the saltwater mix overnight or for a day before using. Put a heater in the container to match the temperature to your aquarium, usually 78 degrees for a reef. Check the temperature and salinity before using the water. Use a calibrated refractometer (preferably not a hydrometer) to test the salt level (Salinity).Desired Water QualitySaltwater aquariums typically have water that is within the following tested ranges. This is accomplished by adding powdered or liquid salt to purified (RODI) water. Once the saltwater has been made and added the to the tank, the aquarium owner is responsible for testing the water to make sure it is still within these ranges:
Salinity – 35ppt or 1.026 Specific Gravity (SG)
Alkalinity – 8-12 dKH
Calcium – 350-450 ppm
Magnesium – 1200-1400 ppm
Phosphate – <0.2ppm
Temperature – 75 – 80°F (23.5 – 26.5°C)
Test Kits
Test kits are required equipment for taking care of a saltwater aquarium. You can buy regular disposable test kits, electronic testing probes, and full blown automated testing systems depending on your needs. The test kits are used to measure the parameters listed above, as well as to track the accumulation of waste compounds such as Nitrite, Nitrate, and Ammonia. These three items are part of the nitrogen cycle.
Cycling the Marine Aquarium
“Cycling” an aquarium basically refers to culturing enough good nitrifying bacteria to process all of the ammonia and nitrite a fully stocked aquarium will produce. Fish produce ammonia through normal respiration and from metabolic waste. Decaying food and organic material and waste from inverts will also produce ammonia. Nitrifying bacteria consume ammonia and form nitrite as a byproduct. Other types of bacteria then convert the nitrite into nitrate, which is exported through water changes, as food for algae, or through anaerobic bacteria and carbon dosing. The bacteria that consume ammonia and nitrite are benthic, meaning they form a biofilm on the surfaces of rocks, filter, and everything in your aquarium. You may notice the aquarium water becoming cloudy during the cycle. This is normal. What you’re seeing is a “bloom” of nitrifying bacteria. Live rock is an excellent substrate for these nitrifying bacteria because of its porous nature and the large amount of surface area it provides.
Cycling a reef aquarium is actually a little easier than cycling a freshwater aquarium. If you are using cured live rock, which already houses nitrifying bacteria, it won’t take long for your aquarium to process ammonia and nitrite. If you are using dry rock, it will take a little longer, and you’ll need to dose either bottled pure ammonia (check ingredients for dangerous surfactants) or organic material. Test the ammonia, nitrite, and nitrate levels often. When you see the ammonia and nitrite are zero ppm, you may add (preferably previously quarantined) peaceful, hardy fish in small numbers. Don’t try to stock your aquarium fully at this early stage, as the amount of ammonia produced by the fish will outpace the growth of the bacteria needed to process it. Go slowly and only add small numbers of fish at a time.
If you find ammonia in your aquarium after adding fish, you may notice a drop in the pH. It’s very important that you never try to manipulate the pH while ammonia is present. Ammonia will naturally cause the pH to be lower. The lower the pH is, the more ammonia is converted into tubeless toxic form ammonium. If you try to raise the pH, it will be converted into toxic ammonia and kill your livestock quickly. If you have a low level of ammonia in your aquarium of .25 ppm or less, simply use an ammonia detoxifier like amquel or prime and feed the fish less food. If the ammonia is higher than .5 ppm, you may have overstocked or stocked the aquarium too quickly. Do small water changes daily along with using the ammonia detoxifier and feeding the fish sparingly. If the ammonia is very high, it may be necessary to remove the fish and put them back into quarantine while you sort out the cycle. Ammonia can reach levels that are so toxic, even the nitrifying bacteria that rely on it will die.
Once your aquarium is cycled and you’ve added some fish, you may start to notice some brown dusty “algae” called diatoms growing on the more bare rocks and substrate. This is normal when an aquarium is new. The hardy, opportunistic diatoms are consuming nutrients and squatting in real estate before the more desirable benthic life forms move in and take up residence. If you keep your organic wastes under control, it should disappear in a few weeks. If it doesn’t go away, you may need to add another stage or two to your water purification system. Diatoms feed on silicate, so if your tap water is high in silicate, you can buy an RO system that helps filter out silicate.
Selecting Fish
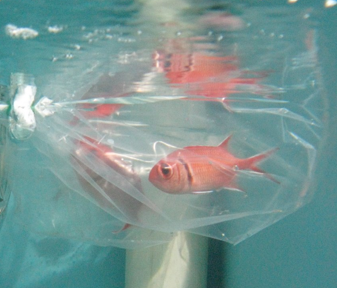
Acclimating Fish
When you have purchased new fish to add to your aquarium, you are ready to acclimate them. Acclimation is the process of slowly preparing a fish for introduction to the aquarium. This serves a number of different purposes:
- Get the fish slowly adjusted to the water conditions in your tank
- Get the fish and other livestock in your existing tank adjusted to their new neighbor
- Keeping your aquarium free from pests (Quarantine)
These articles are very helpful for understanding the role of acclimation and how to do it properly: