In my last installment, I asked for ideas of things to 3D print for saltwater reef aquariums. Kevin Erickson, Vice President of the Marine Aquarium Societies of North America, threw out the challenge of 3D printing a venturi injector for a protein skimmer.
-

- Kent Marine Black Turbo Venturi – 3/4 inch, available from Marine Depot for $20.
Venturi injectors, when coupled with a good pressure pump and air source, are a good way to inject fine bubbles of air into the reaction chamber of a protein skimmer. The way they work is a high pressure jet of liquid is forced through a small orifice in the injector. Just past this small orifice is an air source that allows air to flow into the injector. When the high pressure jet of liquid shoots past this air source, it pulls some of the air in as the liquid shoots past the hole. Tuned just right, this leads to a very fine bubble size within the protein skimmer reaction body.
-

- Air being sucked into a venturi/injector – notice the thousands of small bubbles present after the suction port. From ozoneapplications.com.
A quick search of Thingiverse yielded two venturi injectors. One was for steam injection and the other one was for air injection but needed printed in three parts. The pipe for the steam injection model was too narrow in diameter so that one was excluded. My preference is to design something so it doesn’t require multiple parts and is parametric, meaning I can change a variable and the model adjusts itself accordingly, thus I decide to design my own.
It just so happened I had an old Red Sea Berlin protein skimmer modded years ago with a 3/4-inch Kent Marine Black Turbo Venturi powered by a Mag7 submersible aquarium pump. I had purchased this venturi injector from Marine Depot as at the time they were the only store that carried it. This mod worked rather well on my 30 gallon aquarium before I took the tank down three years ago. I pulled the Kent venturi off the skimmer, took some measurements, and went to work in my modeling software. 30 minutes later, here was the result:
-

- A model of the venturi injector. The part is oriented vertically in the direction that it will print on a 3D printer.
The venturi injector was pretty easy to model all things considered. When one thinks about it, a venturi injector is nothing more than a series of hollow cones and cylinders. Combine them in the right way and you have a venturi injector. Some of you may wonder what the rectanglar piece is under the air port. This is support material for the air port which is printed sticking straight out from the injector. Without this support, the air port would not print properly and when printed this piece is cut away from the part.
One of the problem areas I have with 3D printing is printing narrow pipe threads due to my particular model of 3D printer. While I can print pipe threads, they are messy to clean up and sometimes problematic to seal properly from water leakage. I opted instead to use off-the-shelf 3/4-inch PVC threaded couplings for attaching the venturi injector to the pump and protein skimmer. I used one 1/2-inch slip (F) to 3/4-threaded (M) and one 1/2-inch slip (F) to 3/4-threaded (F) which cost me ~ $2.50 at my local hardware store.
I then 3D printed the venturi injector on my Makerbot Cupcake:
-

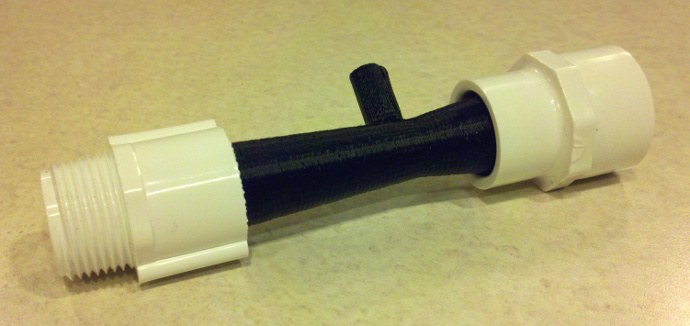
- The unassembled venturi with PVC fittings ready for gluing.
Assembly was simple. Add PVC cement to the couplings and slip the venturi into them and wait. The fit was very snug into the slip fittings and the PVC cement worked well at joining the parts.
-

- The assembled venturi injector ready to screw into the skimmer and Mag7 pump.
The weight after printing was 14.1 grams. With ABS cost at $53 per 2 kg, the part ended up costing me $0.37 not including electricity. The retail Kent venturi available from Marine Depot costs $20 before shipping yielding a net savings of $17-$20 if I factor in shipping.
Here is the final result completely plumbed together:
-

- The assembled skimmer, venturi injector, and Mag7 pump.
I have not yet tried it on a complete saltwater reef aquarium so I cannot speak to its effectiveness compared to the Kent version. However, I have tried it in a bucket and it works well at injecting air, which proves proof-of-concept.
For those of you that have a 3D printer at your disposal, I have published the design on Thingiverse for others to use in their projects. Print and enjoy! In addition, here is a link to all of my other 3D printing articles in case you would like to check out what I have already designed and printed.
In my next installment, I will talk about a 3D printing challenge I received while at the Marine Breeding Initiative Workshop two weekends ago.
Give me a challenge: what would you like to see me print? I want your ideas!


Hello,
I’m reef tank passionate man, living in France. I need your help about material injecto venturi you use for make skimmer you have. Please tell me if you can give me name of maker for venturi injector ?
I d’ont have the exact models I need, so I search maker.
You will be so kind to help me.
Thanks a lot.
Regard,
Alix Tételin