

 i am trying to build a overflow and i have it working fine right now. however, when i simulate a power outage ( by turning off the return pumps until the overflow stops sending water to the sump) then turn on the pumps again i cannot get the overflow to start siphoning water again. Please help would be greatly appreciated.
You are using an out of date browser. It may not display this or other websites correctly.
You should upgrade or use an alternative browser.
You should upgrade or use an alternative browser.
overflow design
- Thread starter shane1101
- Start date
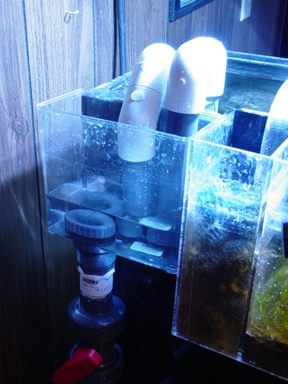
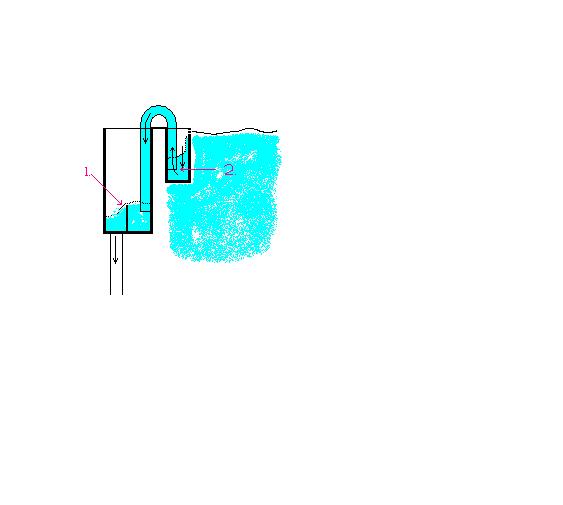
you must be loosing your syphon. First Let me classifly a few points in the overflow. The water first flows in the initial overflow in the tank. ( I say initial because there is another overflow in the outside part of the overflow.) Then it enters the skimmer chamber, before it is sucked by the syphon intake. It is very important to maintain water levels on each side of the syphon so that it does not break. After it goes up, over, and out of the tank, water than enters an external overflow box. In this box is a piece, a baffle, which the water must go over to flow out of the overflow and into the sump. The baffle in the external overflow box must have it's overflow point at a level which is above the bottom of the syphon intake's level, yet low enough to allow good flow. I try to make my overflows with a baffle which is half way between the initial overflows top lip and the syphon intakes level. This makes a good level.
If the baffle in the external overflow box cant keep water at a level above the syphon intakes level, when the water slows down the water in the external overflows box will continue to drain until one end of the syphon is exposed to air and the syphon breaks. Got it? I can post a diagram if needed.
If the baffle in the external overflow box cant keep water at a level above the syphon intakes level, when the water slows down the water in the external overflows box will continue to drain until one end of the syphon is exposed to air and the syphon breaks. Got it? I can post a diagram if needed.
Attachments
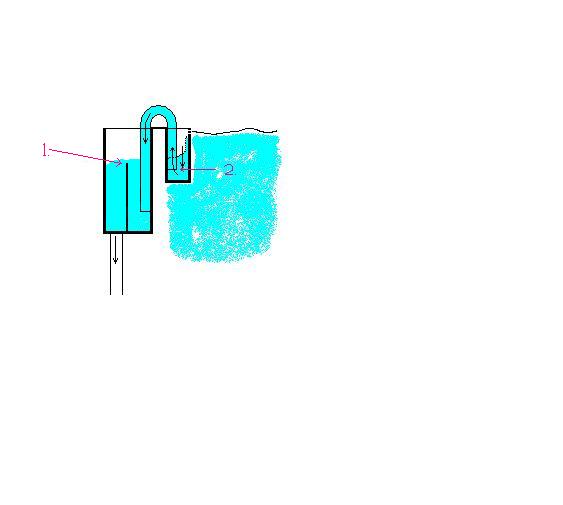
this is the bad one. Whatever the exact levels may be, the level of 1 must be kept above level 2. If not, your syphon will break because the syphon will continue sucking from the internal skimmer's cup until the water level is down to point 1...and it runs out of water so the syphon breaks. got it?
Attachments
I have a drawing on my home PC (am at work now). I will post it tonight if I remember.
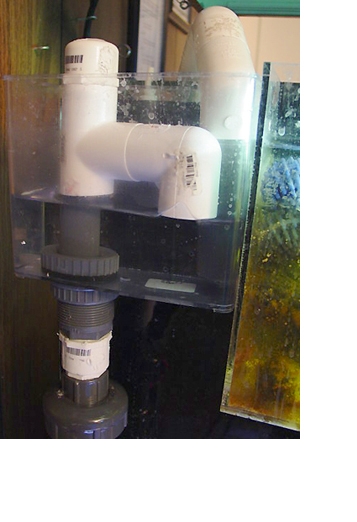
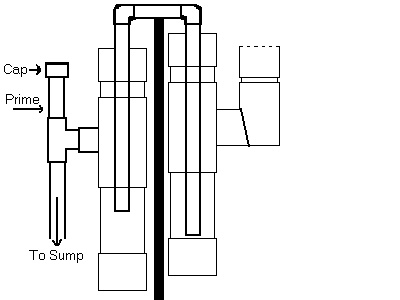
Basically I am using 1-1/2" PVC for the overflow, 3/4" PVC for the "U tube", and 1"PVC for the down pipe. This is the biggest one that I have made. It is derrived from the "willard overflow" that has been posted on some DIY articles. I used a 1-1/2" to 1" T for the entrance and exit of the overflow.
Maybe you can visualize it from what I have posted. I will try to post the pic tonight or sometime soon.
This is the plans for the last overflow that I made. I found plans on the net for a DIY Overflow by Larry Willard. Funny thing is that I can't find them any more. It is like they were pulled or something.
Anyhow, the elbow is something I added.
My latest model will not have the elbow for asthetic reasons.
The dimensions are relative. I am currently using 1-1/2" PVC for the overflow body, 1" PVC for the down pipe, and 3/4" PVC for the "U tube".
I would imagine you can go 2" and 1" for the U tube. I may upgrade. I want to be able to take my overflow apart at times so I used a bit of duct tape to put ring around the u-tube to hold it snug to the body, then I used silicon glue to atach it. I have found that silicon glue guns ( the kind used for arts and crafts) make a good quick way to glue things. The glue is safe, strong enough to hold but can be broken if necesary. However, I would not use it to attach sections of pipe. Use the PVC glue for sections that need to be permanent and you don't want to leak.
Attachments
Not sure what is going on here. I posted a jpg attachment from my home pc last night and can't see it while viewing from work today. It should be attached to my last post.
Do you still have to have a web site somewhere and link the image to this forum to view pics?
Do you still have to have a web site somewhere and link the image to this forum to view pics?
Now I see it...must be the way our proxy is behaving with cache.
Anyhow, the design is pretty basic. You can pretty much use any size of pvc as long as you keep the lengths of the pipes relative. I think the Willard design shows 6" and 8" for the sides of the U tube.
I found that the back tube has to be bigger vs the drop of the downpipe. Otherwise the force of the siphon seams to empty the downpipe when the return is shut off or depleted.
I could not show it in my pic, but I would turn the back half so that the pipes sit parallel with the tank so that you can get the tank as close to the wall as possible.
Sponsor Reefs
We're a FREE website, and we exist because of hobbyists like YOU who help us run this community.
Click here to sponsor $10:
