

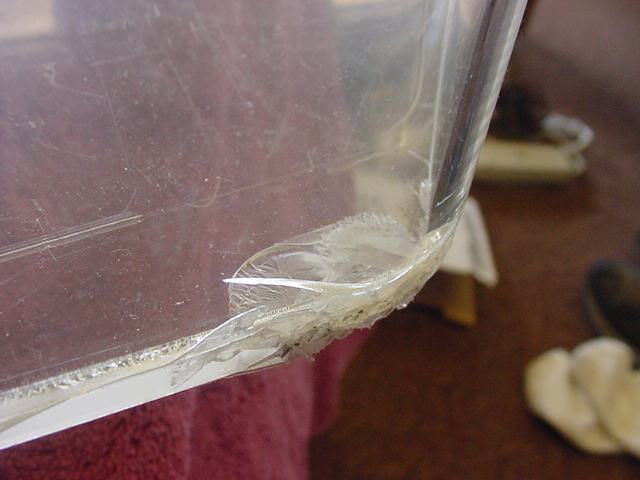
Have a USAq. 25FBH IFS that UPS damaged when I moved to Cali. Sweet little tank if I can still use it. I've never done any real acrylic work. It's been suggested that I drill holes at the ends of the cracks (to keep crack from spreading) and perhaps "glue" acrylic over the crack to patch? Hoping someone has some experience with such repairs. This is one of the bottom front corners of the tank. If fixed, it'll definitely have a DSB, so the looks of the repair job are not of much concern, just as long it holds water again. Any advice?

You are using an out of date browser. It may not display this or other websites correctly.
You should upgrade or use an alternative browser.
You should upgrade or use an alternative browser.
Need help fixing busted acrylic tank
- Thread starter jorcutt
- Start date
Yeah, reading though old posts on RC, Weld On 4 appear to be the way to go for sealing up the cracks themselves, but I'm not sure how to patch it since I'm dealing with a curved corner. I'd be afraid of the whole corner blowing out without a patch though?
btw Gary...good to see KS on here! I'm originally from Hutchinson!
btw Gary...good to see KS on here! I'm originally from Hutchinson!
First off, you'll have severe crazing on any repair you do, since this is a standard aquarium, and has been flame polised. What you will see is a network of surface fractures that will radiate out from the corner, because of the stress in the plastic from the polishing process. As soon as you apply a cement, these are going to appear.
It doesn't look like this is a linear break, more like it's a chip from a blow striking the edge of the piece where the edge form a sharp right angle. Is this correct? FWIW, this is why high-quality tanks and acrylic products have the edges rounded over during machining, forming a radius, rather than a right angle. That right angle edge is very notch-sensitive, and tends to be where fractures like this occur.
First and best option: file a UPS claim, and make them buy you a new tank. Those droids break everything, which is why I refuse to use them for shipping my products.
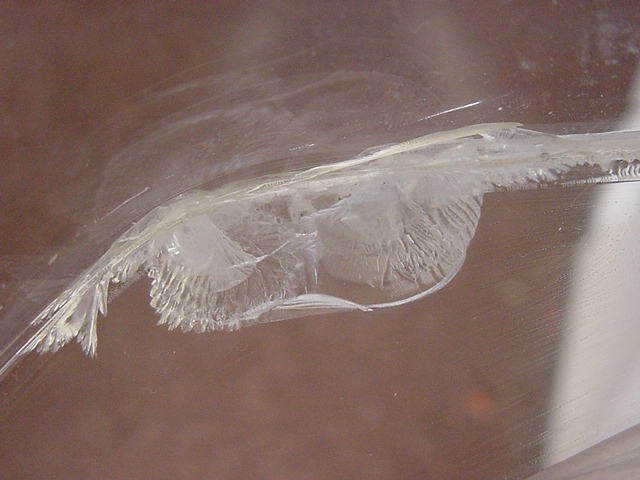
Second option: the repair is really going to risk making this worse, but it should be able to be done. Weldon #3 and #4 are both capillary solvent cements, which means they are not meant to do this kind of repair, and they have no gap-filling abilities. Likewise, cyanoacrylate is useless, as it won't bond long-term, and will mar the surface of the plastic. I can't really see the way the fracture is from the picture, and gluing on the corner will definately be problematic. Pouring #40 is an option, on the inside of the tank, which has not been flame polished, and should limit crazing. Take a couple more pics, macros if possible, up close and from different angles. Then I'll try to answer what you can do.
In all honesty, with a bottom fracture like this, I don't think I would trust a repair on it, especially on a tank made of thin acrylic like this one. The repair should be made to the outside, but the corner and polishing make this difficult.
BRIAN
BRIAN
_________________
Mercedes 600
It doesn't look like this is a linear break, more like it's a chip from a blow striking the edge of the piece where the edge form a sharp right angle. Is this correct? FWIW, this is why high-quality tanks and acrylic products have the edges rounded over during machining, forming a radius, rather than a right angle. That right angle edge is very notch-sensitive, and tends to be where fractures like this occur.
First and best option: file a UPS claim, and make them buy you a new tank. Those droids break everything, which is why I refuse to use them for shipping my products.
Second option: the repair is really going to risk making this worse, but it should be able to be done. Weldon #3 and #4 are both capillary solvent cements, which means they are not meant to do this kind of repair, and they have no gap-filling abilities. Likewise, cyanoacrylate is useless, as it won't bond long-term, and will mar the surface of the plastic. I can't really see the way the fracture is from the picture, and gluing on the corner will definately be problematic. Pouring #40 is an option, on the inside of the tank, which has not been flame polished, and should limit crazing. Take a couple more pics, macros if possible, up close and from different angles. Then I'll try to answer what you can do.
In all honesty, with a bottom fracture like this, I don't think I would trust a repair on it, especially on a tank made of thin acrylic like this one. The repair should be made to the outside, but the corner and polishing make this difficult.
BRIAN
BRIAN
_________________
Mercedes 600
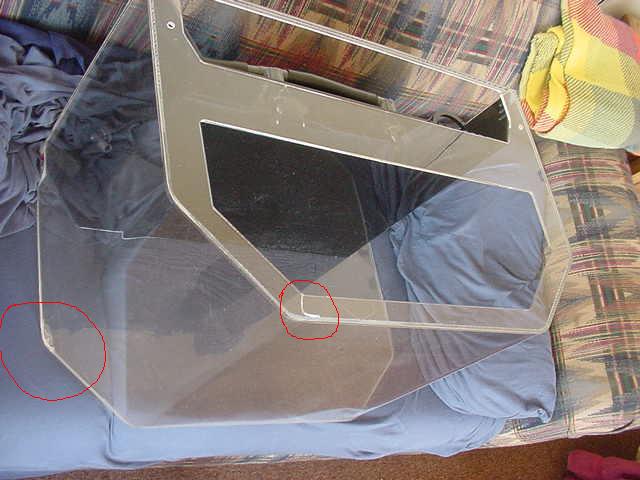
hmm...well, I guess I need to take some more pics. The busted corner is actually a curve, not a right angle. I mean, the bottom is a seam, so of course that's at a right angle, but I think all tanks are a right angle seam where the bottom meets the side, so I'm guessing that's not the corner you were talking about.
As for UPS...don't even get me started! I did actually file a claim with them 9 months ago, but they had to send some one out here to look at it, and they don't have anyone in my town. So after a month of phone tag, I got busy (read "I'm a lazy SOB") and didn't continually harrass the man to get him out here. Now it's too late.
Here's one more photo I took for UPS that at least gives you an idea of the shape of the tank (there's also a small crack on the top lip, but much easier to repair and less of a concern). I'll try to get some close ups this afternoon. THANKS for the help.
Attachments

hi.
I agree with fergy. The tank is damaged in such a way that it is very difficult to repair, since the crack is near the curved corner. The top brace is easy, but not the bottom.
For a newbie, it is not recommanded to tackle your tank damage. For professionals, it can be done, but the time and efford does not make this a good route to go unless he/she really don't have anything else to do. I guess this will take about an hour to put a acrylic patch on the bottom and the curved sides, but for a small tank like this, it is just not worth it.
Crazy Glue (tm) is not appropriate for perm. tank repair, as mentioned.
jorcutt":1kyvf102 said:It's been suggested that I drill holes at the ends of the cracks (to keep crack from spreading) and perhaps "glue" acrylic over the crack to patch? Hoping someone has some experience with such repairs. This is one of the bottom front corners of the tank. If fixed, it'll definitely have a DSB, so the looks of the repair job are not of much concern, just as long it holds water again. Any advice?
If you are going to try and fix it:
Drill the hole at the end of the crack
Thoroughly clean the area with water and allow to dry.
Glue on some small strips of acrylic onto the bottom of the tank such that they are touching the sides on both sides of the crack. Note that the strips must be higher than the drilled hole.
You should now have a small "chamber" that you can fill with Weld-On 40.
You may incure some crazing with this, this is the risk but probably your best chance at long term strength.
FWIW, this is the type thing that most shops will not guarantee anyway - certainly not with any replacement guarantee so why not give it a shot.
HTH,
James
Hmm...that's an interesting idea. Haven't heard anyone talk about that technique before. Have you used it, or just hypothesized? How deep do you think I should make my "chamber"? This seems like a really good idea to me. But again, I haven't done this type of repair, so ??? Got to do something though...it's a $600 tank (new), and my time's not THAT valuable!
hi.
I did something similar in patching up a hole that was drilled in a bad spot by previous owner.
$600 for a 25 gal tank? Wow!
James has more experience with acrylic than anyone else I know... maybe with the exception of fergy.Have you used it, or just hypothesized?
I did something similar in patching up a hole that was drilled in a bad spot by previous owner.
$600 for a 25 gal tank? Wow!
jorcutt":2s60253g said:Hmm...that's an interesting idea. Haven't heard anyone talk about that technique before.
Most tanks can be somewhat repaired by gluing a block along the crack, seeing as how this is a rounded corner, that method is not practical in this instance.
What you are doing is building up an area of acrylic around the affected area - essentially doing the same thing just with an acrylic resin vs acrylic blocks. It's about the only way I know of that works well without actually cutting off the bottom and gluing a new one on.
The only other issue may be how long the crack extends into the glue joint, if at all.
jorcutt":2s60253g said:Have you used it,
Yep, welcome to my job
FWIW, for the last 15 years I've been building acrylic tanks for public aquariums, casinos, universities, etc.. for a living and while I don't really care for making too many repairs - it is part of the gig.
jorcutt":2s60253g said:How deep do you think I should make my "chamber"?
I'd make it at least 1/4" above the top of the hole, the Weld-On 40 will evaporate about 20% by volume so you need to make sure you're covered.
You may also wish to put a piece of tape or something on the outside of the hole while pouring the Weld-On 40 just to block it from coming out.
Again, no promises, but if done correctly
")
HTH,
James
Thanks so much for the advice. Sounds good. Think I'm going with this method, then. I'll let you know how it turns out.
After I've finished the interior work, is there anything you think I should do to the exterior as added protection?
This is an IFS with the built-in skimmer, filtration, etc. (I didn't have pay retail for it, though!)
After I've finished the interior work, is there anything you think I should do to the exterior as added protection?
Robin Goodfellow":2le9vufa said:$600 for a 25 gal tank? Wow!
This is an IFS with the built-in skimmer, filtration, etc. (I didn't have pay retail for it, though!)
Sponsor Reefs
We're a FREE website, and we exist because of hobbyists like YOU who help us run this community.
Click here to sponsor $10:
