


A
Anonymous
Guest
EDIT: Read this entire thread before building it, please.
Ok, so it actually cost $13, but that included some airline and an airstone. I figure lots of folks have this laying around already. I wouldn't use this skimmer on anything larger than 20 gallons, and even that's pushing it. It is incredibly cheap, however, and it works.
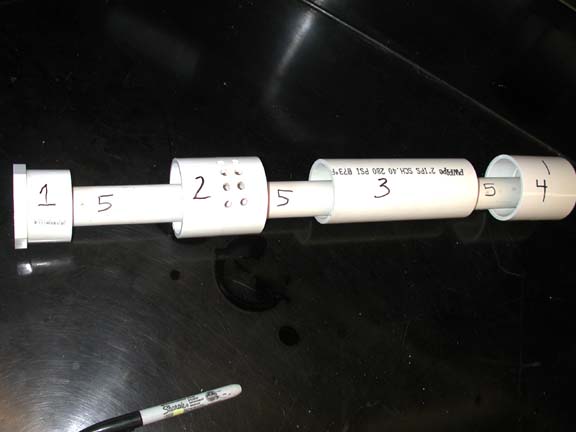
I labeled all the parts in the pics for easy reference.
1= 2" X 1" slip by slip reducer bushing. This is where water is drawn into the skimmer. Further mods described below.
2= 2" slip coupling, with a bunch a holes drilled in it. This is where the skimmed water will exit the skimmer
3= 2" pipe. This piece is 6" long, but can be any length that fits your setup.
4= 2" coupling.
5= 1" pipe. The length varies related to the length of #3. The top of the pipe should be even with the middle of part 4.
6= 2" X 1" slip reducer bushing.
7= 2" X 1" slip reducer bushing. 6 & 7 are glued together with PVC cement. It's necessary to sand down the sides in contact with each other before gluing. Further mods described below.
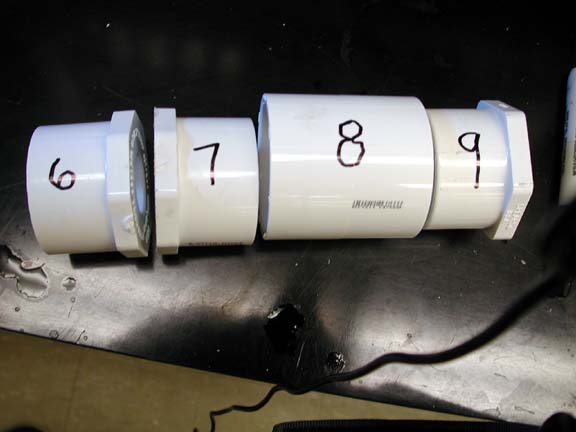
8= 2" coupling
9= 2" cap, with a couple holes drilled in the top.
There is also a very short section of 1" PVC pipe connected to part 7, inside the collection cup. This is the riser tube.
I hope the pics are all pretty self explanatory. The 1" pipe sits inside the 2" pipe. Parts #1 & 7 have to be modified. 1" pipe will have to be added on the "incorrect" side of the reducer bushings, so they have to be sanded down or drilled down with a dremel tool. The airstone sits inside part #1. I connected the airline to it outside the skimmer, and rubberbanded it to the main body. When emptying it, I just removed the collection cup (parts 6,7,8, and 9) and rinsed it all off in the sink.
Let me know if you have any ?s
Hope this helps, Matt.
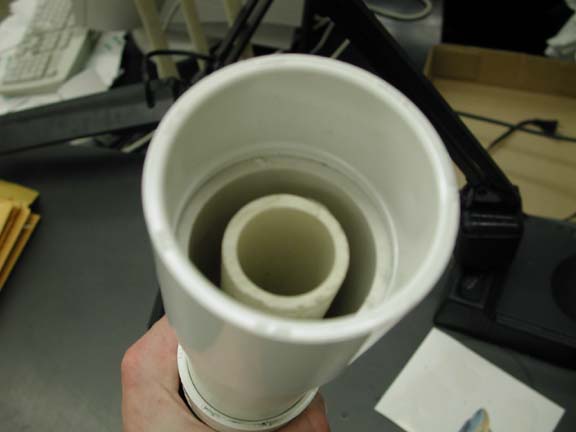
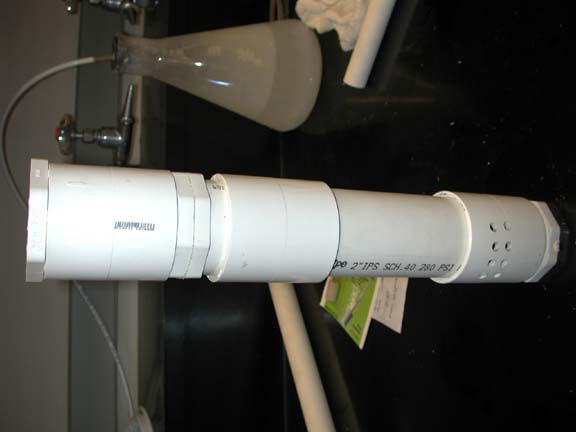
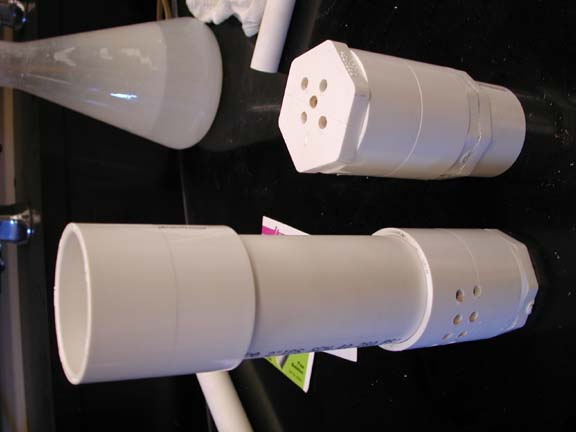
The first 3 pics are the entire skimmer, the collection cup removed from the main body, and looking down into the main body with the collection cup removed.
Ok, so it actually cost $13, but that included some airline and an airstone. I figure lots of folks have this laying around already. I wouldn't use this skimmer on anything larger than 20 gallons, and even that's pushing it. It is incredibly cheap, however, and it works.
I labeled all the parts in the pics for easy reference.
1= 2" X 1" slip by slip reducer bushing. This is where water is drawn into the skimmer. Further mods described below.
2= 2" slip coupling, with a bunch a holes drilled in it. This is where the skimmed water will exit the skimmer
3= 2" pipe. This piece is 6" long, but can be any length that fits your setup.
4= 2" coupling.
5= 1" pipe. The length varies related to the length of #3. The top of the pipe should be even with the middle of part 4.
6= 2" X 1" slip reducer bushing.
7= 2" X 1" slip reducer bushing. 6 & 7 are glued together with PVC cement. It's necessary to sand down the sides in contact with each other before gluing. Further mods described below.
8= 2" coupling
9= 2" cap, with a couple holes drilled in the top.
There is also a very short section of 1" PVC pipe connected to part 7, inside the collection cup. This is the riser tube.
I hope the pics are all pretty self explanatory. The 1" pipe sits inside the 2" pipe. Parts #1 & 7 have to be modified. 1" pipe will have to be added on the "incorrect" side of the reducer bushings, so they have to be sanded down or drilled down with a dremel tool. The airstone sits inside part #1. I connected the airline to it outside the skimmer, and rubberbanded it to the main body. When emptying it, I just removed the collection cup (parts 6,7,8, and 9) and rinsed it all off in the sink.
Let me know if you have any ?s
Hope this helps, Matt.
The first 3 pics are the entire skimmer, the collection cup removed from the main body, and looking down into the main body with the collection cup removed.


") ? ...jk. Nice work! Now what about a PVC Ca reactor?
? ...jk. Nice work! Now what about a PVC Ca reactor?
