• Why not take a moment to introduce yourself to our members?

Arch01

Advanced Reefer
Rating - 0%
0   0   0
Hi everyone. I'm looking to make a DIY sump/refugium for my new 180 gallon tank. I was originally thinking of just getting something like a 40g long tank, but decided I would rather have a custom sump to better utilize my space. I then figured that I would just make one tank for the sump and refugium and just have them seperated with a wall, but to get a large enough volume, I would not be able to get this under my stand with the center support. So now I'm thinking of doing them as two seperate pieces so that I can get them in and out easier for setup and if I ever need to do maintenance.

I called around locally to get some prices on 4'x8' sheets of acrylic. One place sells 1/4" Plexiglas MC for around $85 and another sells 1/4" Acrylite FF for about the same price. For 3/8" the first store sells Plexiglas G for $145 and the other sells Acrylite FF for $125. My question is should I go with the multi-cast stuff or go for the cell cast for a little more? I figure the sump will be about 16-18" tall (probably less than 12" water level) and the refugium will be 18-20" (16-18" of water). They will be about 20" long each and 18" wide. I've read through some of the construction threads, but must have glazed over the recommendations on thickness. Is 1/4" or 3/8" enough or should I go up to 1/2"? Also, I was thinking of using WeldOn 4 and 16 since this is my first project with acrylic and I figured I'd need the 16 to fix where I leave gaps.

I'll try to post some designs of what I'm thinking of once I get a chance. Right now I'm just trying to get some expert advice on where to start. Thanks in advance.

Alex
_________________
defeating debt
 
A

Anonymous

Guest
Rating - 0%
0   0   0
Take a look at this page that shows some good sump contruction pics.

Cyro's aquarium thickness calculator can be found here. Download the excel spreadsheet and figure out what thickness you need.

I would suggest that you use cell cast material. Acrolite GP would be a good choice. Plexiglass G is another good choice.

If you don't have special blades for cutting the acrylic, you better pay the supplier to cut it for you. You really need good clean cuts for the joints to glue properly. Weld on #4 should be all you need with proper cut.

Maybe James aka "acrylics" will join in for addition advice.

Good luck and post pics if you can.

Louey
 

Acrylics

Experienced Reefer
Location
Portland
Rating - 0%
0   0   0
You could get away with using extruded material such as FF on a sump but given the price difference is rather small these days - I don't see a real reason. 3/8" would be thick enough if you put any sort of top on it - a 2" eurobrace is great for that size.

I would suggest having the edges prepared for you so you don't have to spend much on tooling. Your local plastics distributor will be able to give you names of fabricators in your area who can route all the edges for you - this will be of great benefit.
A good fabricator can route all 12 of your pieces easily in an hour - a small but wise investment IMHO.
BTW, look ONLY at materials made by either CYRO (Acrylite GP & FF), Plexiglas (MC & G), and Polycast. Most other brands are hit & miss insofar as quality goes but these 3 brands are consistently superior.
If you need anything else, we're here for ya :)

James
 

Arch01

Advanced Reefer
Rating - 0%
0   0   0
Thanks a lot for your help guys. I didn't realize before I called around that there was only a $20 price difference between the extruded and the cast acrylic. I will definitely go with the Plexiglas.

I have a question about the cutting. I have easy access to a router. Would I be better off having them cut the sides a little longer to make construction easier and then just trim off the excess, or would I be better off just having them do it exactly the right size? I was probably going to use the pins method (or a smaller guage wire) for construction. If I do decide to use the router, is there a specific bit that I should use?

I'll definitely be back here for more questions, but thanks for your help so far. This is probably the most intimidating undertaking becuase I don't have any experience with it and the tolerances are fairly low for things like cutting.

Alex
_________________
Sexual Health Forum
 

Acrylics

Experienced Reefer
Location
Portland
Rating - 0%
0   0   0
Alex,

Is the router table mounted (please say yes :) ) or would you have to do it by hand?
If you are going to have them cut it and prep the edges yourself, then have them cut each piece about 1/4" over.
So for a tank measuring 20 x 18 x 18 using 3/8" your cut list would be:

2 pcs 20.25 x 17.5 front/back, finish at 20.25 x 17.25
2 pcs 17.5 x 17.5 ends, finish at 17.25 x 17.25
2 pcs 20.25 x 18.25 top/bottom, route the access cutout in top

Using the above list to glue the ends between the front & back, then top & bottom.

For router bits you have a lot of choices but some depnds on whether the router is table mounted or handheld. You could easily do the whole job with just a 1/2" flushcutter AKA "Flush Trim Bit". Look 1/2" diameter cutters from companies like Whiteside, Bosch, CMT, Porter Cable, or Amana, in this order. There are other companies that make good router bits but IME, these companies are very good and very consistent. You should be to get a goo flushcutter from any of these for less than $20 that will last quite a while provided you take decent care of it. I prefer 1/2" shanks as well if your router has a 1/2" collet.
You'll also need at least one gluing jig to hold the pieces in place when gluing.

If you need a hand when ready to do this, let us know. We can build one here and show pics of it step by step so you have a reference. I haven't built a small tank in a while so it would be fun ;)

HTH,
James
 

Arch01

Advanced Reefer
Rating - 0%
0   0   0
James,
Thanks for your help. The router is table mounted, and can be removed to use by hand. I have a question about the gluing jig you mentioned. Exactly what is it? I have seen where people have used triangles with the corners cut out and double sided tape to hold the pieces verticle during gluing. Is that what you mean?

Also, I was thinking of doing the two tanks of different sizes now. The refugium would be 26x18x20 and the sump would be 18x14x26. This would allow me to align the sump easier to put bulkheads in for my skimmer and return pump and also so I can put the drain for the refugium after the skimmer so the little critters don't get chopped up quite so much. My only concern here was if 1500-2000gph of water would be too much flowing through the smaller sump. One of these days I'll get a diagram up here so it makes more sense.

Thanks,
Alex
_________________
Ferrari 125
 

Acrylics

Experienced Reefer
Location
Portland
Rating - 0%
0   0   0
Nothing too complicated.
I'll take a picture of an easy DIY jig today. Costs just a coupla bucks to make, particle board, wood glue, and 10 minutes or so. This and 2 spring clamps, and your good to go. There are foam jigs that are extremely helpful as well. All in all, you should be able to get going with about $10-15 and 15 minutes worth of jigs.

James
 

Arch01

Advanced Reefer
Rating - 0%
0   0   0
Okay, I've come up with a little drawing of my sump and refugium design to see if anyone thinks it won't work out. I expect to have about 1500 gph through the sump and 500 or so through the refugium. Sorry for my crappy drawing, I don't have anything fancy to use...

Alex
_________________
Mutual insurance Forum
 

Acrylics

Experienced Reefer
Location
Portland
Rating - 0%
0   0   0
Alex,
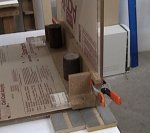
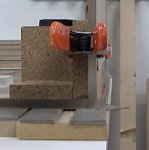
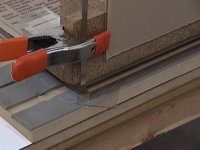
This is a cheap n easy gluing jig, just some particle board. Make them any length you need.

The foam is just camper shell foam, available at any hardware store. 3/16" thick x 1.25" wide, self adhesive back to apply to partical board, MDF, whatever. The purpose is to allow for som irregularities in the acrylic, table, and/or machining. Also is nice so that when you remove the wires/pins, you can gently ease them out without splashing. The weights are used to keep the jig from moving and to help flatten out the acrylic - not always necessary but helpful.
$ 5.00 2' x 4' 3/4" partical board (Home Depot)
$ 3.00 wood glue
$ 6.00 camper shell foam

$14.00 Total, about 10 minutes to make plus a coupla spring clamps

HTH,
James
 

Attachments

  • gluejigoh.jpg
    gluejigoh.jpg
    28.2 KB · Views: 2,302
  • gluejigside.jpg
    gluejigside.jpg
    18.5 KB · Views: 2,284
  • gluejigcu.jpg
    gluejigcu.jpg
    82.9 KB · Views: 2,337
A

Anonymous

Guest
Rating - 0%
0   0   0
schweet clamping jig. what are the small squares of plastic for?( the ones that are double sided taped together.) is the overhang there to be routed off later, so it's a perfect edge?


I know the local plastic place here lazer cuts most of their stuff, so the edges don't need to be finished. They come out perfect, and no tooling is needed. Since this is your first project, you might want the edges to be nice from the start. one less step you'll have to go through. Just a thought.

Post pics when you start!

B
 

Acrylics

Experienced Reefer
Location
Portland
Rating - 0%
0   0   0
Bingo":aov6v3uf said:
what are the small squares of plastic for?( the ones that are double sided taped together.) is the overhang there to be routed off later, so it's a perfect edge?
just tape blocks so I can move the pieces side to side and flush them up without the risk of actually changing the dimensions once they are set.
I know the local plastic place here lazer cuts most of their stuff, so the edges don't need to be finished. They come out perfect, and no tooling is needed. Since this is your first project, you might want the edges to be nice from the start. one less step you'll have to go through. Just a thought.
The only problems I have with laser cutting are A) Lasers by nature produce some very intense heat so the pieces *can* craze when you glue them and B) Large lasers are very expensive so they get top dollar for cutting.
But I do agree it's nice to have the material prepped prior to starting, especially for someone new to plastics :)

James
 

Sponsor Reefs

We're a FREE website, and we exist because of hobbyists like YOU who help us run this community.

Click here to sponsor $10:


Top