• Why not take a moment to introduce yourself to our members?

A

Anonymous

Guest
Started on this a few weeks ago. Basically brought a tank with stand along with a bunch of other craps, and the stand is so ugly that there is no way my wife going to let me bring it in my house. So instead of paying to buy a commerical stand, I decided to break the old one into pieces, and reuse as much of the lumber as possible.

The original stand is 60X18X40. It is too tall for my taste (I am not that tall, and I like my boys to watch the tank without looking straight up). I also want to reuse a 60 gal tank as sump. The 60 gal is 15 inch deep.

Some of the lumber smells due to water/fungus damage, so I end up usning the four legs and two of the cross bars that go lenght-wide. I cut the legs down to 24 inch, and make the stand 24 inch front to back.

Here are some pics. I end up using some red oak and stained it, and currently waiting for the urenthane to dry. 4 coats.

The first pic is stand with top off.

The second pic is with the top (plywood) on.

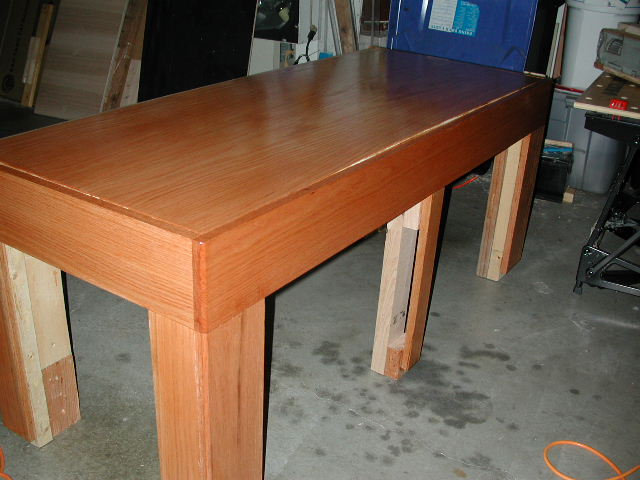
The third pic is after it is stained and vanished.

I still need to add panel to one side of the stand, doors, and drill holes on the top for return and drain. The sump will go thru the right side of the stand (half of it inside the stand, the other half outside).

Lesson learnt:
1, particle board is never good near water
2, don't use cheap hair brush for vanishing, since the hair will falls off and get embedded in the vanish
3, don't use stain+vanish combo and think that you can save time.
4, solid hard wood is expensive.
 

Attachments

  • DSCN8633.JPG
    DSCN8633.JPG
    50 KB · Views: 2,519
  • DSCN8629.JPG
    DSCN8629.JPG
    47.6 KB · Views: 2,524
  • DSCN8628.JPG
    DSCN8628.JPG
    48.5 KB · Views: 2,524
A

Anonymous

Guest
Rating - 0%
0   0   0
Looks like you could sit a Hummer on it to me.

Nice work

Louey
 

trido

Advanced Reefer
Rating - 0%
0   0   0
Wow!! even dado'd the cross supports. Nice looking stand. Coming from a carpenter.. Id say it should be plenty strong. You'd be suprized what a couple of 2x4's can hold. BUT, I still wont give you the company guarantee :lol:
 
A

Anonymous

Guest
Rating - 0%
0   0   0
Sweet!


I love the look of Red Oak, especially with lighter stains where you can see the grain.

If you use a varnish that needs to be sanded between coats you can get away with using cheap brushes during all but the last coat. You just sand the bristles out...

I have actually switched to using throw away foam brushes for the last coat of Spar varnish at work because then there are no bristles at all. Even very expensive brushes lose bristles at first.


Is the sump going to be sticking out into a closet or another room or something?

And last question...

Are you going to put doors on it?
 
A

Anonymous

Guest
Rating - 0%
0   0   0
>...I still need to add panel to one side of the stand, doors, ...

:P

knucklehead, your flow rate calculation makes everyone want to see 13 significant digits nowaday. You spoil all the fun out in this hobby. ;)

Seriously, there are still a few pieces of wood that I have not added before taking the pics. I feel there is no need to add more, but I would feed better if I do. The stand is much deeper front to back than the tank (24 inch stand, 18 inch tank) so I beefed up some of the cross beams. I will probably add another 2X4 to the middle leg, and sent the bill to FragMaster.
 
A

Anonymous

Guest
Rating - 0%
0   0   0
Tank on stand, and filled with water. Waiting for more rock and I will add fish and fix the bulkhead so that I can fill it all the way up with water.
 

Attachments

  • DSCN8684.JPG
    DSCN8684.JPG
    105.2 KB · Views: 2,306
A

Anonymous

Guest
Rating - 0%
0   0   0
The back of the stand, drilled for plumbings and powercords.

Plumbing is not complete, since i am waiting to spare a 60 gal as sump, instead of a 20 gal underneath the stand now.
 

Attachments

  • DSCN8682.JPG
    DSCN8682.JPG
    106.9 KB · Views: 2,305

steene_c

Active Reefer
Rating - 0%
0   0   0
That looks sweet nice stand . Are you going to put doors on the front and post a pic I would like to see it when it is done . Can you post the pic of the holething sump and all .

what happen to the bulkhead ?

If you want to cut the cost you can use lauan for the side and the front with the doors all you have to do is use some 1" x 1/2" on the inside for the doors that way you can put the hinges on . lauan is only like $9.00 in illinois for a 4' x 8' peace and it has the grain look to so you can stan it just the same .
 
A

Anonymous

Guest
Rating - 0%
0   0   0
I will put doors on it, but right now, I have several million things that I need to finish, such as pack and ship out 5 aquariums, smallest one is 100 gal.

The doors are even made yet. Right now, the bottom of the stand is just storage space for the junk, ballast, sump and water filter. I will use a cabinet door router set that I just brought to make the door panel. But I may end up with a flat sheet of plywood for it instead (still got several large scraps laying around in the garage after I cut a piece out for the top of the stand).

There is only one bulkhead in the back for drain. I will put more bulkheads in the tank so that the water can raise up without flooding.
 

steene_c

Active Reefer
Rating - 0%
0   0   0
do you sell tanks or work in a pet shop .

i was just asking on the bulkhead because you where saying
"Waiting for more rock and I will add fish and fix the bulkhead so that I can fill it all the way up with water."

is this the same tank from Post subject: Overflow installation
 
A

Anonymous

Guest
Rating - 0%
0   0   0
Yes, it is the same tank as the other thread. If I have a few minute this evening, I will take a pic and post it.

I do not have any pet-related business. Just a hobby. My wife wants me to clean out my garage/backyard. Hate to sell thing that I know I can make use of when I retire in 2052! :D :lol:
 

Sponsor Reefs

We're a FREE website, and we exist because of hobbyists like YOU who help us run this community.

Click here to sponsor $10:


Top