A
You are using an out of date browser. It may not display this or other websites correctly.
You should upgrade or use an alternative browser.
You should upgrade or use an alternative browser.
Maybe I shouldn't post drunk. I don't remember starting this thread. I just started another! Mods, go ahead and delete that thread!
Anywho...
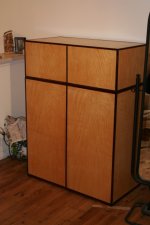
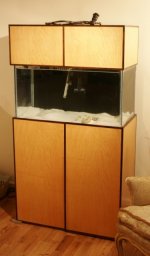
Stand and canopy is maple ply with 1/2" square walnut trim.
Sump is 24x15x16 I built with 1/3 of it a fuge. Return is an Eheim 1262
Skimmer is a Deltec mc500 in sump
Lights two 150w Lumenarc mini's DE with phoenix 14kk running on icecap ballasts. one t-5 actinic for dusk/dawn. Someday I'll build some moonlights.
Closed loop is an eheim 1262 with an oceans motions 4 way. Two in the back corners, 2 in the front. I have one of the 'revolutions' but it's kinda big and bulky. I might not use it.
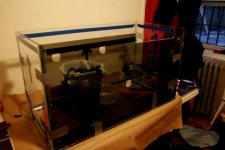
I'm still deciding whether to use blue or black for the background. It will be a sheet of plexi. It's going INSIDE the tank and will have overflow teeth cut into it.
I am indeed eurobracing it. 2" strip along the top front and back. That's it. The whole tank is 3/8" glass, so I really don't need it, but I'm putting it in just for good measure.
B
Attachments
This is only the second aquarium stand I've made. I think I took some pics, but I can't be sure. I know I have a 3-D cad drawing of it that I did.
I've been doing carpentry since I was 12 or 13. I started by remodeling houses with my dad. I never thought all that stuff I was taught (FORCED TO LEARN) would come in handy!
I'm kinda worried about filling the tank with water. I do have renter's insurance, so If it does fail I'm covered. I also have a shop vac at the ready.
B
frame is:
2x6 top frame. 2x4 center brace.
two 2x3' legs glued and screwed together for each leg.
2x4 bottom frame.
Skin is maple ply with solid walnut trim. Natural stain on the maple, walnut stain on the walnut. all of it coated with spar urethane. I think I used satin.
Both the stand and the canopy are 4 pieces of ply each. The sides are glued and nailed on and the whole front is the door.
There's a lot of small things I'd do differently. Like use 5/8" cabinet grade ply rather than 1/2" Small things like finding hinges to fit. I ended up rabiting in slots and drilling and tapping metal plates for the hinges. I scrwed them in and epoxy'd them solid. I'd re-do the trim so it would be more solid pieces.
you'll have to wait for pics of the build. I have them somewhere, but don't have time to edit them now.
B
Does the canopy have a door? And the stand door just swings out from one side? And the middle piece of trim just covers the seam of the front ply pieces, right?
I really like it, like I said, and I might copy your design, if you don't mind. So, I'm really looking forward to more pictures!
If you decide you don't really want to edit the pictures, send them over to [email protected]
I really like it, like I said, and I might copy your design, if you don't mind.
If you decide you don't really want to edit the pictures, send them over to [email protected]
bleedingthought":24jv6vbv said:Does the canopy have a door? And the stand door just swings out from one side? And the middle piece of trim just covers the seam of the front ply pieces, right?
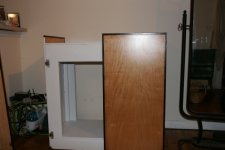
The front two panels on both the stand and canopy ARE the doors. The center piece of trim is attached to one of the doors. Actually all the pieces of trim on the front are attached to the doors. And you' are correct. They do cover the edges of the ply. (except the piece in the center. white paint covers the other side.
Here's a pic that might explain more.
Attachments
Ah, ok. Thanks!Bingo":1v5pbu4t said:bleedingthought":1v5pbu4t said:Does the canopy have a door? And the stand door just swings out from one side? And the middle piece of trim just covers the seam of the front ply pieces, right?
The front two panels on both the stand and canopy ARE the doors. The center piece of trim is attached to one of the doors. Actually all the pieces of trim on the front are attached to the doors. And you' are correct. They do cover the edges of the ply. (except the piece in the center. white paint covers the other side.
Here's a pic that might explain more.


