You are using an out of date browser. It may not display this or other websites correctly.
You should upgrade or use an alternative browser.
You should upgrade or use an alternative browser.
Those are penductors. They basically have the effect of increasing your flow without any addition power consumption. They actually claim to make your pump draw less power, but I am a little skeptical about that.
I've never used them before. I'll be interested to see how they work.
I've never used them before. I'll be interested to see how they work.
Lokking good Louey! I vaguely remembering contributing (if that's the word? :? ) to the thread when you were just thinking about this. Now you've made this much progress...
Shows the virtue of only leaving the Sump every so often. This way you get some nice surprises.
Keep up the good work!
I have about 14 unprotected outlets scattered at strategic places round my tank. I prefer that to having them all in place. That way I have a chance of hitting one no matter where I spill water.
I hate to admit this, but I put some water in my overflows today to water test the buldheads and one of the four leaked pretty bad. That's not the hard part to admit. The hard part is that it leaked directly on one of my outlets 8O . I don't think any water got in the outlet. I turned the breaker off quickly and covered the outlet with a towel.
So now Greg Scheimer and dgasmd can now say "I told you so".
Of course now that the leak is fixed I am 98.7% sure that there will never be a leak like that ever again.
Louey
So now Greg Scheimer and dgasmd can now say "I told you so".
Of course now that the leak is fixed I am 98.7% sure that there will never be a leak like that ever again.
Louey
Now, upwards and onwards. All bulkheads in the tank and the three on the bottom of the sump all appear to be watertight. I did have to tighten one of the bulkheads in the sump, but it now appears to be watertight.
Now I needed to get my starboard in the tank.
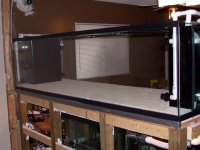
Here's a few pictures of the starboard thus far. I need to caulk the seams and put a little bit of sand on the caulk. I am going to do that tonight.
I'm almost ready to fill this thing with freshwater
Louey
Now I needed to get my starboard in the tank.
Here's a few pictures of the starboard thus far. I need to caulk the seams and put a little bit of sand on the caulk. I am going to do that tonight.
I'm almost ready to fill this thing with freshwater
Louey
Attachments
m-fine wrote:
:lol:
No way I'm dumping saltwater in there until I freshwater test it for at least a few days. Of course, you knew that.
I really want to run it with freshwater with the lights on and everything so that I will know what the water temp is going to be. If I am going to need a chiller, I want to know now so that I can get one ordered.
My carpenter is supposed to come Saturday to close the wall in. I am not planning on running this thing continously until the wall is closed due to noise. I watch TV only 10' away from it and I am quite sure it will be noisy.
Louey
That could be interesting. You thinking along the lines of Oscars or Koi or something more exotic?
:lol:
No way I'm dumping saltwater in there until I freshwater test it for at least a few days. Of course, you knew that.
I really want to run it with freshwater with the lights on and everything so that I will know what the water temp is going to be. If I am going to need a chiller, I want to know now so that I can get one ordered.
My carpenter is supposed to come Saturday to close the wall in. I am not planning on running this thing continously until the wall is closed due to noise. I watch TV only 10' away from it and I am quite sure it will be noisy.
Louey
Liquid wrote:
I don't know how well the sand would adhere to glass. You have to scuff up the surface of the starboard in order to get the glue to adhere to it.
I also am not set up for cutting glass. You have to cut pieces that will fit through the openings in the top of your tank and cut around the overflows. I'm not really interested in cutting glass either. It also weighs a ton, making it harder to work with.
Working with glass would be a bear IMHO.
Maybe someone else can pioneer the glass/glue/sand BB substrate.
Louey
Dumb question but couldn't you have just used panes of 1/4" or 3/8" glass (maybe 1'x1' or so) and covered it with sand like you did with the Starboard? You'd have been ahead cost-wise...
I don't know how well the sand would adhere to glass. You have to scuff up the surface of the starboard in order to get the glue to adhere to it.
I also am not set up for cutting glass. You have to cut pieces that will fit through the openings in the top of your tank and cut around the overflows. I'm not really interested in cutting glass either. It also weighs a ton, making it harder to work with.
Working with glass would be a bear IMHO.
Maybe someone else can pioneer the glass/glue/sand BB substrate.
Louey
The PVC solvent cement you used should work equally well on glass as it does Starboard. Heck I'll try it tonight as I have some small squares of glass in my lab that I can grab.  If roughening is required, sandpaper will also rough up glass. I was thinking that someone could just go to their local glass shop and have them cut the glass for you.
The one thing I just thought of was that it will break if a rock drops on it...maybe it's not such a good idea after all. hehe
Shane
The one thing I just thought of was that it will break if a rock drops on it...maybe it's not such a good idea after all. hehe
Shane
This morning I filled the sump. Then had to empty it to fix a few leaks in my threaded fittings.
That was okay that I had to drain it. I wanted to test my drains in the bottom of the sump anyways.
Here are some pics.
Louey
That was okay that I had to drain it. I wanted to test my drains in the bottom of the sump anyways.
Here are some pics.
Louey
Attachments
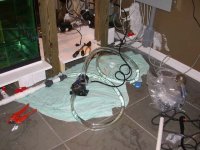
Here's a picture of the pump I used in-line with the drains to empty the sump. It's a velocity T-4.
I wasn't very happy with the T-4. I haven't used it in a year. It would start at first. Then did start. But it seemed to struggle a bit.
Took at least 20 minutes to drain the sump.
I wasn't very happy with the T-4. I haven't used it in a year. It would start at first. Then did start. But it seemed to struggle a bit.
Took at least 20 minutes to drain the sump.
Attachments
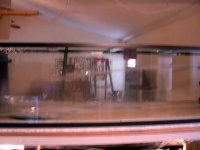
After I filled the sump, and before I filled the tank, I fired up one of the Iwaki 100's to see how the water came out of the penductors. I shot clear across to the other side of the tank and splattered water all over the place.
Sorry for the poor picture, but I was hustling trying to take a quick pics and unplug that Iwaki in a hurry.
This tank is going to have some serious flow
Louey
Sorry for the poor picture, but I was hustling trying to take a quick pics and unplug that Iwaki in a hurry.
This tank is going to have some serious flow
Louey
Attachments
I fired up both Iwaki's and they are clearly too powerful. Or maybe the Pneductors are making them seem too powerful. I dunno yet. Gonna have to play around with it.
Check out the flow across the top with both Iwaki's going. The water sometimes splashes over the top Eurobracing.
Louey
Check out the flow across the top with both Iwaki's going. The water sometimes splashes over the top Eurobracing.
Louey


