• Why not take a moment to introduce yourself to our members?

A

Anonymous

Guest
Based on how you've taken constructive criticism in this thread, I doubt the other thread contributed much to change or do anything differently than what you know best anyway. It is you tank, so do as you like.

Well, when you do start threads about "how to do it" it is tough to take "you should have done it".

And I don't know best in any aspect of starting a 300G high flow, high light, reef tank. This one is my first large tank, thus all of the previous threads.

FWIW, in spite of a few things I already know I should have done differently, I think my setup will work out fine. I will probably re-do things more times that I even want to imagine right now, but hey, that's reefkeeping. There is no "how to" guide for setting up a tank like this one, or yours.

I will read through your 24 page thread on the other site over the weekend. Thanks for the link. :)
 

dgasmd

Advanced Reefer
Rating - 0%
0   0   0
Well, I speak for myself only, but I think most people that reply to one of these threads and say "you should ahve done x" usually only say it about things you can change now before you ahve to do it or learn it the hard way later. Trust me when I say that even when you do it the best way possible way, things crap out on you regardless. You are right in that there is no manual or hot to guide for it.

I personally took in a lot of advice from a lot of people I considered very successfull and "knowing a thing or two about this". Some advice I took completely and some I thought about it and did not make me change anything. However, I did listen to every single person that had something to say. urns out there was some things I eventually changed because of someone I personally considered a mediocre idiot at best. He did have a point on what he said, so took his advice. Turns out it was very good advice regardless.

Anyway, good luck in the progression of your tank. :D
 
A

Anonymous

Guest
Rating - 0%
0   0   0
dgasmd wrote:

Anyway, good luck in the progression of your tank.

Thanks. I am looking forward to filling it with RO water, maybe starting tonight if I finish cleaning the tank and sump tonight. I hope to fill it by midday Saturday so that I can go to the LFS and buy some rock on Saturday. Otherwise, they are closed on Sunday and Monday.

Louey
 
A

Anonymous

Guest
Rating - 0%
0   0   0
Well, the RO hasn't made enough water yet so I won't be getting any liverock today.

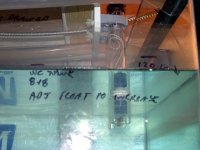
Today I finished off my auto top-off for evaporation water. I basically took a Lifereef float switch that controls an outlet and added another float switch in series with it. That way if one float switch fails, I won't get a flood. I mounted the float switches to a piece of scrap marine board that I had left over using some nylon screws and wing nuts. The floats are held in place using a conduits support called "the click system". Clamp size #40 works perfectly for 1.25" acrylic. You can slide the floats up and down to your desired water lever.

I will have a MJ 1200 in my 32G brute kalk mixer that will be plugged into the float switch controlled outlet.

FWIW, in the 3rd picture, the float on the right is made my Lifereef, the one on the left is a hack job by yours truley.

Louey
 

Attachments

  • Floats 008.jpg
    Floats 008.jpg
    36.6 KB · Views: 4,251
  • Floats 007.jpg
    Floats 007.jpg
    28.9 KB · Views: 4,249
  • Floats 009.jpg
    Floats 009.jpg
    30.3 KB · Views: 4,250
A

Anonymous

Guest
Rating - 0%
0   0   0
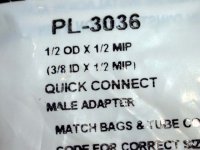
I thought I share this with you all. Fumbling through the fittings available at HD and Lowes, I found a fitting that will connect directly to the output of a MJ pump. The brand is Watts. The part number is shown on the bag. It's one of those quick connect fitting like you see on you RO's, but this one is for 1/2" tubing. It is also threaded on the other side for connection to 1/2 NPT pipe.

I used a threaded coupling to connect the quick connect to a hose barb.

This is the powerhead that will be in my Kalk mixer to supply makeup water. I'll pump it straight to the sump.

A picture of the whole rig is shown below.

Louey
 

Attachments

  • MJ's and Fittings 002.jpg
    MJ's and Fittings 002.jpg
    30.9 KB · Views: 4,236
  • MJ's and Fittings 001.jpg
    MJ's and Fittings 001.jpg
    17.1 KB · Views: 4,235
  • MJ's and Fittings 003.jpg
    MJ's and Fittings 003.jpg
    31 KB · Views: 4,239
A

Anonymous

Guest
Rating - 0%
0   0   0
I have picked up two loads of LR from my local LFS over the last two days.

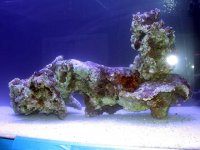
Most of it is Tonga deep water rock. One of them actually weighed 50 pounds. Three others weighed over 20 pounds each. Big rocks are great when you are aquascaping a tank this size. The other rocks are Fiji rocks that I picked up more because I liked their shape or saw something growing on them that looked good.

I'll get some better pictures once the water clears up a bit.

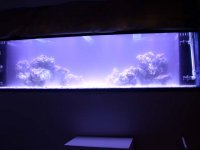
That rock is in no way stacked the way it will be when I am done. It is pretty much just separated into two seperate piles with the center open. The center will be open when I am done because that is where the T. Gigas will go.

I plan to order some large pieces of Marshall Island LR from Premium Aquatics has any large pieces in stock.

Louey
 

Attachments

  • Rock 003.jpg
    Rock 003.jpg
    44.1 KB · Views: 4,204
  • Rock 009.jpg
    Rock 009.jpg
    45.1 KB · Views: 4,202
  • Rock 010.jpg
    Rock 010.jpg
    18.8 KB · Views: 4,204
A

Anonymous

Guest
Rating - 0%
0   0   0
Today, I got my skimmer dialed in and it produced this much skimate in about 1 hour.

This is a beckett skimmer that I made in one of the MACO course. It rocks. Thanks again Fergy ;)

Louey
 

Attachments

  • Rock 008.jpg
    Rock 008.jpg
    46.5 KB · Views: 4,202
  • Rock 007.jpg
    Rock 007.jpg
    29 KB · Views: 4,202
A

Anonymous

Guest
Rating - 0%
0   0   0
Randy mah boy, very impressive. Can't wait to see it full and clear!!!

Peace,

Chip
 
A

Anonymous

Guest
Rating - 0%
0   0   0
I'll post some pictures by this weekend, I promise. ;)

The water had cleared considerabilly last Friday. This weekend I finished up the last few little things for the tank like mouting the hose reel for the water changes on the outside wall, mounting a ceiling hugger fan/light (so I won't bust another light with my ladder, :lol: ) and a few other odds and ends.

I also did a water change on my poor forgotten 75G. According to my log the last time it had a WC was the beginning of June. It looked like crap.

Today my carpenter came over and trimmed out around the tank and added the door above the tank. I have to stain the molding and paint the wall and casing and then this puppy will be complete, minus the stocking.

The bottom of the tank and some of the rock is now coated in diatoms. Yeah! :lol: . New tanks are great, aren't they ;).

No pics today :P

Louey
 
A

Anonymous

Guest
Rating - 0%
0   0   0
I have a question about the starboard .......What did you use to adhere the sand to the searboard. I was under the imprestion that there wasn't anything thould stick to it. HAs the sand stayed attached? What type sand?

Thanks
 

Sponsor Reefs

We're a FREE website, and we exist because of hobbyists like YOU who help us run this community.

Click here to sponsor $10:


Top