*UPDATE
Things are moving along in the setup of the new tank. The rocks are fully cured now and my RO/DI filter arrived.
It only took at little more than 5 days for the rocks to cure. I waited until the smell was gone and the levels were back down to normal.
Just to recap.. I had 90# of rock in a 35 gallon Rubbermaid trashcan with an airstone, heater, and protein skimmer. After about 3 days or so I did a 100% water change. To do this I had another trashcan with premixed water sitting next to the one with the rocks. I gave each one of the rocks another scrub and then placed it in the new can.
RO/DI install: Well guys I though I was pretty handy but this proved a little tougher than I had hoped. The directions were written by someone who apparently understood plumbing better than me so they didn’t help much. After about 2 hours I had it installed and running. Along the way I got my kitchen pretty wet from leaks and whatnot so be prepared if you DIY. I did have to make a run to the HW store and get another piece that I mistakenly drilled a hole in. DOH!

After it was in a running, about an hour later my GF got home from work and I though I would show her my accomplishment. I demonstrated the water as it came out of the new little faucet..”.um.. nice” she said. Of course not fully appreciating all the work I had put into it but ok that’s fine.. I’ll just SHOW her. 8) So I opened the cabinet doors to unveil all the glory for what the water filter and tank can display!! Splash.. Opening the doors was like opening the damn. “AAAHhhhh..” we screamed together. Apparently the water system <so I read later> works from a pressure system built from the tank. As the pressurized tank fills, the pressure builds. IE: when the tank starts getting full it puts more and more pressure on the hoses. IE: if the hose isn’t quite tight enough, at THIS point is where it will choose to “pop” and spray a lovely stream until noticed.
NOTE: STAY CLOSE BY UPON STARTING NEWLY INSTALLED RO/DI FILTER TO MONITER FOR LEAKS THAT MAY OCCUR.
Ok OK enough. So after fixing that, and using a little Teflon tape on the tank valve, we’re good to go.. no leaks and good water.
After 3 more days the rocks were ready to go. I laid out some plastic on my kitchen table and a cardboard cutout of the size of my tank so my GF and I could start playing with some aquascaping ideas. WHOOPS. While moving the rocks out of the trashcan I broke the S&!T out of my 200watt heater. That sucked.
NOTE: REMOVE HEATERS WHEN DOING ANYTHING WITH LR.
Oh well, live and learn. Once we had an idea of how we wanted to setup the rocks in the tank, in they went. After a few minutes of messing with the rock I realized I had put some scratches in the glass. DAMN.
NOTE: WHILE ARRANGING ROCKS IN TANK, BE AWARE THAT THEY WILL SCRATCH GLASS <OR ACRYLIC>.
Luckily I didn’t do too much scratching and you can’t really notice it much.
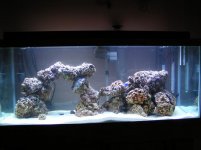
Now it’s all setup. Have the water level back up to the top, all the LR and LS is in, and were cookin’. Looks like a fish tank finally! In the tank at this point are the two fish, Blue and Domino Damsel, and 3 little clams/mussels. They hitchhiked in on the rocks. Kind of neat, every morning when I get up I see lines in the sand where the little clams were running around the tank. :wink:
So this is where I’m at today. I’m going to order a cleaning crew here in the next few days and then just let the tank go for another month or so. Then if all is well I will fish out the Damsels and trade ‘em in for some other livestock.
~R
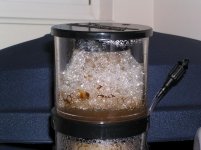
ps. I know that everyone hates the SeaClone skimmers so I thought I would attach a pic of the skimmer after full day of skimming the rocks. Not sure if it should be more or less but it does look like it’s getting something.[/b]


