Hello Reefs.com!
I have been keeping a long build thread(s) of my 120gal reef system on my local forum and I thought I would share a condensed version of it with you on here.
Here's what my reef system looked like at the start of 2021.
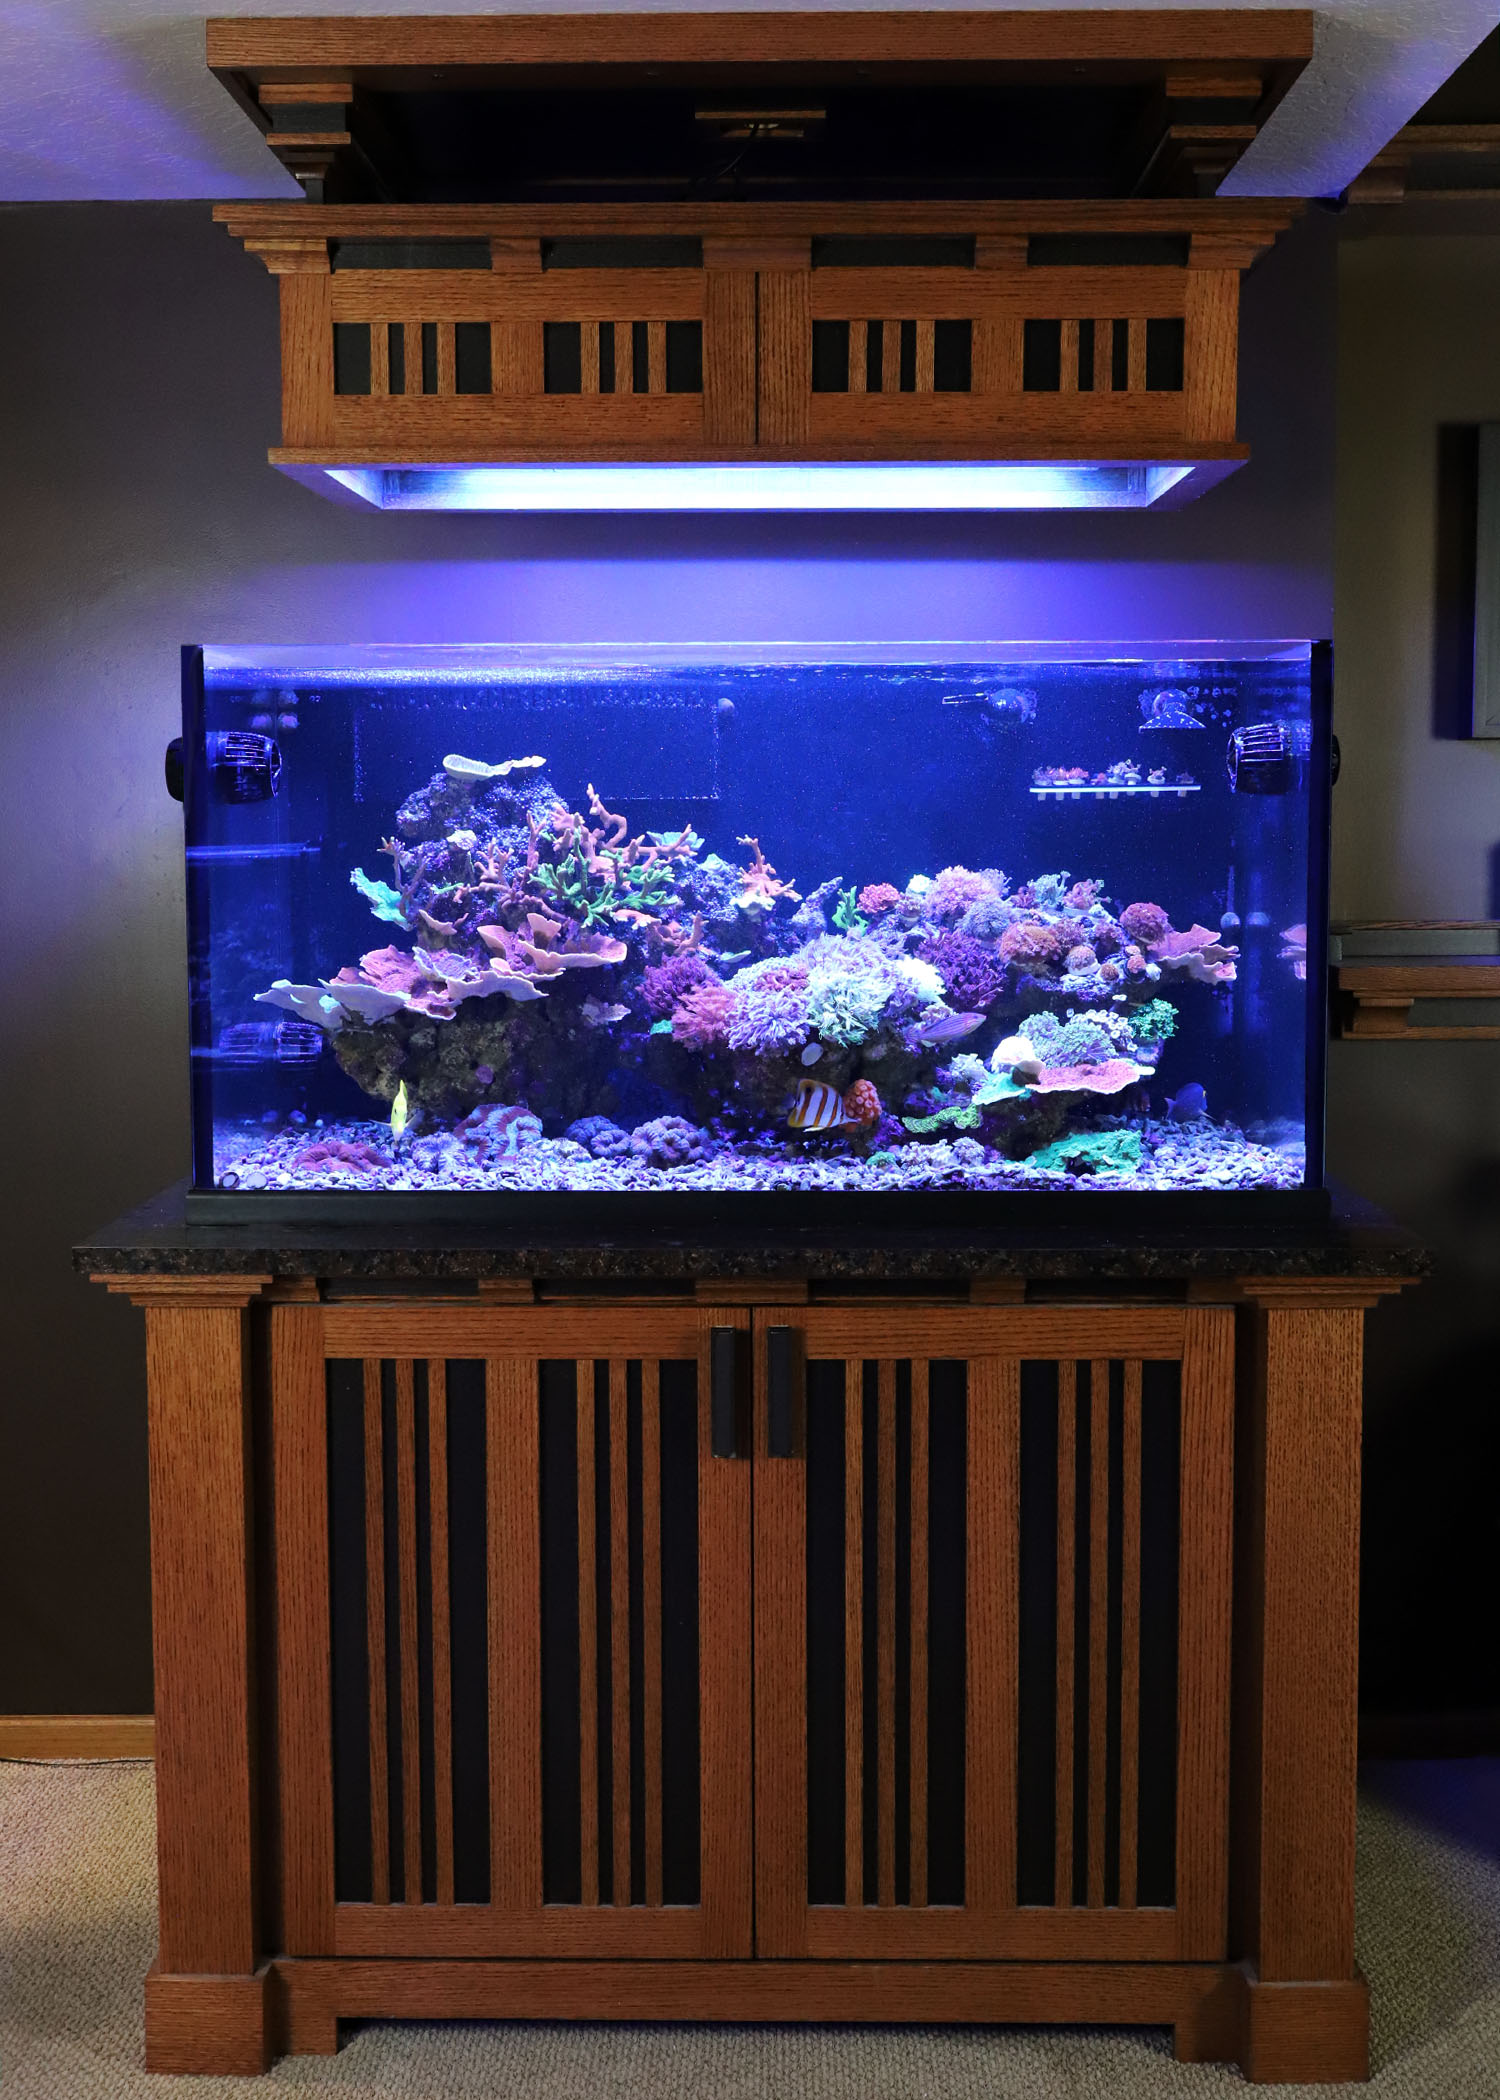
This system was set up in 2018 after I had torn down a previous 120gal system that suffered a montipora coral crash. I sold that old tank and most of the equipment and started a new build using the existing stand and canopy.
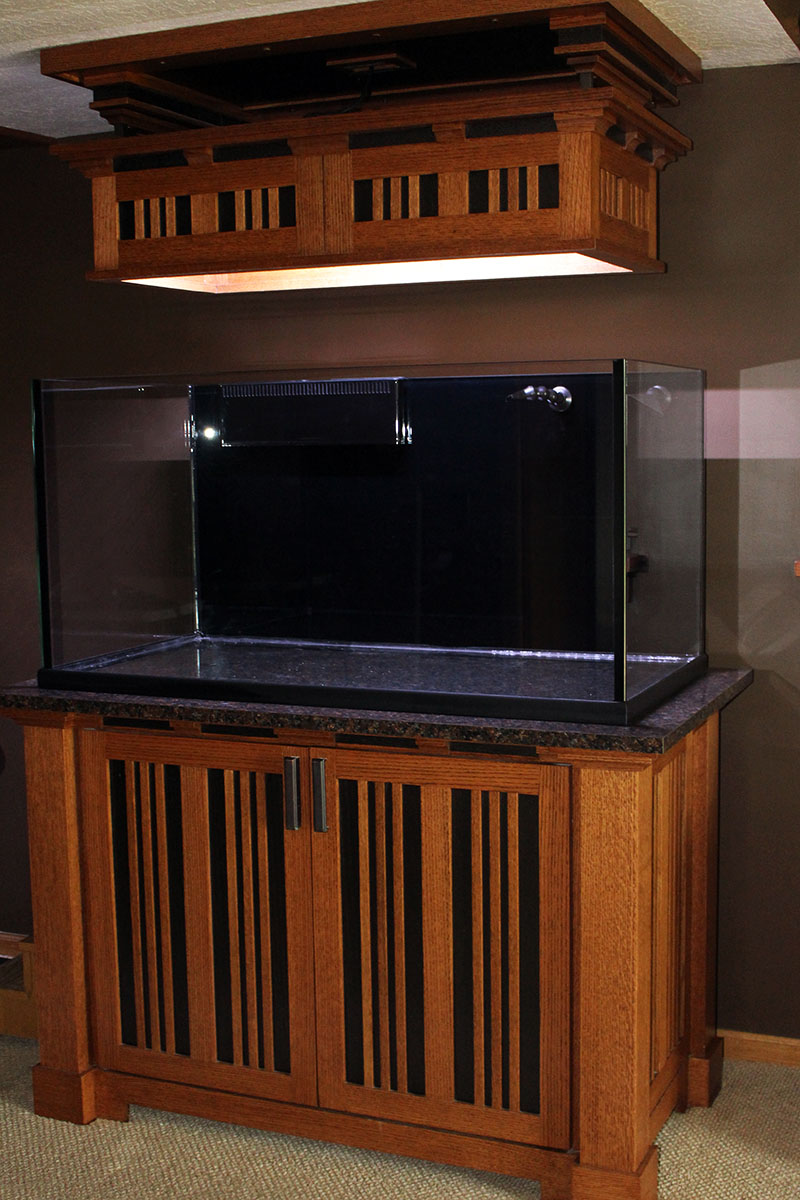
The foundation of the system is a "custom" Planet Aquariums rimless tank with low-iron glass front and sides, a Modular Marine overflow system and the custom stand and canopy that I built back in 2012.
Since I had plenty of time to plan out the new build, I designed the system to incorporate exactly what I wanted for filtration and the reef. I also need to comply with my OCD about keeping everything (as much of everything) placed inside of the stand. I like having everything contained in one neat package.
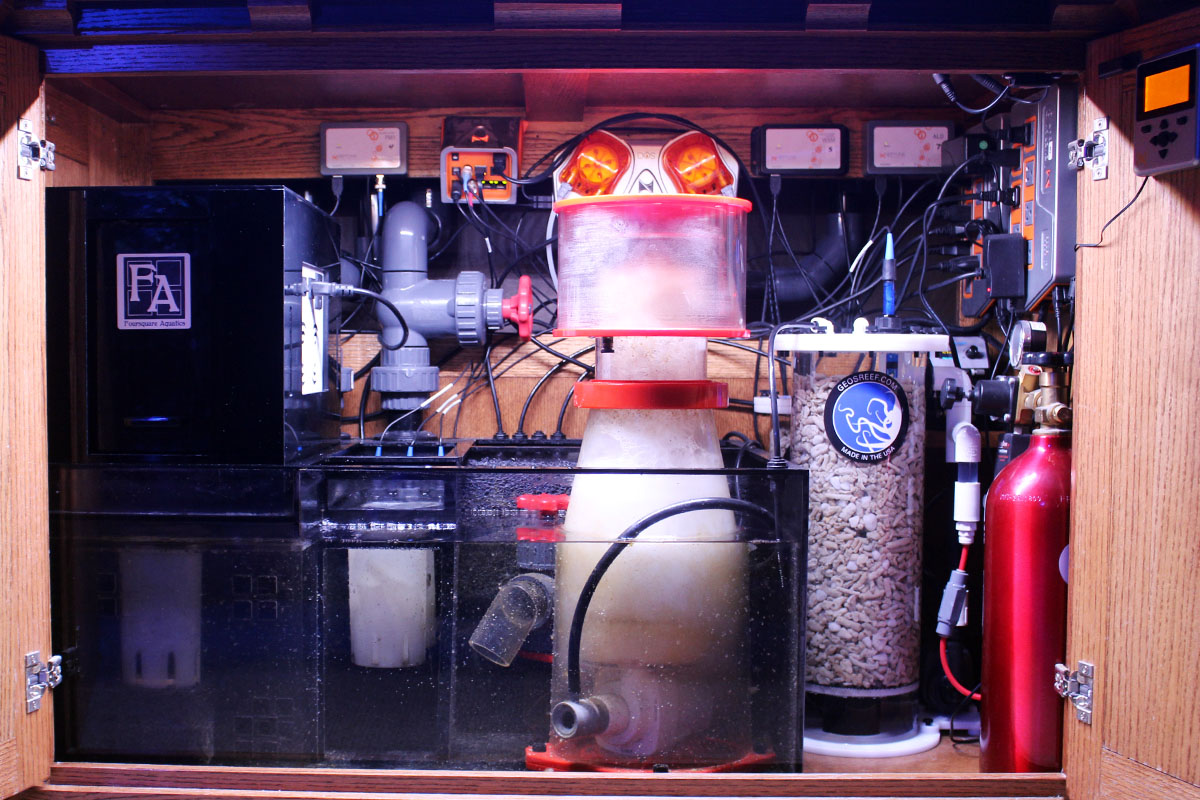
Since I was starting over, I decided to build my own sump so that it would incorporate my algae turf scrubber and other filtration choices. I was also switching over from dosing 2-part to running a calcium reactor, so I need to account for having all of that located inside of the stand. It is tight inside of there, but I have easy access to what needs to be maintained regularly.
The equipment running the system include:
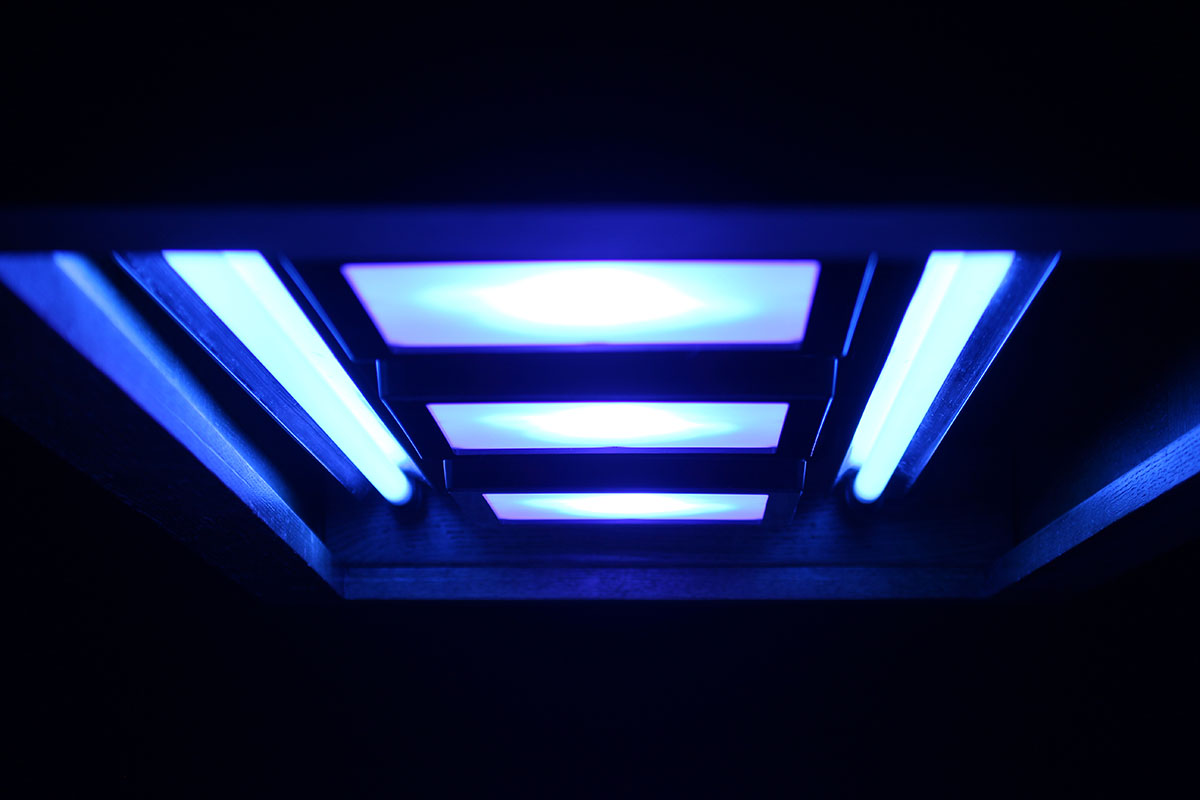
My lighting system consists of three (3) Ecotech Radion XR15 G4 PRO LED Fixtures supplemented with two (2) 39w ATI Blue Plus T5 bulbs.
Since I do not like seeing any cords visible, I installed a power outlet above the system in the soffit. The light fixtures are controlled via an Ecotech ReefLink and a WiFi power strip for the T5 bulbs.
The original plan for this system was to be a scaled back montipora dominated reef; less fish and less coral diversity. I had great success growing montipora corals in the previous system and I wanted to focus on growing them again. I had given my corals from that old system to friends to care for them as I set up this new system, so I had corals coming back to me. This included some nice Lobophyllia pieces and a decent sized ORA Red Goniopora. I have a strict "No sticks." policy with this system.
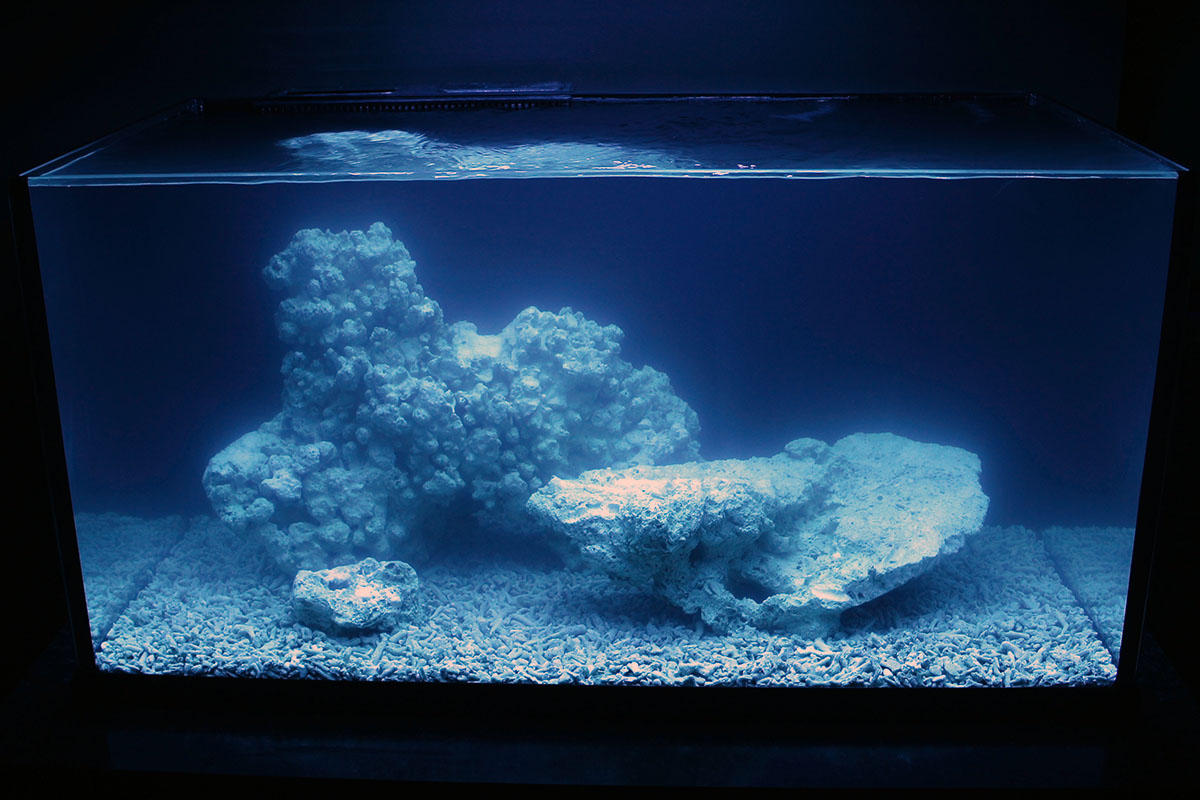
With concentrating on montipora corals, I knew that wouldn't need much for a reef aquascape. I made a trip over to BRS to hand select some large pieces of Tonga Shelf Rock. I came home with two HUGE pieces that weighed a total of 86 pounds!
I was able to create a nice aquascape by placing the larger piece of rock vertically. I actually had to break off some of the smaller rock to make it fit the space. Those two rocks made for a visually appealing and functional aquascape and they filled the 4ft by 2ft footprint of the tank.
For a substrate, I decide to use TLF ReBorn calcium reactor media. Knowing that I wanted a lot of flow (4xMP40s), I needed something more substantial than just sand. And I've been a fan of using the media as a substrate since I had seen it used in Kevin Kohen's office tanks. The media ia great for a substrate as it stays in place and is very easy to clean.
By October of 2018, I was ready to add water.
Over the course of the next year or so, there was many obstacles with starting a system with dry rock; bacterial blooms, lyngbya outbreak and almost complete coral deaths. By the summer of 2019, I ordered 25 pounds of live rock from Tampa Bay Saltwater and placed it into my sump beneath the ATS unit. Over the next few months, the dry rock was being seeded with sponges and other microfauna that helped my system stabilize.
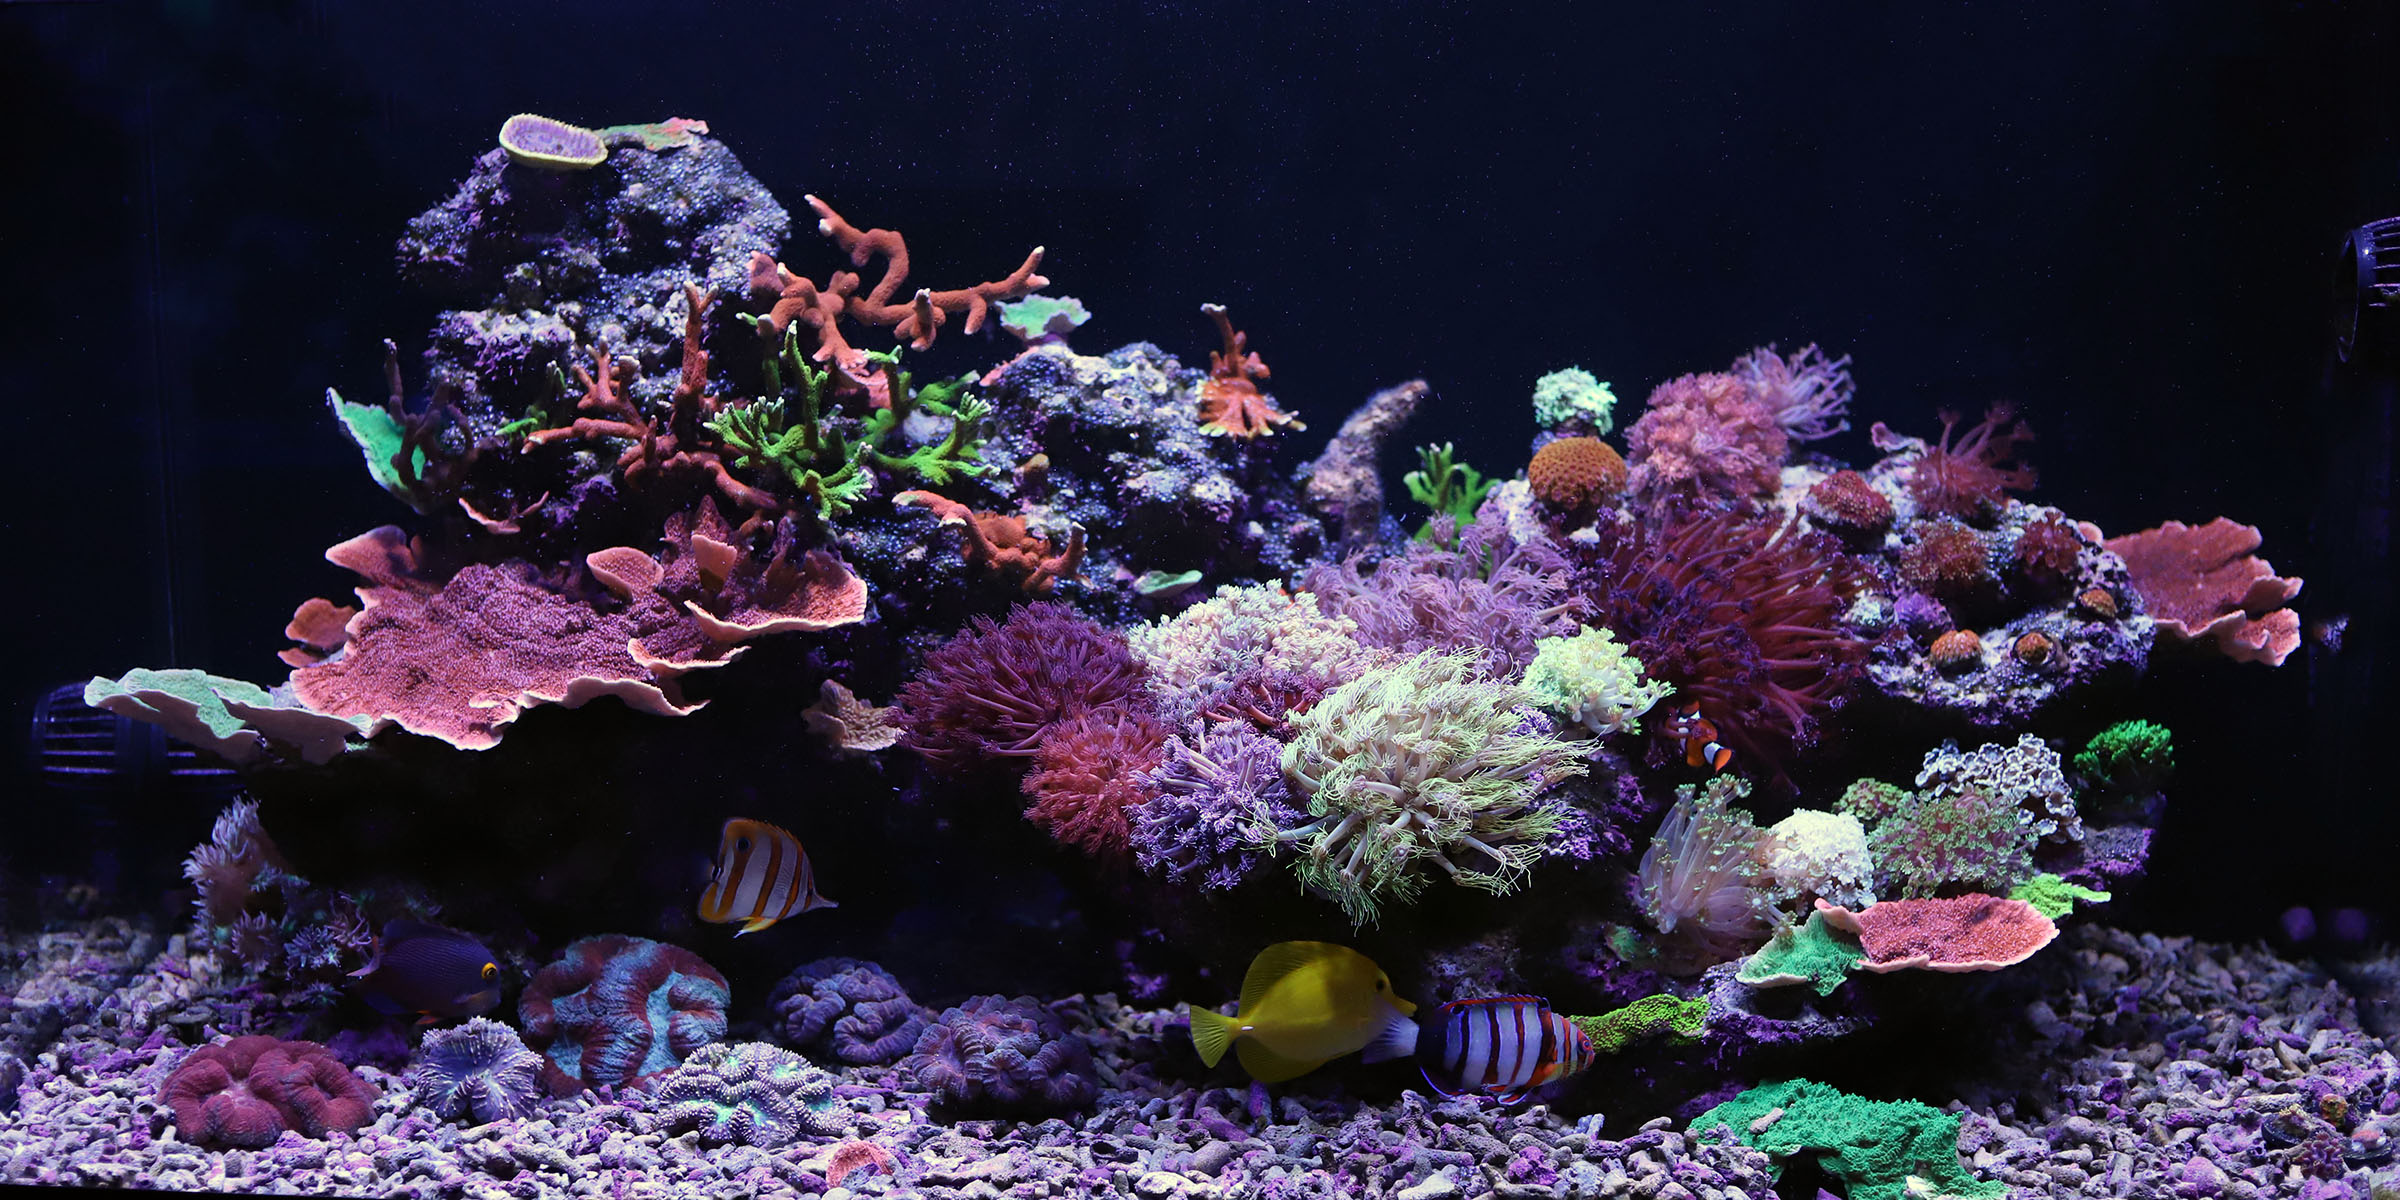
While attending some reef shows, I began to collect small frags of corals that I thought would fare well after the loss of all of the other corals. My ORA Red Gonipora was doing well, so I bought a few frags. This was the start of my obsession with the flowerpot corals. The new system was now going to be a Montipora, Lobophyllia and Goniopra/Alveopora/Bernardpora reef.
Here's a picture of what it looked like back in November of 2020.
I almost forgot about the fish!
Since I wanted to scale back on this reef, I was limiting myself to a very short list of fish. Originally, I only wanted to keep four to five fish total including a pair of Genicanthus semifasciatus angelfish and a Harlequin Tuskfish; my favorites.
Every [size appropriate] reef tank that I have maintained has had a Kole Tang, so one of those was added right away. A LFS was closing its doors and they had a very small Yellow Tang about the size of my Kole Tang, so I picked that one up as well since I hadn't really kept one of them previously.
Some pests had made their way into my system so I needed to add some utilitarian fish to combat those; a Melanurus Wrasse for MEN and a Copperband Butterflyfish for aiptasia.
In another tank, I had our original Percula Clownfish that we bought in 2009. It was the male of a spawning pair but the female had gone blind and eventually perished. It wasn't doing well in another system (lethargic/depressed) so I added it to this system and it loved the goniopora garden and is full of vigor again.
In April, I decided that I wasn't likely going to find my pair of G. semifasciatus angelfish (waited three years), so I purchased two female G. lamarck angelfish from a LFS; differently sized. They're doing well; very well. The larger fish had already developed the black pelvic fins after seven weeks in the reef and completed its transition within a few more weeks.
And then this fall, I tore down my smaller reef system and moved my Ornate Leopard Wrasse over to this reef. After some territorial "discussions", they are all doing well.
This year has been extremely busy so I haven't taken as many photos of the corals or fish, but that should change once our kids go off to college and our house becomes empty.
If you have any specific questions or comments about my system, please ask.
This is a massively condensed version of my typical build threads. I will add more posts to highlight various aspects of the complete build.
Thanks!
I have been keeping a long build thread(s) of my 120gal reef system on my local forum and I thought I would share a condensed version of it with you on here.
Here's what my reef system looked like at the start of 2021.

This system was set up in 2018 after I had torn down a previous 120gal system that suffered a montipora coral crash. I sold that old tank and most of the equipment and started a new build using the existing stand and canopy.
The foundation of the system is a "custom" Planet Aquariums rimless tank with low-iron glass front and sides, a Modular Marine overflow system and the custom stand and canopy that I built back in 2012.
Since I had plenty of time to plan out the new build, I designed the system to incorporate exactly what I wanted for filtration and the reef. I also need to comply with my OCD about keeping everything (as much of everything) placed inside of the stand. I like having everything contained in one neat package.
Since I was starting over, I decided to build my own sump so that it would incorporate my algae turf scrubber and other filtration choices. I was also switching over from dosing 2-part to running a calcium reactor, so I need to account for having all of that located inside of the stand. It is tight inside of there, but I have easy access to what needs to be maintained regularly.
The equipment running the system include:
- Two (2) Finnex 300w Titanium Heaters
- APIS-300 Algae Turf Scrubber; fed from a Neptune Systems Cor-15 pump.
- Reef Octopus Regal 200-SSS Protein Skimmer.
- Neptune Systems Cor-20 Return Pump.
- Geo's Reef 618 Calcium Reactor with a 415 Secondary Chamber; fed by a Kamoer FX-STP pump.
- Neptune System DŌS pump for ATO.
- Neptune Systems APEX controller, two EB832 Energy Bars and various modules.
- Neptune Systems Trident.
- Four (4) Ecotech Marine MP40W-ES/QD pumps.

My lighting system consists of three (3) Ecotech Radion XR15 G4 PRO LED Fixtures supplemented with two (2) 39w ATI Blue Plus T5 bulbs.
Since I do not like seeing any cords visible, I installed a power outlet above the system in the soffit. The light fixtures are controlled via an Ecotech ReefLink and a WiFi power strip for the T5 bulbs.

The original plan for this system was to be a scaled back montipora dominated reef; less fish and less coral diversity. I had great success growing montipora corals in the previous system and I wanted to focus on growing them again. I had given my corals from that old system to friends to care for them as I set up this new system, so I had corals coming back to me. This included some nice Lobophyllia pieces and a decent sized ORA Red Goniopora. I have a strict "No sticks." policy with this system.
With concentrating on montipora corals, I knew that wouldn't need much for a reef aquascape. I made a trip over to BRS to hand select some large pieces of Tonga Shelf Rock. I came home with two HUGE pieces that weighed a total of 86 pounds!
I was able to create a nice aquascape by placing the larger piece of rock vertically. I actually had to break off some of the smaller rock to make it fit the space. Those two rocks made for a visually appealing and functional aquascape and they filled the 4ft by 2ft footprint of the tank.
For a substrate, I decide to use TLF ReBorn calcium reactor media. Knowing that I wanted a lot of flow (4xMP40s), I needed something more substantial than just sand. And I've been a fan of using the media as a substrate since I had seen it used in Kevin Kohen's office tanks. The media ia great for a substrate as it stays in place and is very easy to clean.
By October of 2018, I was ready to add water.

Over the course of the next year or so, there was many obstacles with starting a system with dry rock; bacterial blooms, lyngbya outbreak and almost complete coral deaths. By the summer of 2019, I ordered 25 pounds of live rock from Tampa Bay Saltwater and placed it into my sump beneath the ATS unit. Over the next few months, the dry rock was being seeded with sponges and other microfauna that helped my system stabilize.
While attending some reef shows, I began to collect small frags of corals that I thought would fare well after the loss of all of the other corals. My ORA Red Gonipora was doing well, so I bought a few frags. This was the start of my obsession with the flowerpot corals. The new system was now going to be a Montipora, Lobophyllia and Goniopra/Alveopora/Bernardpora reef.
Here's a picture of what it looked like back in November of 2020.

I almost forgot about the fish!
Since I wanted to scale back on this reef, I was limiting myself to a very short list of fish. Originally, I only wanted to keep four to five fish total including a pair of Genicanthus semifasciatus angelfish and a Harlequin Tuskfish; my favorites.
Every [size appropriate] reef tank that I have maintained has had a Kole Tang, so one of those was added right away. A LFS was closing its doors and they had a very small Yellow Tang about the size of my Kole Tang, so I picked that one up as well since I hadn't really kept one of them previously.
Some pests had made their way into my system so I needed to add some utilitarian fish to combat those; a Melanurus Wrasse for MEN and a Copperband Butterflyfish for aiptasia.
In another tank, I had our original Percula Clownfish that we bought in 2009. It was the male of a spawning pair but the female had gone blind and eventually perished. It wasn't doing well in another system (lethargic/depressed) so I added it to this system and it loved the goniopora garden and is full of vigor again.
In April, I decided that I wasn't likely going to find my pair of G. semifasciatus angelfish (waited three years), so I purchased two female G. lamarck angelfish from a LFS; differently sized. They're doing well; very well. The larger fish had already developed the black pelvic fins after seven weeks in the reef and completed its transition within a few more weeks.
And then this fall, I tore down my smaller reef system and moved my Ornate Leopard Wrasse over to this reef. After some territorial "discussions", they are all doing well.
This year has been extremely busy so I haven't taken as many photos of the corals or fish, but that should change once our kids go off to college and our house becomes empty.
If you have any specific questions or comments about my system, please ask.
This is a massively condensed version of my typical build threads. I will add more posts to highlight various aspects of the complete build.
Thanks!
Last edited:


