

Aquarium lighting has undergone a revolution in recent years, overwhelmingly because of the introduction of high power light emitting diodes, or LEDs. Being involved with high-end residential construction business, I’ve witnessed LEDs “rise to dominance” in a relatively short period of time. While the aquarium and horticulture industries were among the first to adapt this new source of artificial light, home improvement businesses quickly followed, and went over and beyond with the introduction of home automation systems, where electronic devices are connected to a central hub and can be remotely accessed and controlled through an interface installed on computers and mobile devices. These days, a cellphone-controlled light bulb or an advanced smoke detector that sends text messages to home owners whenever it detects carbon monoxide are a reality within reach of the average consumer. Moreover, the technology changes so quickly, it drives prices down to the point that nowadays, an LED is a common technology most people come into contact with it in everyday life . Fish tank lighting manufacturers, trying to keep up with the trend, implemented at least some level of automation into their fixtures, most often through auxiliary controllers and wireless hubs that consumer had to pay extra for. Until now …
Enter Aquaillumination Prime, one of the very few LED lights with built-in controller readily available in North American markets. Designed after the merger of the two largest US aquarium LED lights manufacturers – Aquaillumination and Ecotech Marine, the combined forces of engineers from these two companies allowed for the creation of a product the aquarium scene has not seen before. AI advertises the light as being the most affordable, smallest, and brightest LED panel with full control over the color spectrum. Let’s see how these claims turn out in real life, starting with the hard facts.
I should mention before I start that I have no relation to Aquaillumination and I do not receive any financial compensation from the company for writing this review. I simply bought the light to install it on my nano tank and was then inspired to write an article about its performance.
LIGHT SPECIFICATIONS
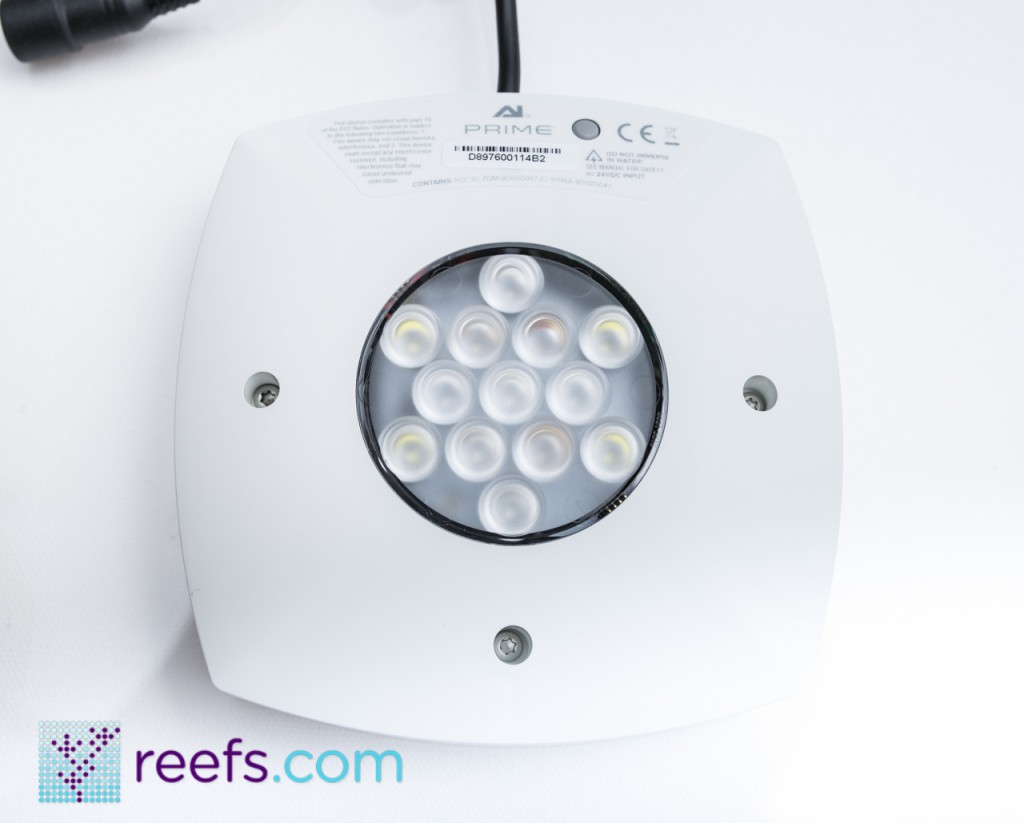
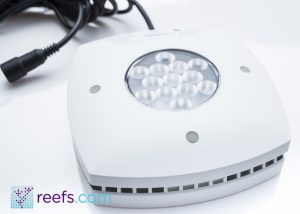
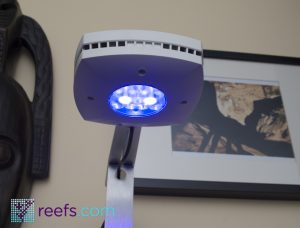
AI Prime is a very compact light featuring a single cluster of LEDs mounted on a PCB board with individual lenses for each emitter. There are 13 LEDs arranged in a star shaped cluster and divided into seven 7 independent channels. The LED arrangement was designed for a maximum light efficiency and optimized color blending, which means that AI tried their best to squeeze out high PAR and PUR numbers while avoiding the so-called “disco effect” where individual colors overlap each other rather than blend together, creating an unpleasant “rainbow” look to the tank. The LED array consists of:
-4 x Cree XP-G2 Cool White
-1 x Cree XP-E2 Blue
-1 x Cree XP-E2 Green
-1 x Osram Olson Deep Red
-1 X Osram Square Deep Blue
-1 x SemiLED Violet (415 nm wavelength)
-1 x SemiLED UV (405 nm wavelength)
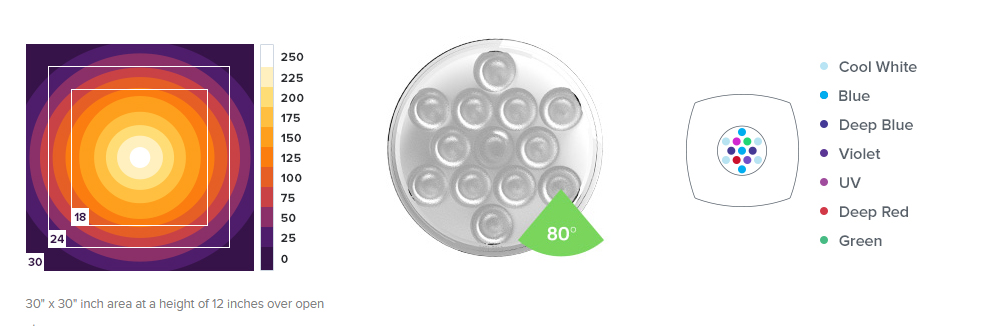 As you see in the above diagram, taken from the AI Prime spec sheet, emitters are wisely spread around the cluster, with four cool white LEDs on the outside “corners”, three Cree XP-E2 Blue across the middle and the rest of the colors arranged tightly in a hexagon shape. It’s worth mentioning that AI Prime LED array is very similar to the one used in the company’s flagship Hydra panels, with the exception of 3 CREE XP-E2 Blue emitters as opposed to Hydra’s Cree Royal Blue. It’s safe to assume Aquaillumination chooses Blue instead of Royal Blue to bump up brightness, as Blue LEDs look significantly brighter to the human eye. A single-mold acrylic cover, complete with 80 degree lenses, sits on top of the LED cluster. Prime comes with only one choice of lens angle of light spread, which is understandable given the fact this light is aimed for shallow nano tanks and aquariums not deeper than 20” (when combining several Primes together). Aquaillumination advertises Prime as having a 30” x 30” total light spread at 12 “ with an effective range of 24” at 12” from the lenses. PAR values peak at 260. The maximum power consumption is rated at 50 W.
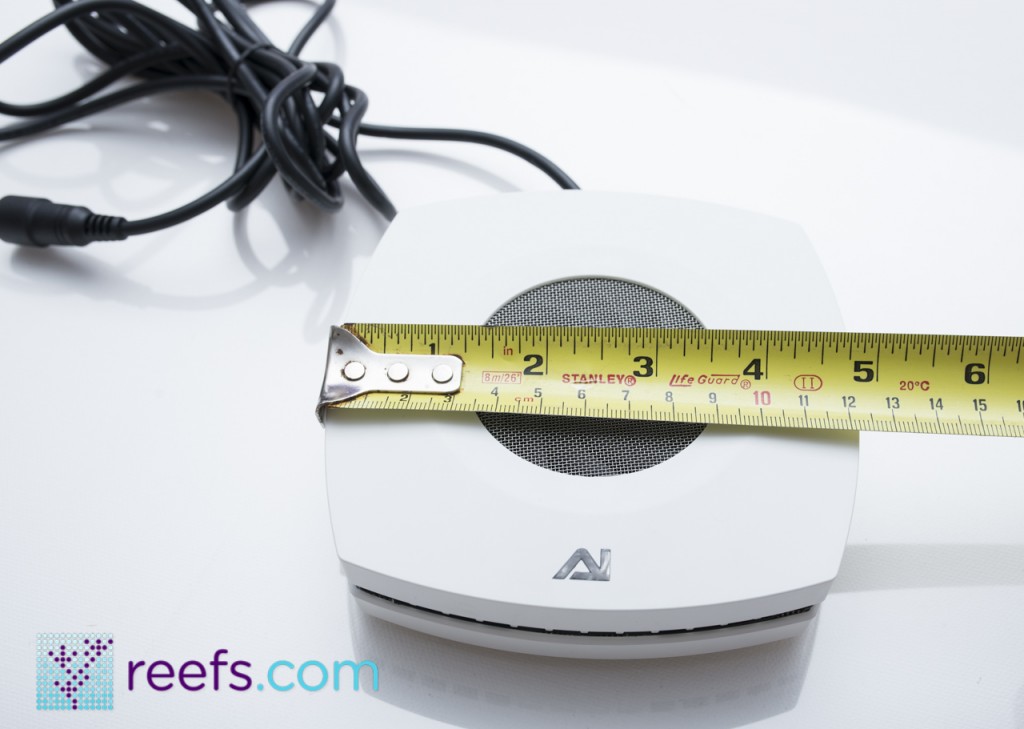
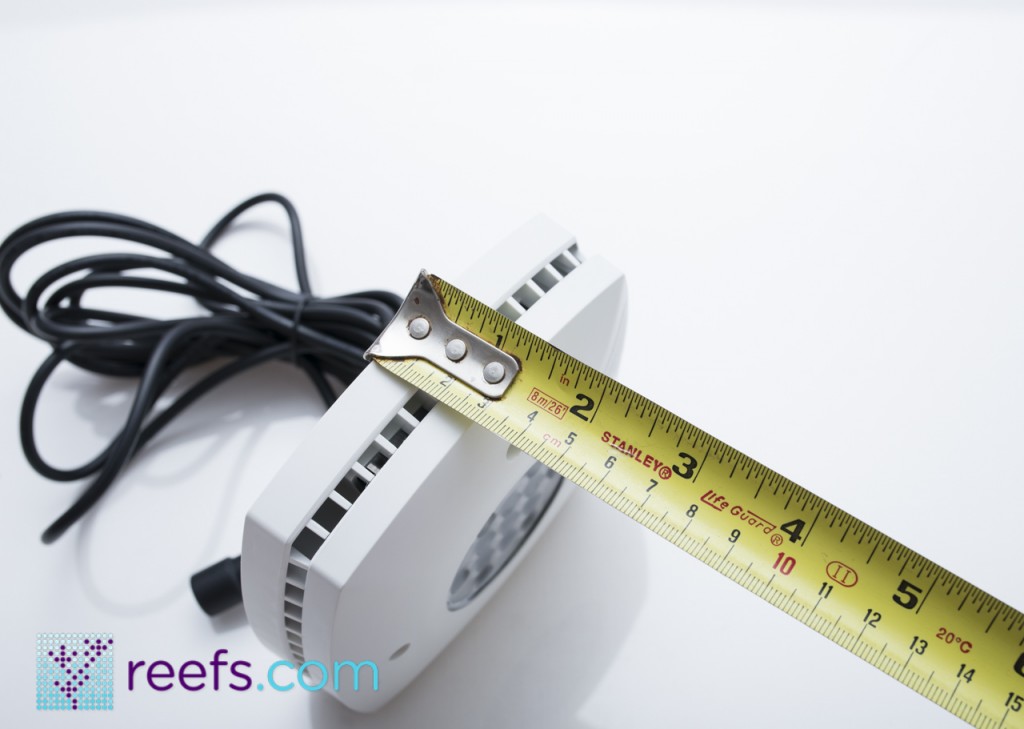
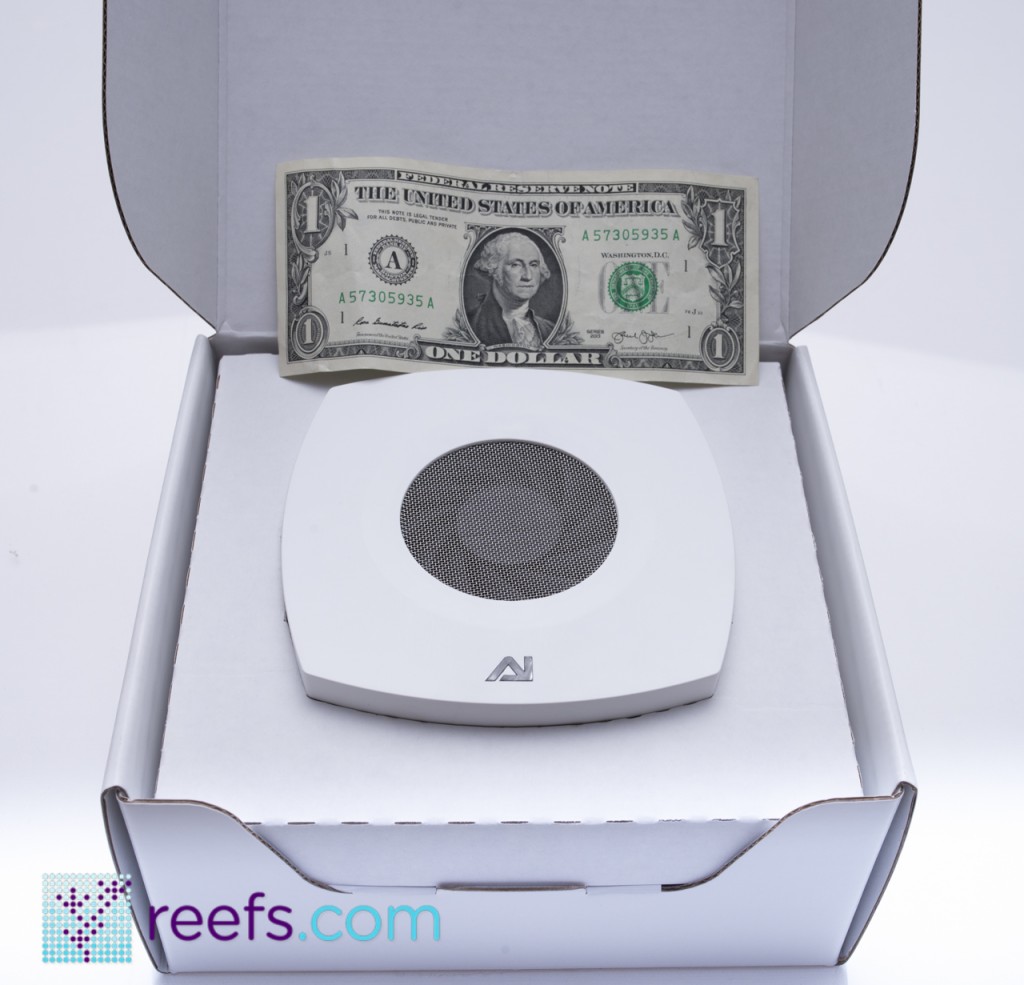
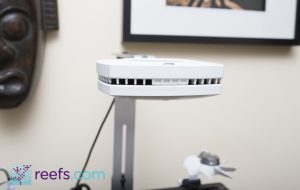
One of the three biggest selling points (the other two being its price and controllability) is AI Prime’s compact size. Indeed, the light is tiny at 4.88 “ (12.4 cm) long x 4.88” (12.4 cm) wide and 1.34” (3.4 cm) thick and it weighs only 0.95 lbs (0.43 kg). The light comes in two colors- black or white- and two, sold separately, mounting options. I will get to that in a little bit. Meanwhile, let’s talk about AI Prime most exciting feature and the one that aquarists have been talking about since the company announced the light back in 2014- wireless controllability.
Aquaillumination Prime LED light is the first product in company’s line to offer full remote controllability without the need of additional controllers or wireless adapters. It’s quite simple yet ingenious in practice – Prime has a built in WI-FI adapter that communicates with your device of choice – an Apple IPhone, IPad, an Android OS phone, a PC or Mac. There is a free app called “myAI” available both in Google Store and AppStore or alternatively, you can access the light via web interface on your personal computer. You can control the light from anywhere there is an Internet access. The new light is also backwards compatible with AI’s own Director wireless platform, therefore you can pair it with AI devices if you wish. In fact, Aquaillumination is so confident of their new wireless platform, they did not include any physical buttons , except for a tiny “Reset ” switch, on the light fixture itself.
What really brought Prime to mainstream attention is when Aquaillumination announced its pricing- $199 for the light + $19.99 for hanging kit or $29.99 for tank mount. It’s by far the most affordable LED panel with this level of controllability from a major manufacturer. Let’s dive inside the box and check out what exactly you get for your $200.
WHAT’S IN THE BOX
I’ve ordered AI Prime for my 14g (soon to be 34g) tank after long hours spent on researching different options and trying to find opinions from early adopters, however, there’s still not much info on this still “fresh” light. AI postponed the release of Prime for several months, a move that got some people to lose their patience and shop for another product. Since I already had a Kessil pendant (that I borrowed from a friend of mine) hanging above my nano, I waited and waited for the light to hit the market. Then I waited some more, until the day finally came that I could order it, and a few days later, ! found a shiny package waiting on my doorstep.
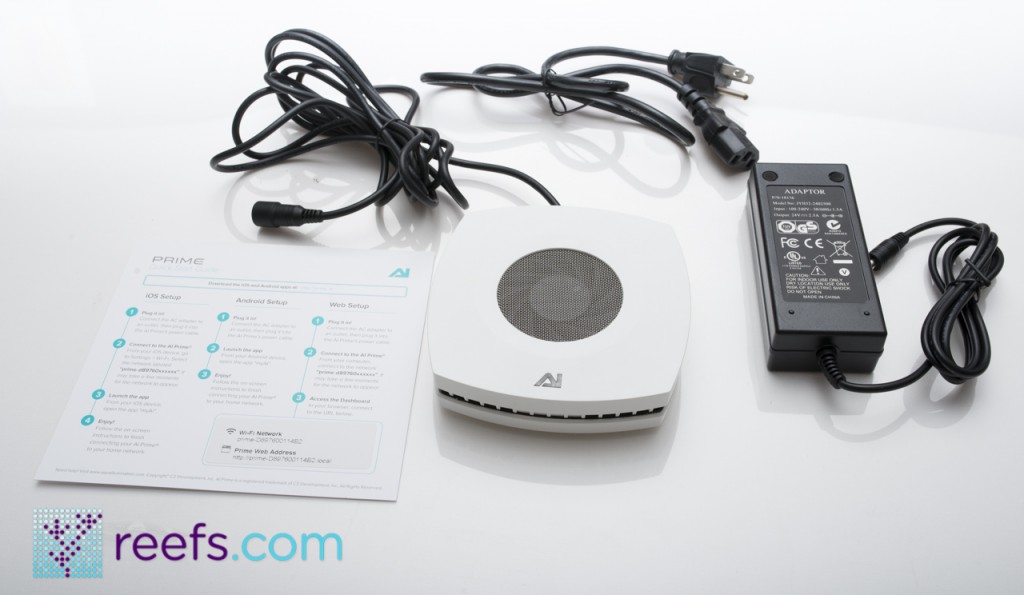
Aquaillumination Prime comes in a nicely designed cardboard box with the company’s logo and a picture of the light on the front. Inside, we have only three items- the unit itself, a quick reference guide and a power adapter. This very minimalist approach makes sense as it keeps the price down, and frankly, this is all you need for the light to function. As I mentioned before, a hanging kit or a tank mounted bracket are sold separately, a practice most aquarium lights manufacturers follow these days.
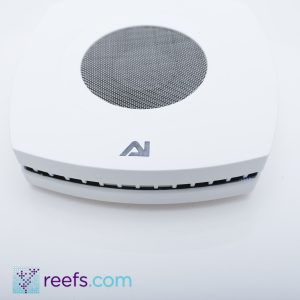
Seeing the light for the first time, it surprised me how small it really is. AI designers and engineers did a great job- Prime, being about the size of a standard smoke detector, looks and feels like a quality product. The light is enclosed in a hard plastic case. A single fan, hidden behind a steel mesh cover, and an illuminated AI logo sit on top while the LED cluster, protected by a lens cover, as well as a tiny RESET button, are located on the bottom of the unit.
The back has a AC/DC adapter socket and a threaded hole through which the mounting hardware can connect. There is a strategically-placed horizontal slot running though the center of the light’s casing, providing necessary air circulation for the heat sink that sits inside. Overall, AI Prime looks and feels solidly built and leaves little to complain about. It takes a tiny amount of space hanging above an aquarium, giving enough room to maintain the tank.
INITIAL SETUP
AI Prime is centered around a wireless platform; in order to program it, an aquarist needs an Internet access and a compatible device that can communicate with the light. Fortunately, anyone with a computer and/or a smartphone would be able to control Prime. The web interface can be viewed on a long list of browsers (I’ve checked it on Google Chrome, Apple Safari, and the new Microsoft Edge and Firefox – all worked flawlessly) on both PC and Mac. Alternatively, you can download a free app for an IPhone or Android devices.
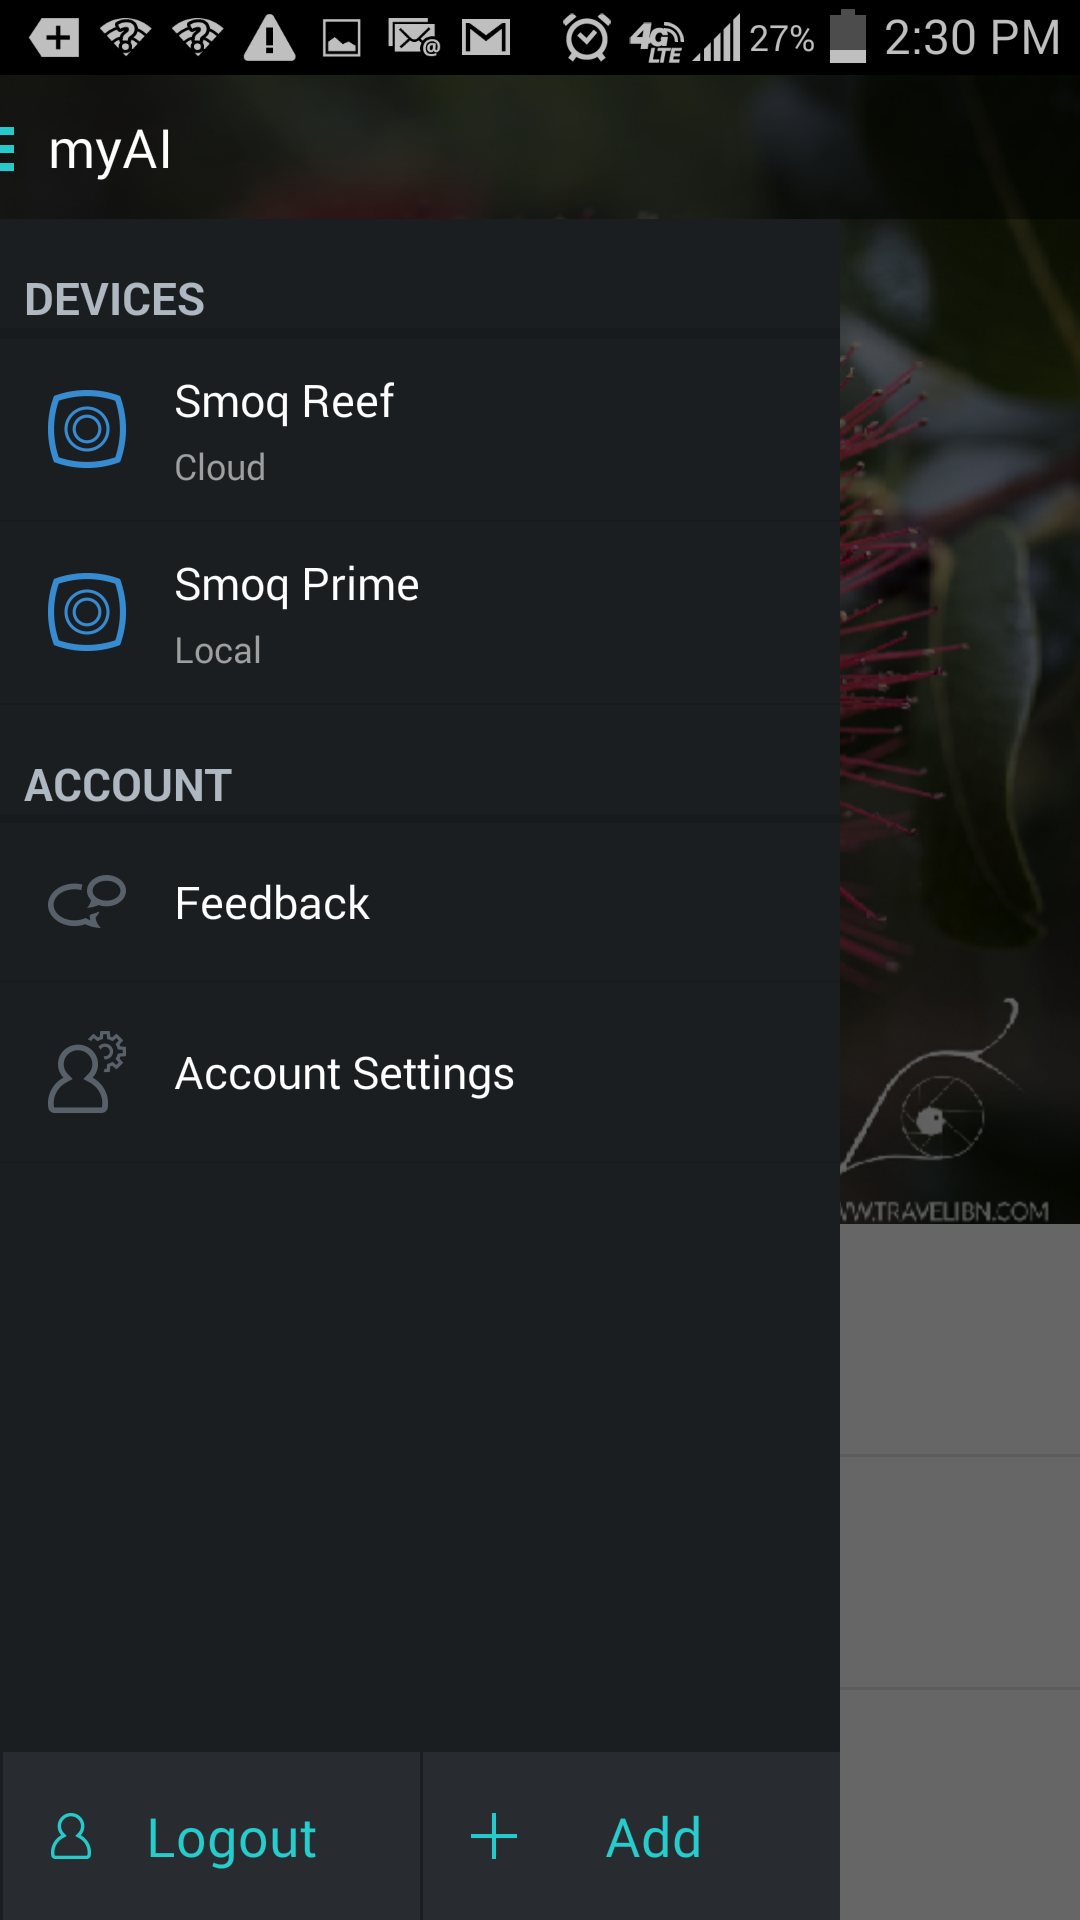
I chose to use my smartphone, downloaded the respective app from the Google Store and installed it on my Samsung phone. It is called “myAI” by C2 Development and as I mentioned before, it is totally free.
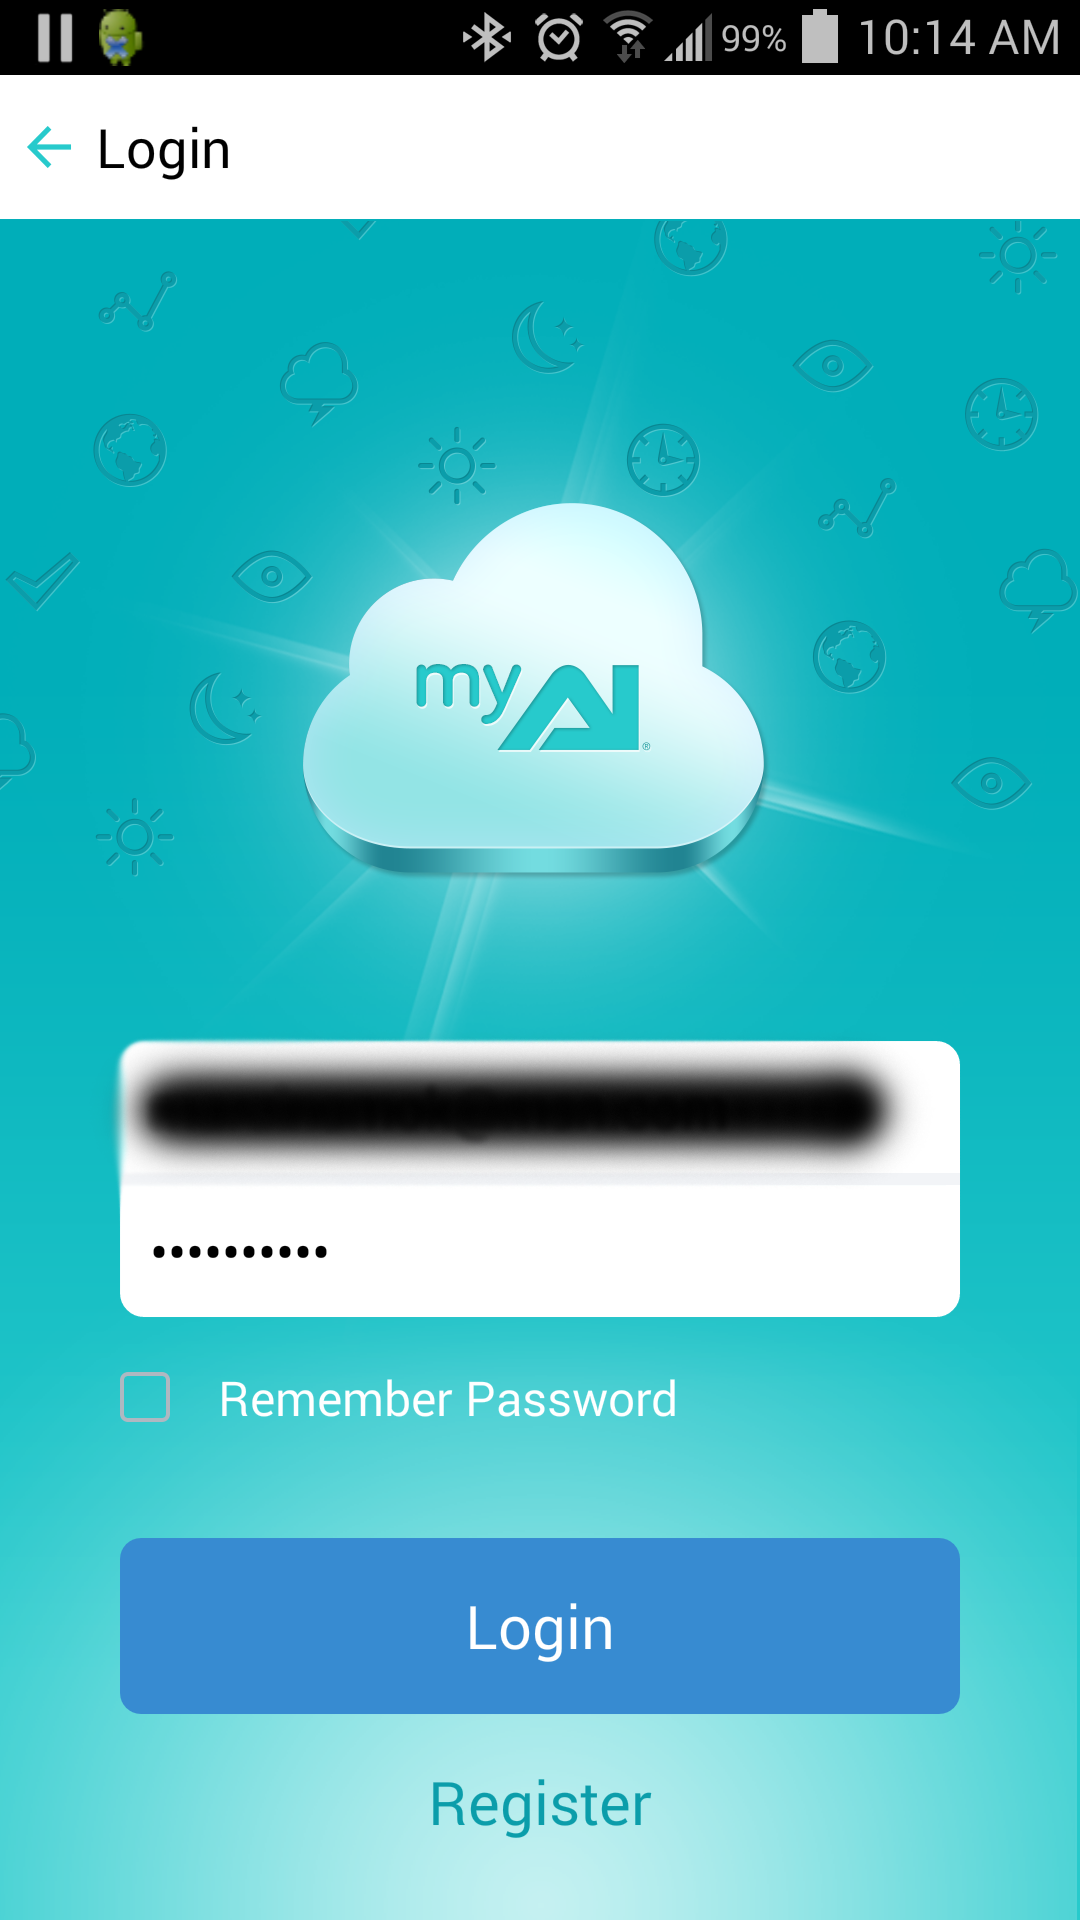
The initial installation process starts with connecting the light to a power source and opening the control app/web interface. I will explain the process based on my device of choice- a cellphone with Android OS. The first time you open myAI app, it asks you to register an account with your email and password. You will need that for accessing the light from a web interface later (the app remembers the login settings after initial setup). After completing the registration, the next window will show all available lights within your home Wi-Fi (the process is extremely fast, it found my AI Prime within a second). Tap a unit from the list and it will switch to another window where you type in the name of your tank and finally, a list of wireless networks AI found in your area. After choosing your home network, typing in the Wi-Fi password and hitting OK, the app displays yet another function window. This step displays all the lights that are connected and, in case you are using more than one Prime, it lets you choose which one will be the parent unit that all others synchronize with. That means you only need to change settings on one Prime to control the entire string of them. You can also make each unit be controlled independently if you wish.
The last setup screen shows a summary of the chosen options, with the name of your unit, the Wi-Fi it is connected to, and the type of connection it obtained. After tapping the “Done” icon, the light connects to the Wi-Fi network and the AI logo on it starts blinking. When it turns solid green, the Prime is ready for action!
The whole process, when described in details, seems long and complicated, but in reality it takes less than a minute and is very intuitive. Truly, the implementation of a wireless protocol is a big step forward and hopefully, in the near future, it becomes a standard for all LED manufacturers.
CONTROLLING AI PRIME WITH A SMARTPHONE APP
The Android and IPhone apps look almost identical and should not create any confusion when going cross-platform. It’s important to note that I used a recent stable 1.2.0 version of the app that added some extra controllability to the Prime.
The main screen of the myAI app has several menus to choose from. Starting from the top left corner, the name of your device shows up and when clicked, it shows a list of all the registered devices that can be accessed with the app. Next, on the top right, we have two icons. The one resembling a photo camera takes you to a menu where you can change the app’s background to whatever picture you choose. It has a resize feature built into it, therefore you can upload any jpeg image and fit it within your phone’s screen boundaries. The gear icon, when clicked, jumps to a settings menu. From the top, there is an option to type in your address and time zone, essential if you wish AI Prime to follow the moon phases in your area (more on that later in this review). Next, you can change the network settings in case you wish to connect to a Wi-Fi hotspot different from the one chosen in the initial setup. Third option allows you to pair your light with a DropCam camera to remotely view the tank from within the myAI app. Unfortunately, I do not own a Dropcam camera, so I couldn’t test that feature. The last sub-menu displays the Prime serial number and firmware version (at the time of writing this review, I was using the latest version – 1.2.0). You can also access a “store demo” mode, which is a pre-programmed scheme showing off the light’s capabilities. Finally, the “Network reset” and “Factory reset” options hide here, in case something goes wrong with Prime.
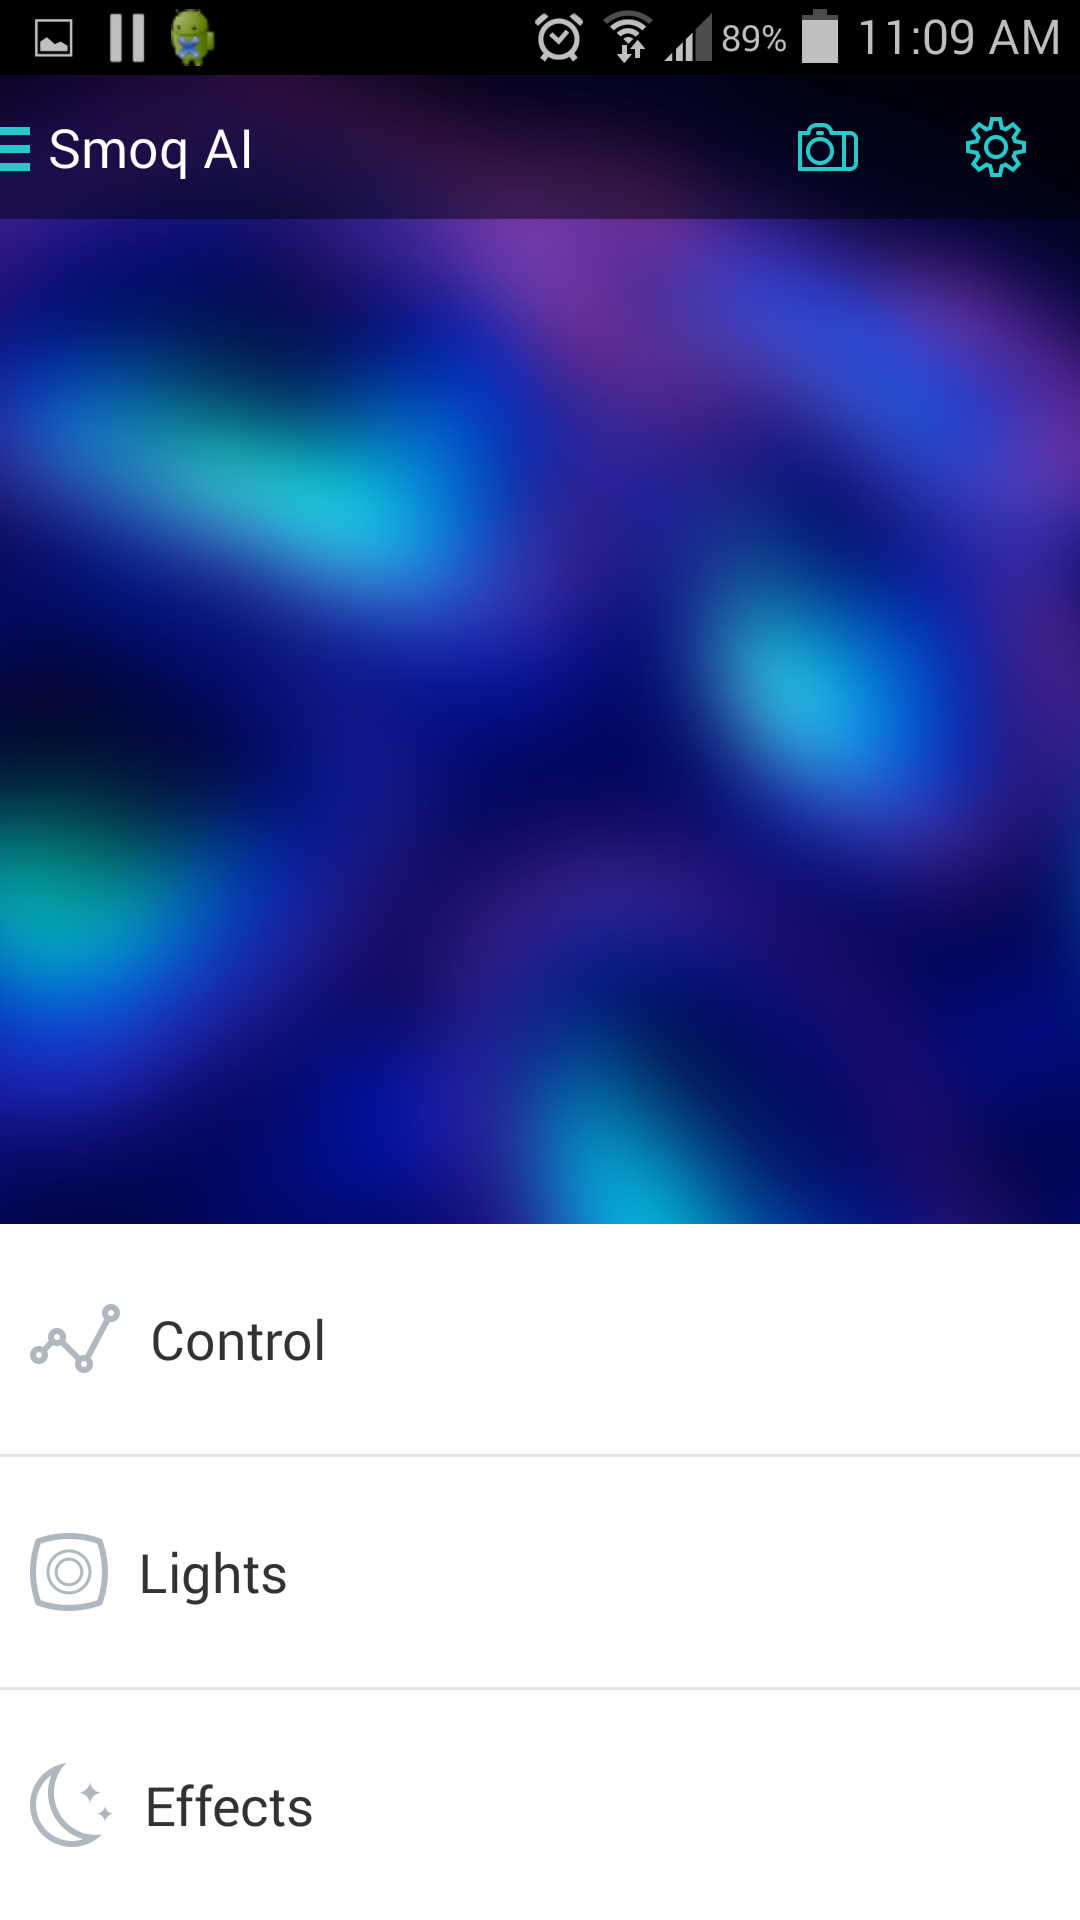
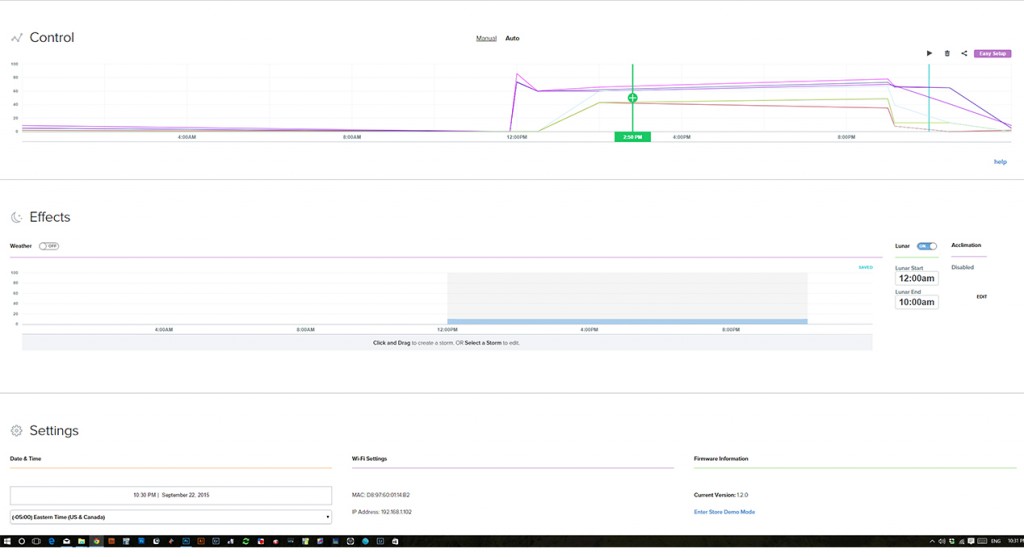
The three buttons on the bottom of the screen are where all the “action” takes place. The first one, labeled “Control” is obvious – this is where you program your photoperiod and adjust the intensity of your LEDs. The second one, named “Lights”, shows a list of connected Prime modules, complete with their status. At the bottom of the screen, the “Effects” tab allows access to various programmed schemes like lunar cycle, weather effects, and Acclimation mode.
The “Control” panel is the most sophisticated part of the myAI app, not to anyone’s surprise, as here’s where an user can program each of the Prime’s seven dimming channels. It has a somewhat steep learning curve and unfortunately, neither the quick reverence guide nor an online manual explains it clearly. That being said, once you get the basic logic behind the program functions, setting up the light is a breeze. The “Control” menu, when clicked, displays two tabs- the default “Manual” and “Auto”. They both are further divided into sub-menus that require a closer look.
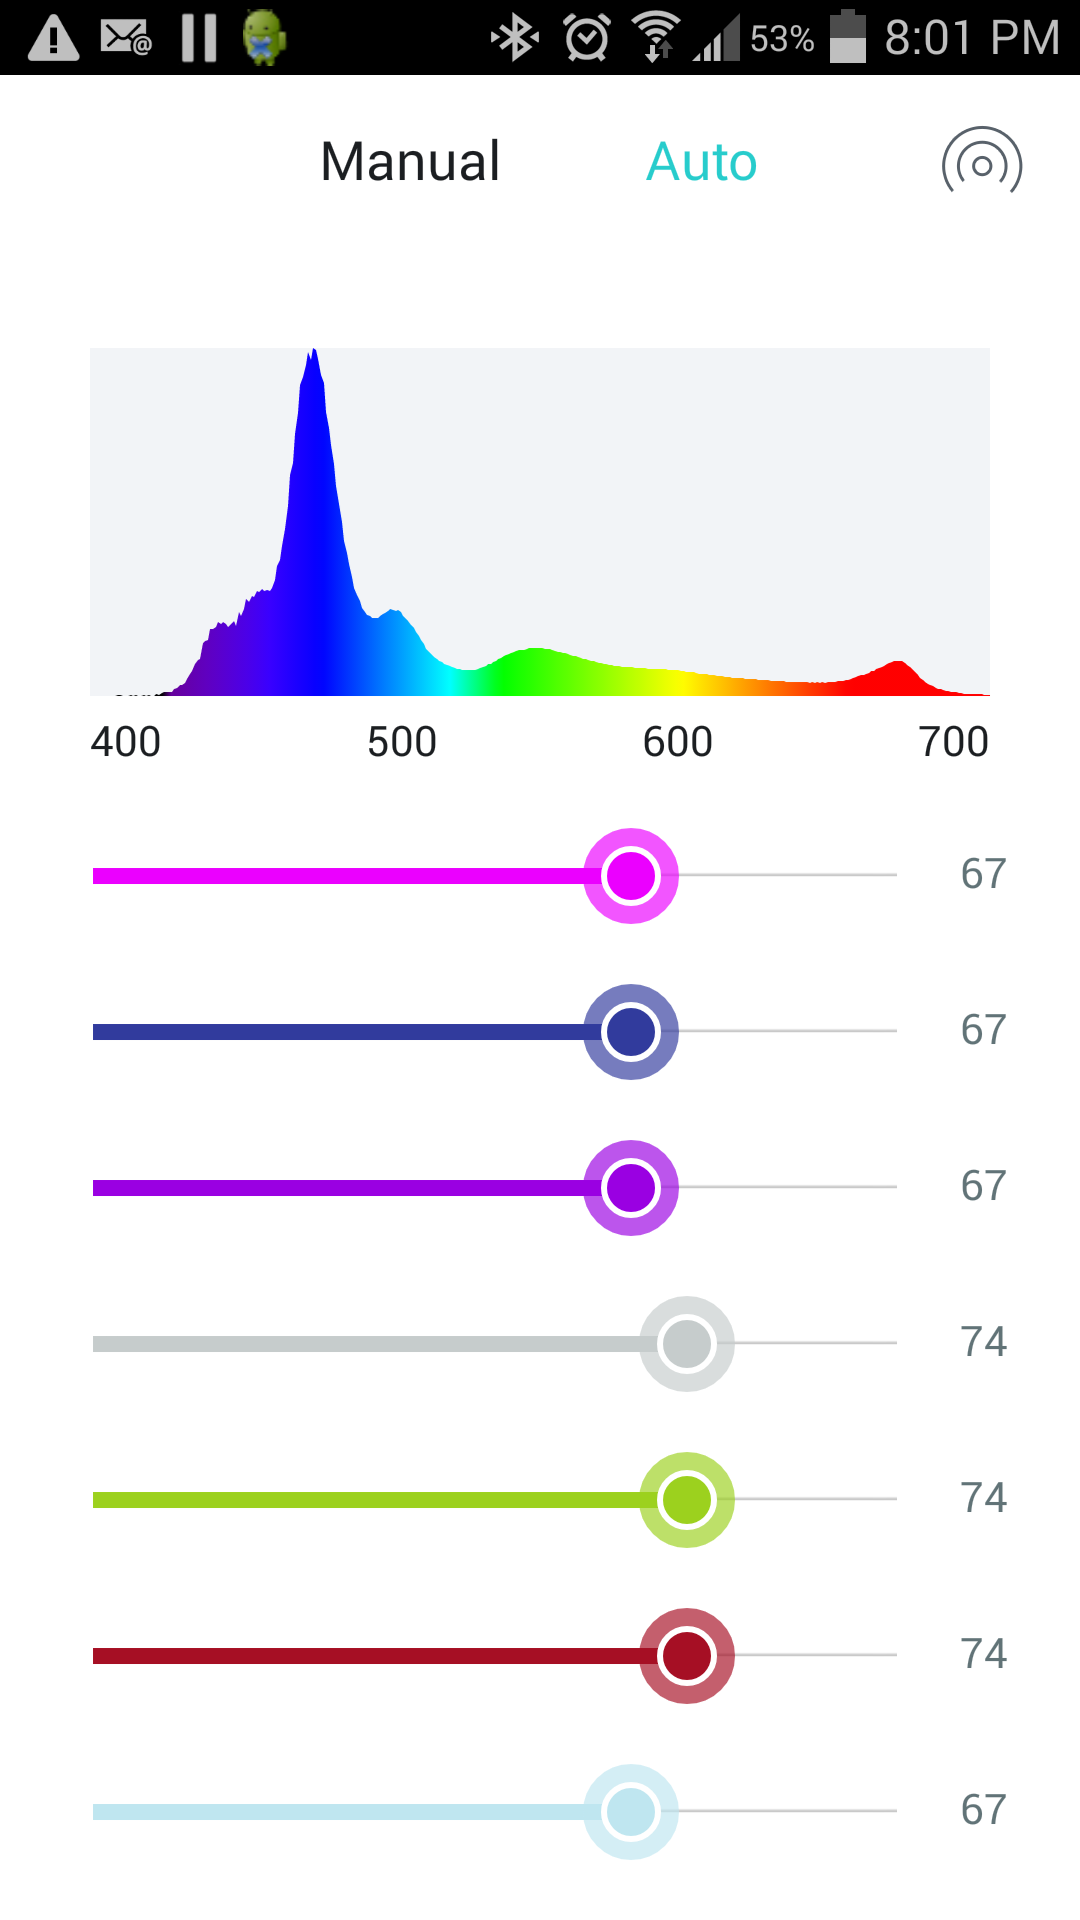
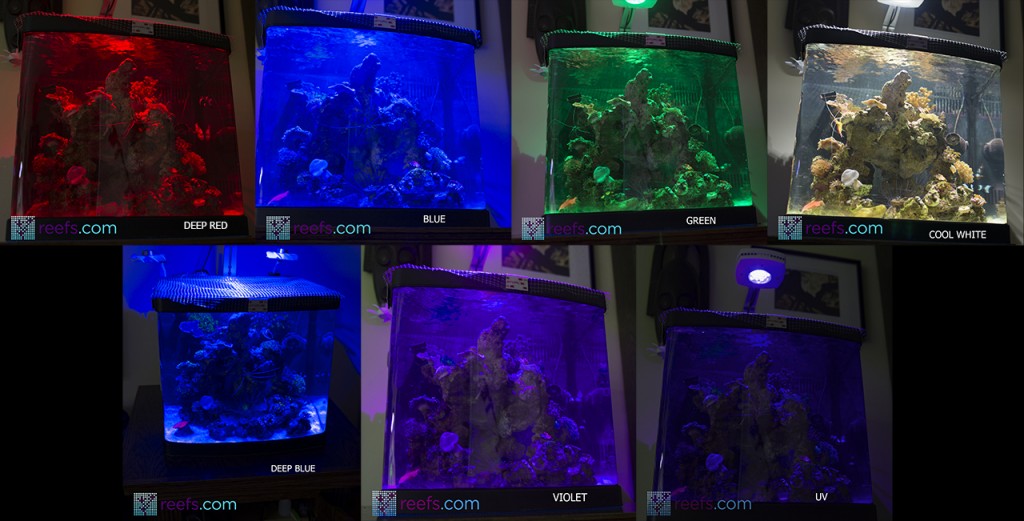
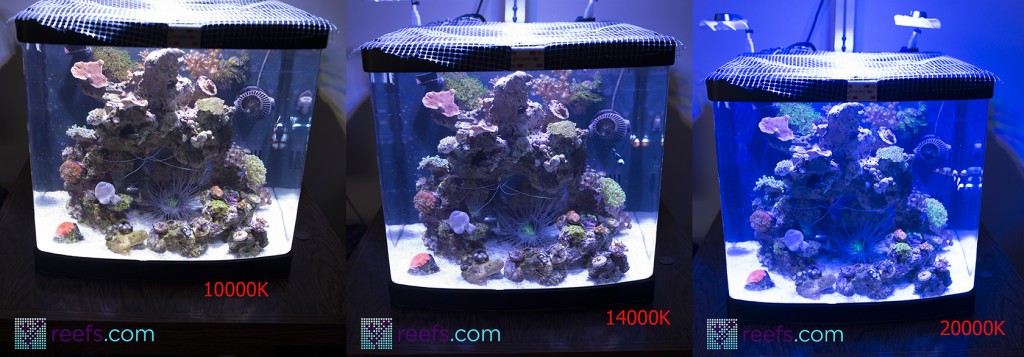
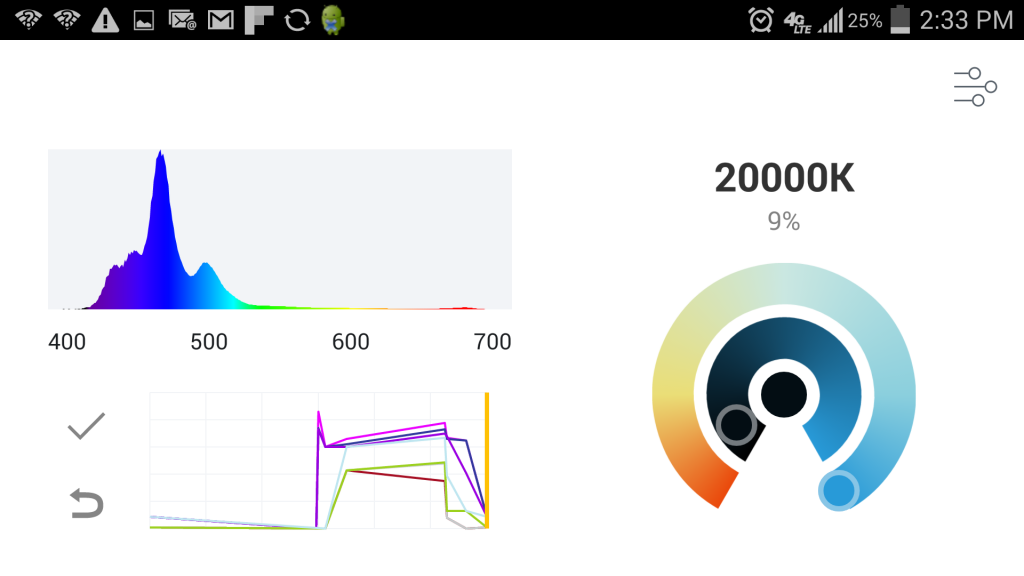
First is the manual mode. The default screen shows a graph representing the spectrum of the light output and below it, a series of sliders, each serving an individual dimming channel. From the top, we have Violet, Deep Blue, near UV, cool white, green, deep red, and blue. Adjusting these sliders changes the spectrum graph in real time, a welcome addition for all hobbyist who are dead serious about the spectrum their light outputs. The dimming works from 1-100% in 1% increments and Prime reacts instantly, either over a Wi-Fi network or a 4g signal from a mobile network. Below is a collage image showing my nano tank with different color LEDs on. I’ve adjusted the white balance to the room rather than the tank to accurately present what each color channel looks like.
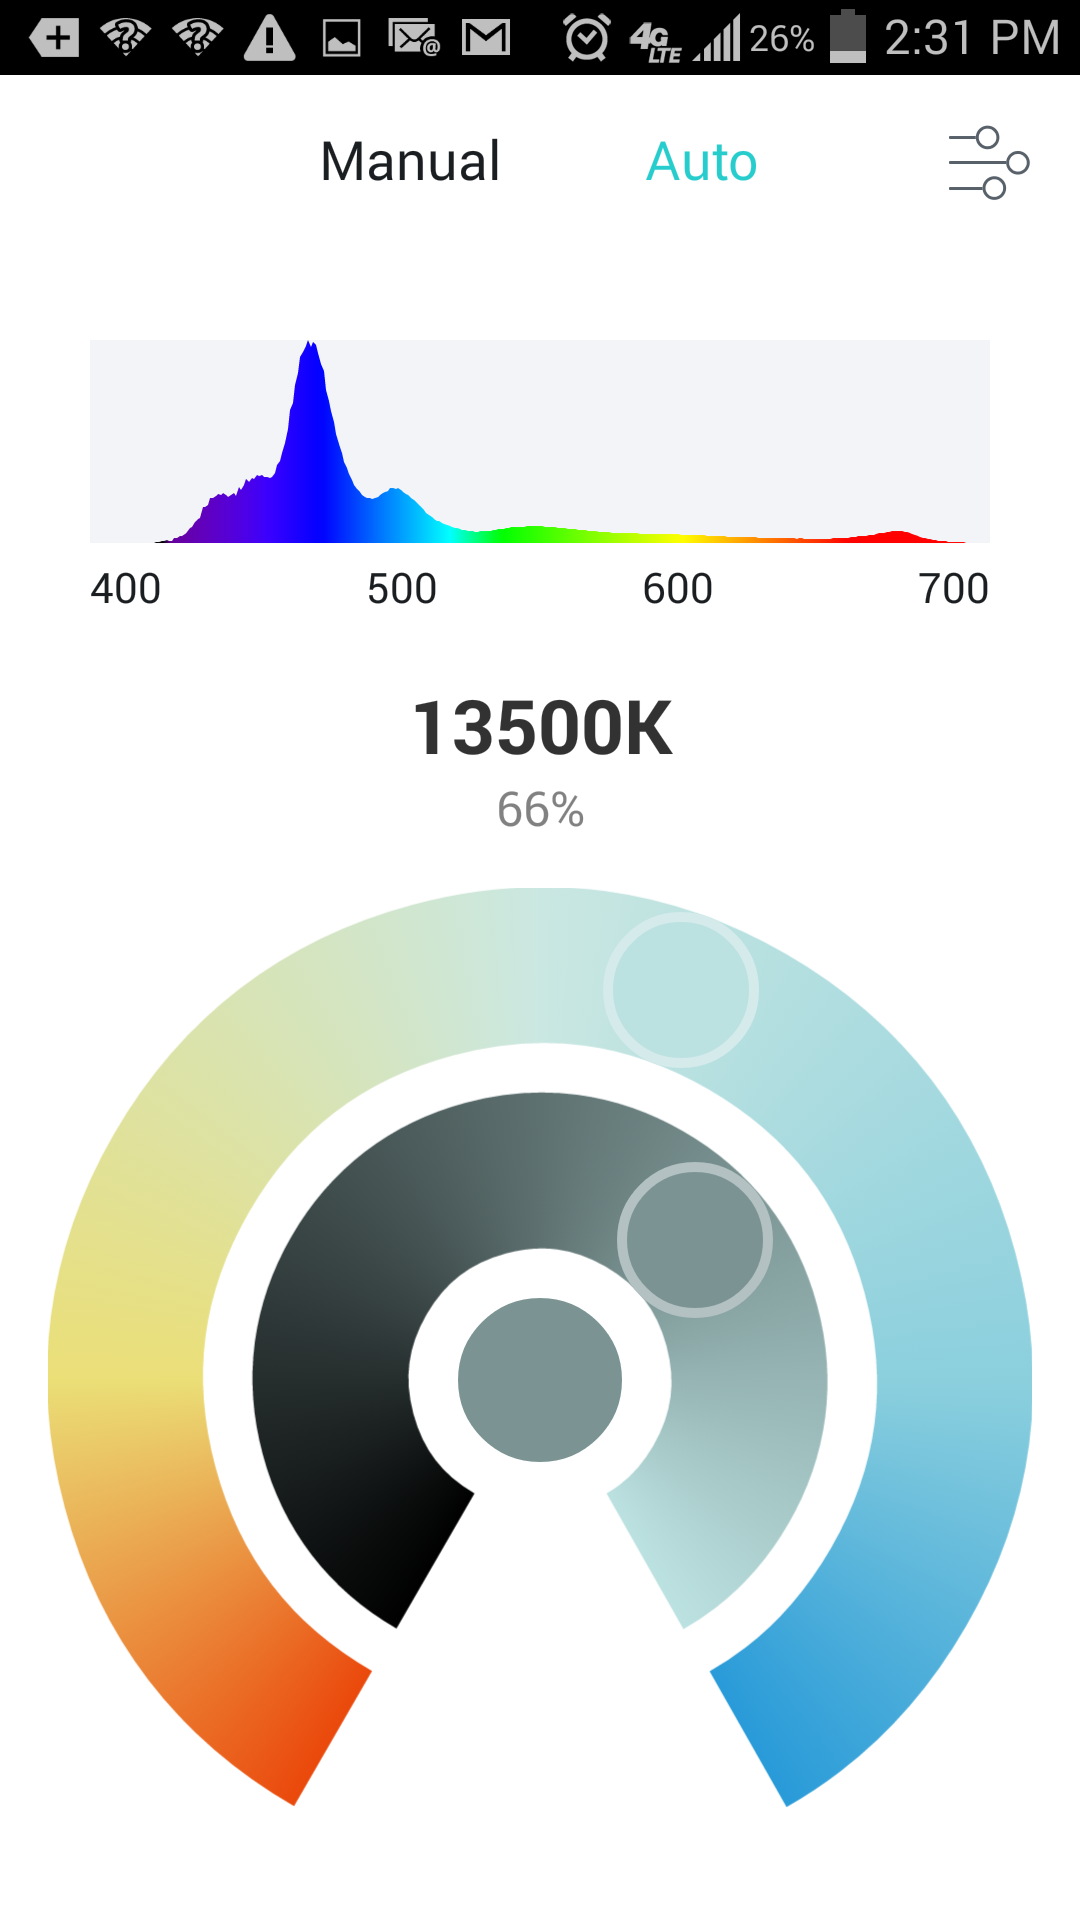
For all those that think tweaking each individual color is too much customization to swallow, Aquaillumination designed a simplified method of adjusting the light output. It is accessible by clicking the little icon in the upper right corner (within the manual menu- see picture), which takes you to a separate screen, displaying the earlier mentioned spectrum graph on the top and two oval shaped sliders. The outer one controls the color temperature of the light, the inner its intensity. Again, the effect can be visible immediately after changing either of the two variants.

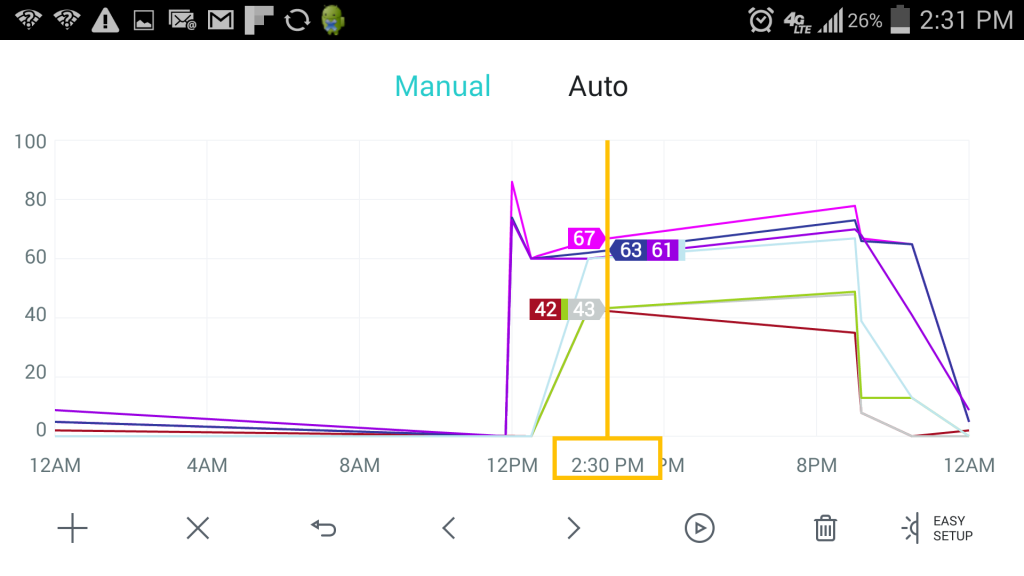
The other mode in the “Control” tab is the one that most aquarists spend a great deal of time programming. Switching from Manual to Auto takes you to a separate tab with a graph representing a 24-hour time period on the horizontal vector and intensity on the vertical. Each dimming channel is shown as a separate graph that changes as you tweak the spectrum output. Below, there are a bunch of icons used to program the photo period. Unfortunately, none of them are explained, therefore you need to experiment to figure it all out. Let me help :)- from the left-hand side, there’s a “+” icon which adds a control point to the graph. First, you click anywhere on the timeline and then tap the “+” button, which takes you to a separate menu.
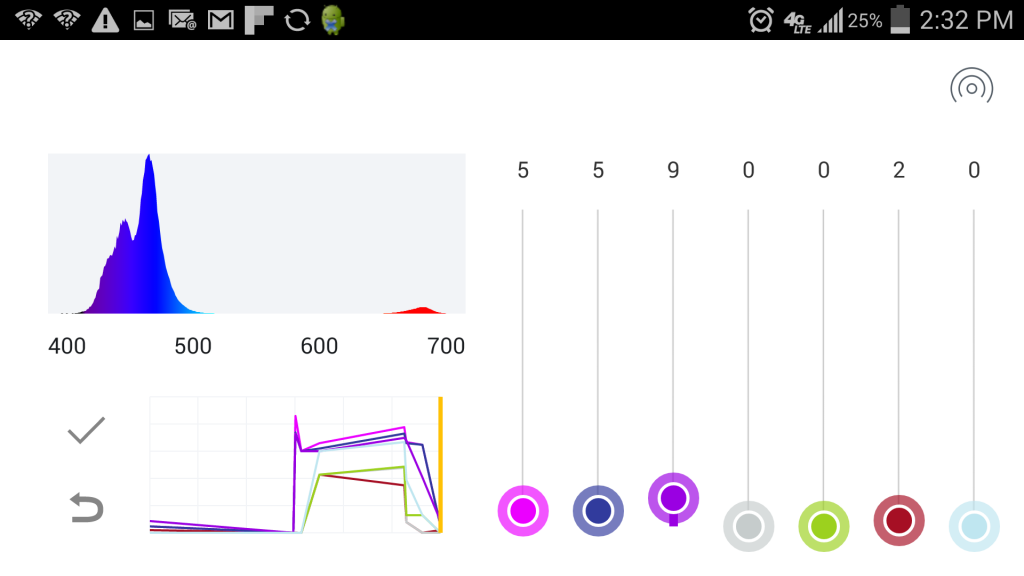
It looks similar to the manual menu, with sliders for each individual dimming channel, the spectrum graph, and a preview of how the program will look like on the main time/intensity graph. There’s also an option to adjust the spectrum using the earlier-mentioned color temperature & intensity sliders (small icon in the upper right corner).
Tapping the “Accept” button takes you back to the main window; any changes you made are clearly visible on the “program” graph. Every time you want to change how the light behaves, you add a control point. As little as 3 control points are enough to create a photoperiod, however, you can add as many as you want, the only limit being they have to be a minimum of 5 minutes from each other on the timeline.
The next four icons on the “Auto” mode screen help to move around, delete, or undo the previously-created control points. The third icon from the right is more interesting as it allows you to simulate the created light scenario in fast forward, so an user has a feeling how his/her light will change the output during a 24-hour photoperiod (although, with many control points, the light responds with a delay when using the “fast forward” feature.
The trash icon wipes the entire program clean. Finally, the first icon on the right is the so-called “Easy setup” where you have a simplified menu that lets you choose the sunrise/sunset time, a ramp up/down period and the intensity/color ratio throughout the photoperiod. Honestly, if you don’t care about looking at the tank with only a specific color LED on or simply don’t have time to mess with the more advanced program modes, you can set the light up using “Easy setup” and forget about it.
Going back to the app home screen, there is one more submenu that needs explanation. The “Effects” tab is where you can program some random weather patterns or synchronize your Prime with lunar cycle to impress your friends when they come over to see the light.

The first one from the top, named “Lunar” is by far the most confusing mode and until recently, I couldn’t figure out how it works. I did eventually, and here’s my take on it- first of all, there’s a slider turning the Lunar mode on. Clicking on the name instead leads to another screen where only two settings can be changed- START and END time. Setting these two variables tells AI when it enters the lunar mode and how long it lasts. That means you can program the lunar mode in the middle of the day if you wish. The AI has a pre-programmed lunar calendar, which follows the phases of the moon and dims the light output accordingly. For it to work, you need to first program a light output for within the lunar cycle, otherwise it will not have anything to dim. Here’s an example- let’s say your photoperiod starts at 12 pm and ends at 12 am. The light turns on at 12 pm and shuts down completely at 12 am, so there’s no light output at all between midnight and noon. Now, you set up your lunar cycle to start at 12am and end at 10 am, having a good 10 hours of artificial moonlight for your fish to “enjoy”. To activate the lunar cycle, you have to go back to the program mode and set up a light output for the 12 am-10 am period. That means any output, may it be one, two, or all channels. For the sake of this example, let’s assume we set up a deep blue channel to 5% for 12 am-10 am, same as the lunar cycle setting mentioned previously. With lunar effect set to “ON”, AI Prime will follow the moon phases, dimming the blue channel accordingly. It calculates for 8 lunar phases, so for example at the new moon, the Deep Blue channel will be at 0%, at First Quarter 2%, Full Moon will output the entire 5% we set up previously and Third Quarter it goes back to 2%. It’s an interesting feature and an excuse to watch your tank even beyond the boundaries of a regular photoperiod.
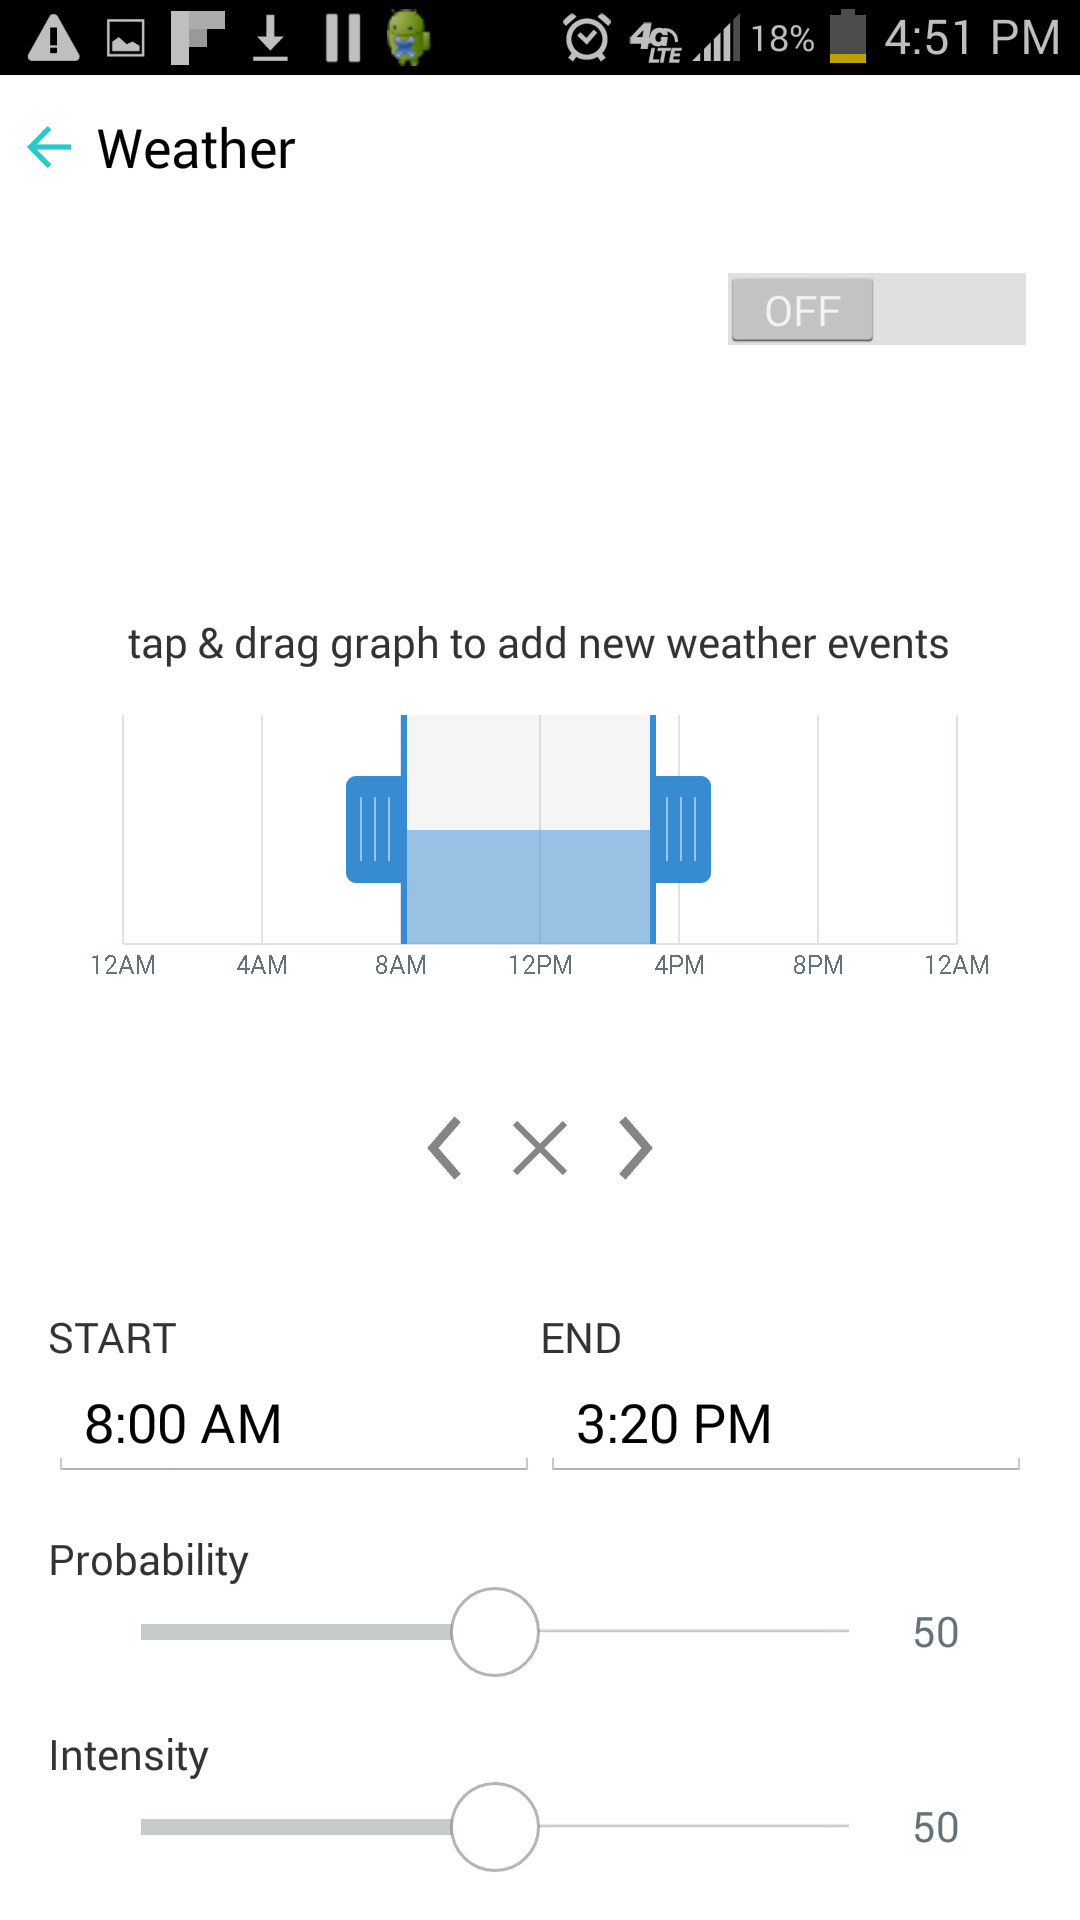
The other tab in the “Effects” menu, represented by a little storm cloud and named “Weather” creates a random storms (with rapid dimming of certain channels and flickering LEDs imitating a lightning bolt) within a given time frame. When clicked, the “ Weather” panel displays a graph where you set up a timeline for each weather pattern you wish to program (you can also use the two fill forms for start and end of the cycle, located directly below the graph) and two sliders- “Probability” which dictates the chance of a storm happening (for example, setting it at 100 means the storm will happen on every occasion, while 50 means it will have a 50% chance of happening) and “Intensity” that tells Prime how violent and “flashy” each storm will be. At the time of writing this review, only a storm can be programmed, which, in my opinion, is more a gimmick that does nothing but scares your fish, but Aquaillumination may add a “Passing Clouds” setting, which they have in their earlier wireless platforms.
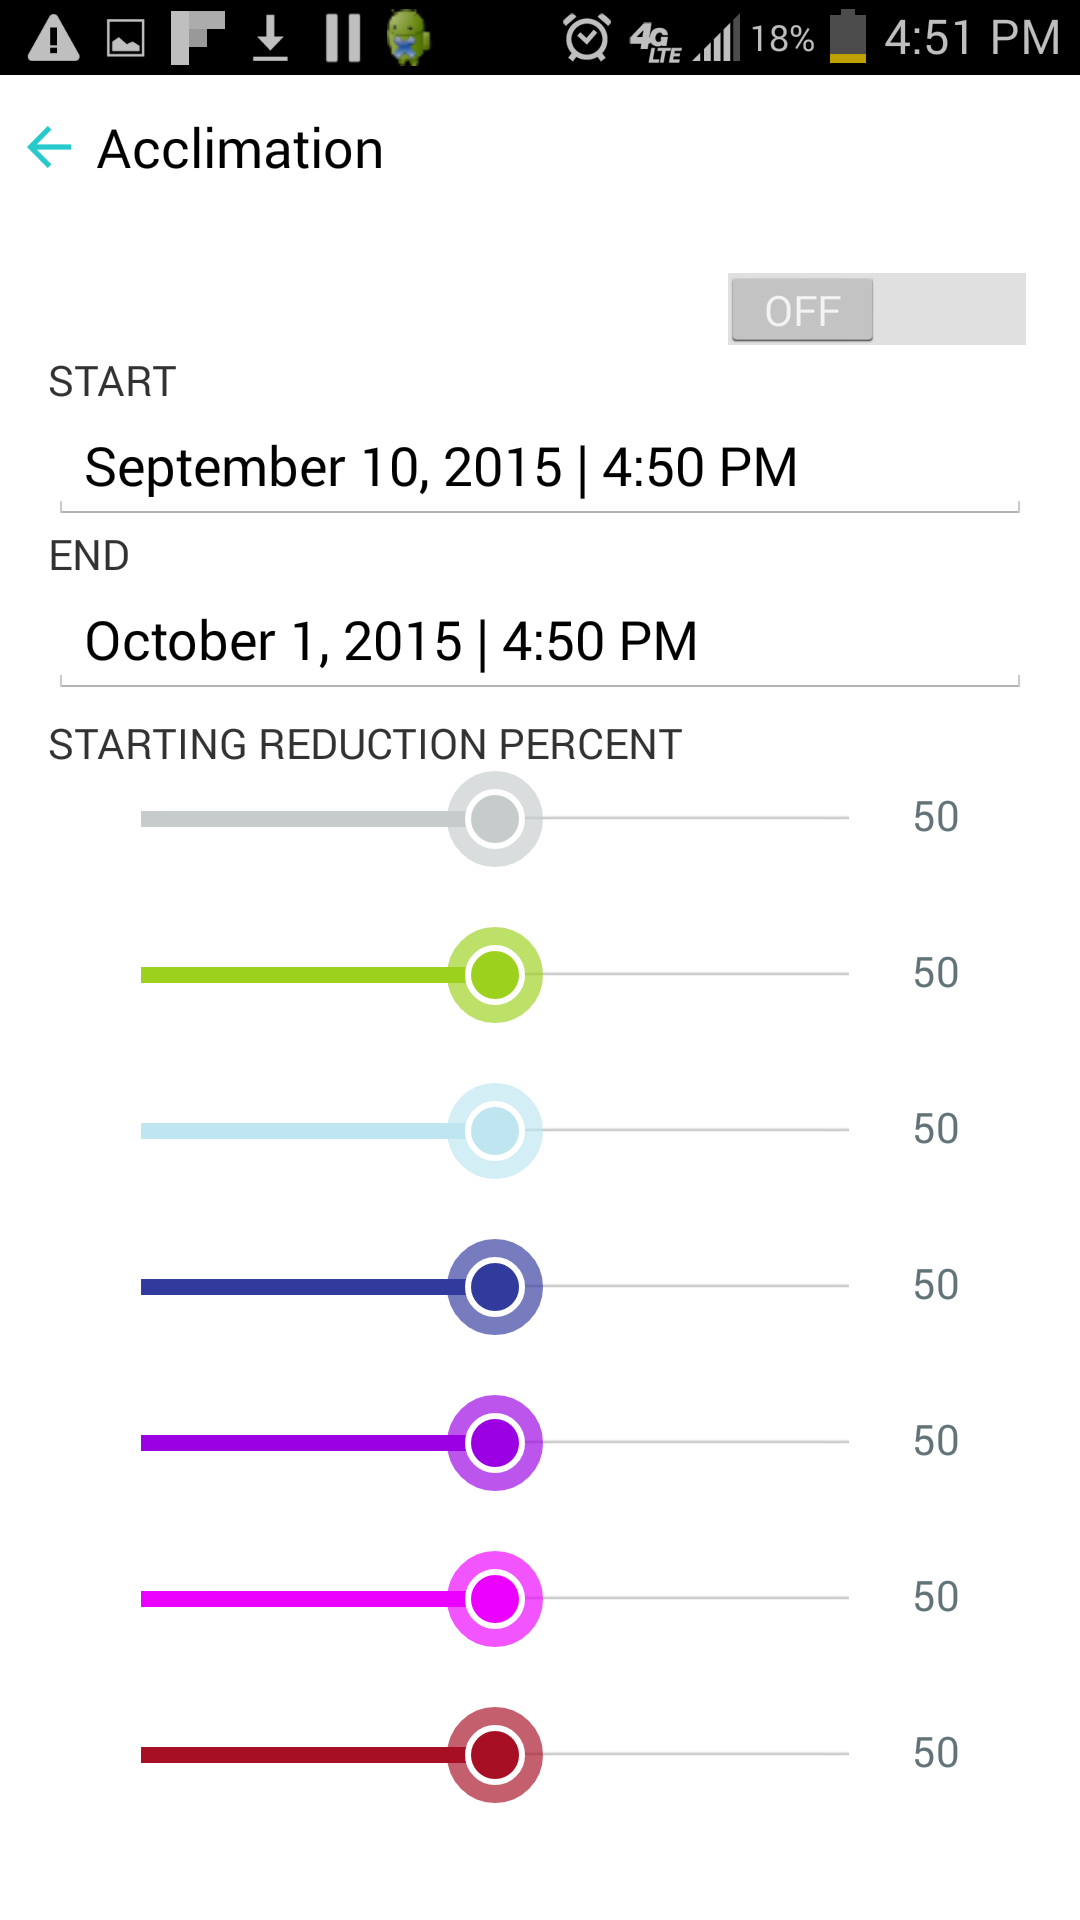
Last but not least, the “Acclimation” tab offers the most usability of all three effects. As the name suggest, this setting allows corals to slowly acclimate to a new light without the user constantly monitoring the process. I should mention beforehand that to have access to “Acclimation” mode, you need to upgrade the firmware to the current 1.2.0 version (the app will prompt you of an available update). This mode ramps up the light’s intensity over a given time period, helping sessile invertebrates acclimate to the output. The user sets up the start and end date and the initial fraction of the preprogrammed intensity. Each channel can be programmed separately. For example, if you have your cool white set at 60% and set up acclimation to 50% “ starting reduction percent” over 30 days, the light will start at 30% on the first day, ramping up a little bit everyday to the original 60% at day 30th. This simple yet very useful feature help protects corals from bleaching in response to a new light source.
These are the modes currently available, with more probably coming with future updates. If you already own an AI Controller or AI Director wireless module, you can pair Prime with them to access even more weather effects, like “Passing Clouds” or “Regional”.
CONTROLLING AI PRIME USING WEB INTERFACE
Changing the light settings from a web browser is essentially the same as with an app, with the only difference being that almost all home computers have large screens and therefore, all settings are displayed on a single page. It’s helpful when creating a customized photoperiod, where an aquarist can precisely click on a point on the graph in need of tweaking. Other than that, the experience is very similar to phone app and it shouldn’t be a problem to figure out the light control page.
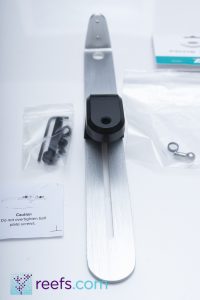
MOUNTING BRACKET

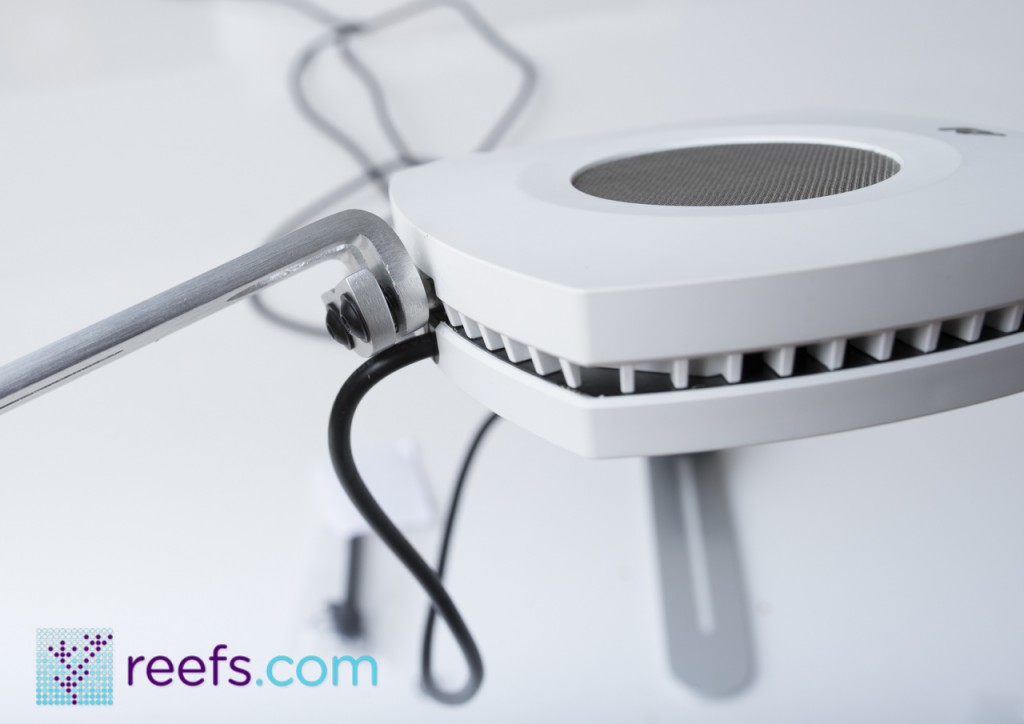
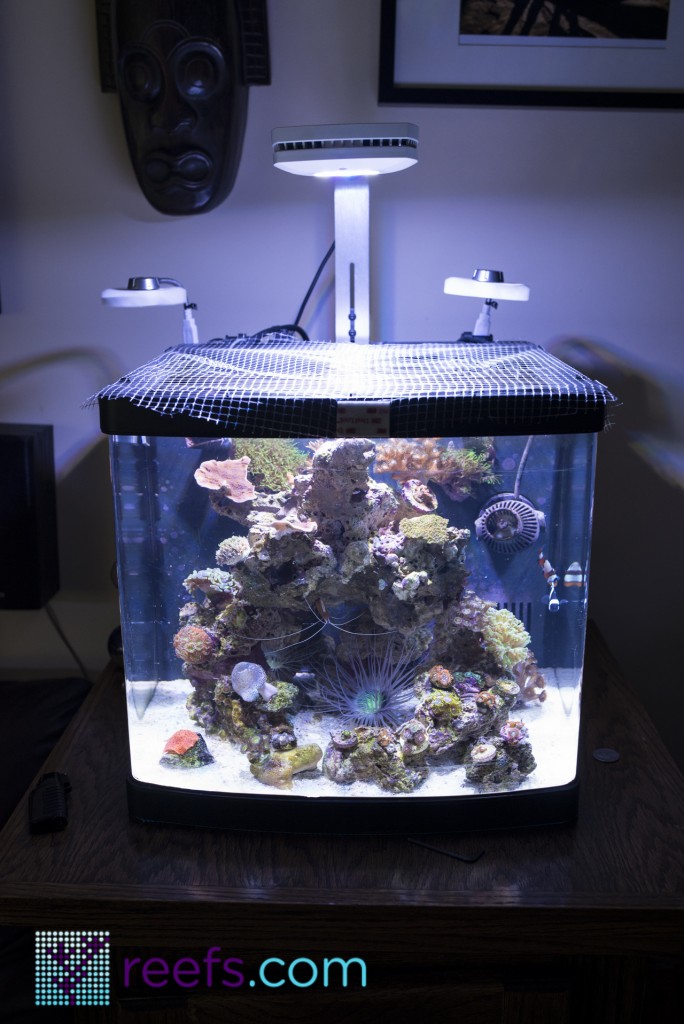
As I mentioned at the beginning of this article, AI Prime debuted with two, sold separately, mounting harnesses. I opted for a tank-mounted bracket (you can choose between black or brushed aluminum), as my nano reef is perfect for attaching one on the back of the tank. The bracket comes disassembled with two aluminum arms – one vertical that attaches to the tank’s rim and one that the light attaches to – a set of screws, and a ball joint that allows the light to be swiveled around its axis when Prime is mounted onto the bracket. Initially, AI had a problem with their mounting harness, specifically, the ball joint; users complained of the light “sinking” under its own weight. AI fixed the issue, sending a new, lager ball joint to eliminate the “sinking” of the light. Mine was shipped with both ball joints and after installing the larger one, I see no problem with my Prime, the light stays at an angle I set and has not moved.
The bracket is somewhat confusing to assemble correctly, but a great AI video (available here) guides you through the whole process. Overall, the bracket is built well and it sits snugly on the tank’s rim. It definitely is not in the same league as the Kessil’s Gooseneck, but it gets the job done and offers adjustments in all 3 dimensions, which ultimately is what most people want. Is it worth $30? I think it is and frankly, it is the only non-DIY way to mount the light on an aquarium’s edge . The bracket looks quite nice without disrupting the overall compactness of the device.
CONCLUSIONS
Aquaillumination Prime, despite its size and price tag, is a versatile and quite capable LED light offering the latest in remote-controled technology. The built-in Wi-Fi adapter, combined with a free smartphone app, ramps up its value even more. It is not the most powerful light on the market, but the price-to-value ratio is hard to beat, especially given the fact AI is a company with years of experience in the market and a large number of followers who praise the manufacturer’s products and their responsive customer service.
My personal experience with Prime is nothing but positive so far. I have had it hanging above a 14-gallon nano tank for over three months, successfully growing some less-demanding SPS corals, along with LPS and soft corals near the bottom of my tank. 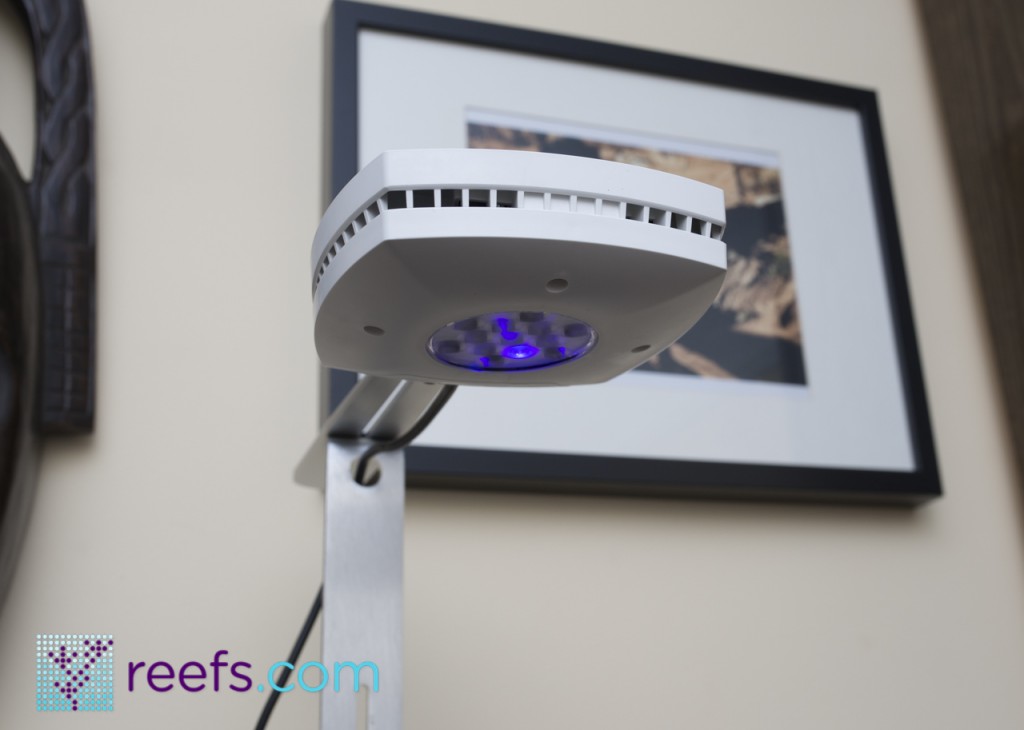
The advertised 30”x30” light spread may be a little exaggerated, but I wouldn’t hesitate to use it as a single light source in mixed reef tanks with a footprint up to 20×20”. I am planning to upgrade my nano to a 34g Solana (a 20” cube) and I will update how this little pendant works with a larger footprint. The unit stays cool for the entire photoperiod and the little fan that cools it is virtually silent.
I never intended to make this review overly technical, and I can’t give you real-life PAR numbers, but what I can tell you is that this light grows corals very well and they look incredible under it. The Prime lacks a great shimmer that you would find with single-chip LED panels like Kessil fixtures, but it makes up for it with a beautiful, highly adjustable spectrum that simply look great. I can recommend Aquaillumination Prime to anyone looking for a compact light with full wireless control and attractive price tag, produced by a reliable company with great customer service.
My tank running AI Prime
Please don’t hesitate to contact me if you have any questions or suggestions regarding this article and the light reviewed. Thanks for reading!
GALLERY


Thank you for this in-depth review!
Hi Marc thanks fo the review. Im thinking of repalcing my stock lighting for my red sea 130c . Is this a good idea? / Can this be considered an upgrade to the lighting that the RS130C has? I am thinking of just purchasing one light. One of the reason I am interested on thise because I can put this inside the canopy of the RS130c. thank you
Marc, thanks for clearing some things up. Regarding your setup, has your ai prime ever given you issues with your in home network? I have mine set up to the wifi and it was working beautifully for about 3 weeks. Today it didn’t want to connect (kept telling me the unit was locked even though I had my user and pass for it) and as a result now my other wifi devices cannot connect to the internet over wifi unless it’s through a wired connection. When I unplug the light, everything seems to connect fine. Can you shed some light on this if you’ve come across this issue before?