WHITE BALANCE HEADEACHE
Al images by author
In previous article, I talked about fundamental parts of creating a photograph and how to use them according to our needs. I purposely omitted to mention white balance as there’s a lot to explain and it deserves it’s own article.
If you missed previous parts, you can find them here::
PART I: http://reefs.com/blog/2011/10/17/aquarium-photography-guide-part-i-choosing-the-right-camera/
Part IV http://reefs.com/blog/2012/01/11/aquarium-photography-guide-part-iv-lenses/
WHAT IS WHITE BALANCE?
In order to understand the definition of white balance, we first have to learn a little bit about Color Temperature. Color Temperature is a standardized way of measuring quality of light. It is based on ratio between red light and blue light and it is measured in Kelvin degrees. The basic rule says that the more blue hue the light source has (the more blue it looks to our eyes), the higher it’s Color temperature. For us, the neutral light that we recognize as pure or neutral white has a color temperature of somewhere between 5000-5500K and it is the color of a sky in midday sun. Light of CT below 5000K starts to look more “warm” or yellow to our eyes and it’s usually the light we feel most comfortable with. Standard incandescent bulb has a color balance of approximately 2,500-3000K and candle flame is 1500K. Light of CT above 5000K begins to look “cooler” or more blue to our perception and, for example, moderately cloudy day’s sky has a CT of 7000K while heavily overcast sky has a CT above 8000K.
Our brain is a powerful “computer” and coupled with a visual information coming from the eye, it can compensate the color temperature of our surroundings so we perceive colors “adjusted” to the light source. Digital camera lacks this mechanism so it needs a “reference point” that is neutral white from which it can measure Color Temperature to calculate all the other colors in the picture. In most situation, it does a good job of finding that reference, but it can be easily tricked in situations where there is no white object in the scene or if the color temperature of available light falls out of it’s preset range of color temperatures. The resulting image often look unnatural and does not reflect the way we saw it by the time we press the shutter button.
To correct this problem, camera manufacturers came up with a setting that is universally labeled as White Balance. It’s purpose is to correct colors in the frame based by our input. We “tell” the camera what is the color temperature of the scene and it re-calculates all colors to save the image as wee see it. You may ask yourself at this moment…
…WHY IS WHITE BALANCE ADJUSTMENT
SO IMPORTANT IN AQUARIUM PHOTOGRAPHY?
You remember when I wrote that camera will have a hard time rendering colors correctly when the color temperature falls out of it’s normal range? Well, a typical reef tank is way of this range. In 99% of everyday use, digital camera don’t have to deal with light of CT above 10000K, while most reef setup lighting has a CT between 10000-20000K. That is why when you take a picture without adjusting white balance in your camera menu, it comes out awfully blue. What can we do about it?
METHODS OF ADJUSTING WHITE BALANCE
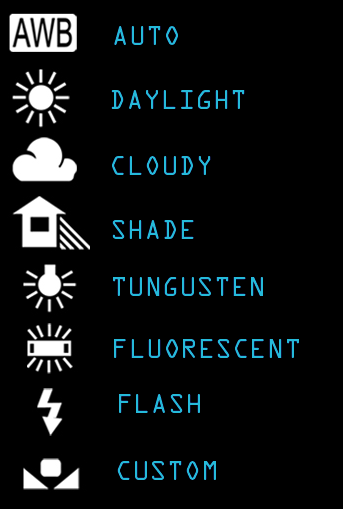
There are several ways, from simple to more complicated, to adjust white balance in our photographs. We can change WB setting before we take a picture (always recommended) or later in photo editing software. The most simple way to change WB is to use one of the pre-set setting almost all present digital cameras have. Those are usually represented in camera menu as little icons with name labels, just like those:
I will shortly explain each one of those pre-sets:
AUTO- camera automatically adjust white balance according to the scene- works in most situations, but definitely not in saltwater aquariums
DAYLIGHT- best used for outdoor photography during daytime, useful in freshwater aquariums that uses 6500K bulbs
CLOUDY- one of the two presets best suited for reef photography, it warms colors up removing much of a blue hue
SHADE- another great WG preset to shoot reef tank,
TUNGUSTEN- a yellowish Color Balance setting, unsuitable to either freshwater nor saltwater photography
FLUORESCENT- somewhat usable preset for tank lighted with 10000K light source
Flash- same as above, useful in flash photography
CUSTOM- using this preset guarantee good results , but adjusting it requires some effort. Custom White balance setting rely on external “reference” object. To properly set this setting, photographer needs a piece of white card or paper, from which camera reads the Color Balance by making a pre-shot and adjust White Balance based on the “reference card”. Unfortunately, not all cameras have custom White Balance Preset
Another method of adjusting white balance some more serious Point&Shoot and DSLRs deliver is a Kelvin Temperature setting. It’s labeled as a CUSTOM setting with letter K next to it and it allows to set WB using Color Temperature. My Nikon has a range between 2500-10000K. Setting WB to 10000K really helps with reef tank photography.
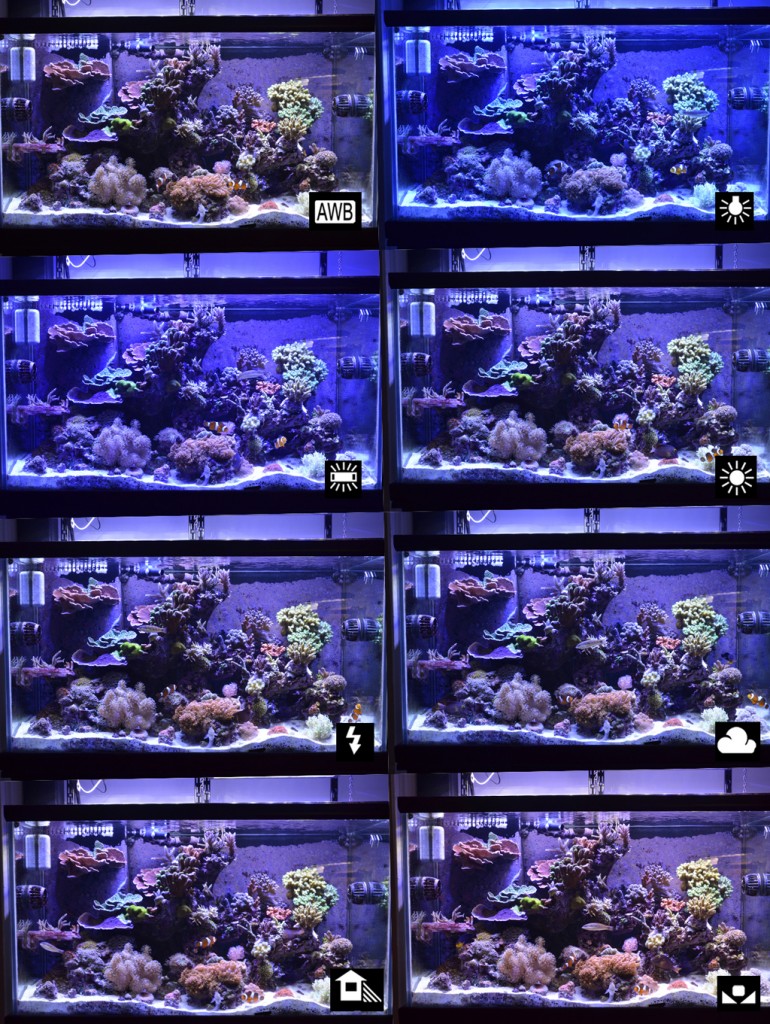
Here is a full tank shot taken at different WB settings (use the coraline algae growing on back wall as a reference)
Those are settings that can be adjusted before you take a picture. Please note that it is always better to end up with an image that has correct or only slightly off White Balance. Further adjustments in photo-editing software not always deliver satisfying results, especially when white balance was way off in the first place.
There is yet another tool that can be a game changer when it comes to adjusting White Balance in aquarium photography- a very powerful one that combines all of the above methods in one simple to use slider in a computer program. It is the RAW file format and I will explain it in details in one of the future parts of Aquarium Photography Guide. See you then…









Can I use a gray card to set the WB instead of a white surface?
What is the difference between using a gray card or a white card for
WB reference?
Kedd
You can use a grey card for WB reference instead of white. There is an ongoing debate between using a white and 12%-18% grey card as a WB reference, but at the end of the day they both do the same thing. White balance is sometimes called Grey balance, the whole idea is not to find a pure white area in the scene, but an area that has neutral color balance. Camera’s sensor read light in three channels (red, green blue or RGB) and when you set the WB you give the camera a reference where all three channels are in fine balance. The main difference between using a grey card and a white card for WB reference is reflectivity of white card compared to grey card. There is a possibility to overexpose a WB reading using white card, causing one or more of the channels to be “blown out” (pure white). On the opposite, if you underexpose a metering using a grey card, you can be “off” in one or more of the RGB channels. So as you see, it’s a no-win situation, that is why using either of the two is accepted for WB reference. In addition, if you take a good metering using both of them, you will end up with very small, if any,difference. I personally think using a white card makes more sense in reef tank situation where blue channel dominates the scene, as using a grey card may contribute to an underexposed metering and/or color shift.
Thanks for the reply.
That helps.
Kedd