• Why not take a moment to introduce yourself to our members?

spaulr

Advanced Reefer
Rating - 0%
0   0   0
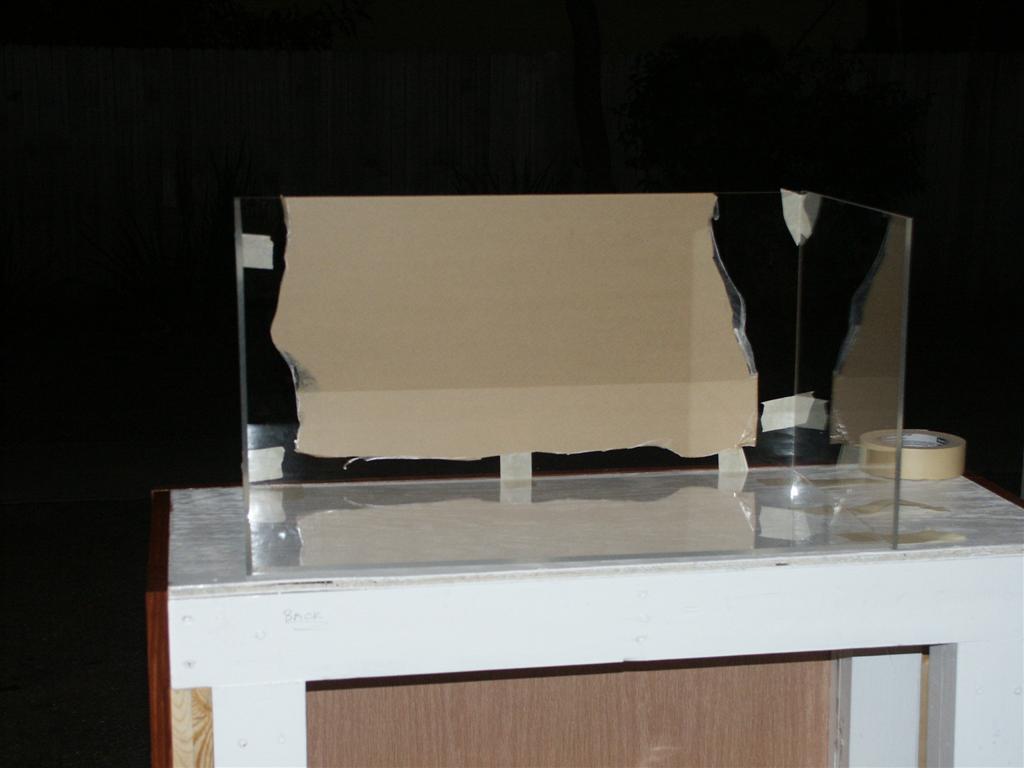
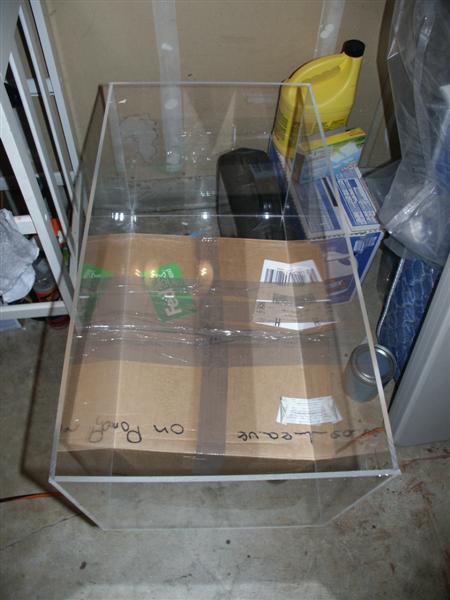
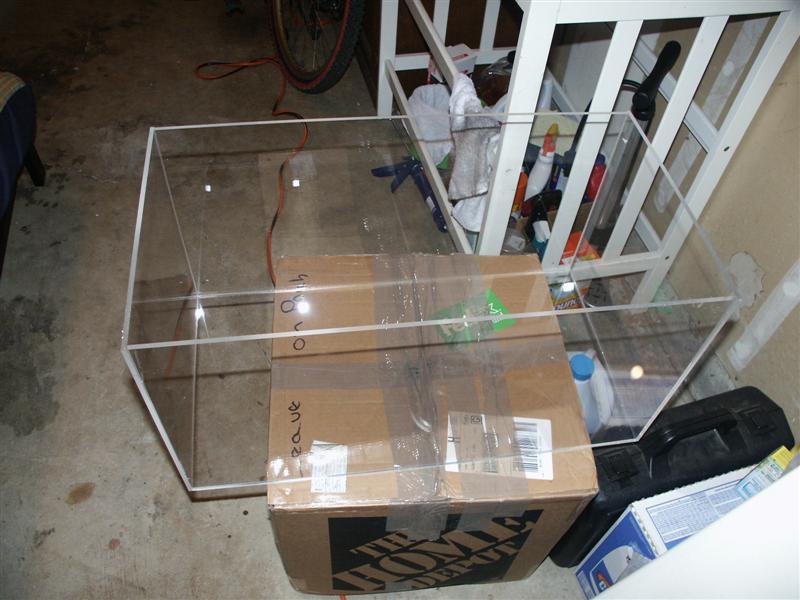
Hi everyone. Now that my stand is "together" I'm trying to fit all the pieces inside. I currently have a 10-12 gallon glass tank as a sump. The problem is that it does not make use of the space efficiently and is causing some cramping in other areas.

What I'd like to do it get an idea of how much a "custom" acrylic or glass sump would cost... ~15 gallon volume.

I priced an acrylic sheet a mcmastercarr. I think 1/4" sheet that was 4'x2' cost $88 + whatever weld on stuff I need + shipping. Would buying a custom glass sump, or custom cut glass pieces, so I can assemble them, be any cheaper?

Know anyone that does custom acrylic stuff?
 

Acrylics

Experienced Reefer
Location
Portland
Rating - 0%
0   0   0
You should be able to get glass cut at your local hardware store or big box store for a much better price. Given the size, it probably wouldn't be worthwhile at all to have one custom made.

HTH,
James
 

trido

Advanced Reefer
Rating - 0%
0   0   0
I custom built my 30 gallon acrylic fuge with 1/4" for about $100.00. My supplier made all of my cuts for me so i didnt have to worry about the proper blade.
 

spaulr

Advanced Reefer
Rating - 0%
0   0   0
I was afraid you were going to say that. I probably don't have the right tools to make the cuts and with acrylic being so pricey I'd hate to screw it up. Especially since I haven't done any acrylic before (other than a very simple bulkhead repair).
 

trido

Advanced Reefer
Rating - 0%
0   0   0
Dont get me wrong Spaulr. I was merely being lazy. I make plenty of cuts on my regular old table saw. My miter saw too for that matter.I just go slow and steady. If you can get them cut for you though. I would recommend it. Let them take the liability of ruining that big sheet. Other wise, if you take your time, make sure your edges are smooth,get some good cappilary action glue (and some silicone,and some thick glue)you shouldnt have any leaks. Keep in mind, I am a real acrylic rooky.
 

spaulr

Advanced Reefer
Rating - 0%
0   0   0
Trido88 - Do you have to use a special blade for the table saw? Seems like it would leave a really rough cut, not to mention possibly melting the acrylic if you go too slow. I guess the mitre saw would work if I bought 24"x12" pieces...which mcmastercarr does sell. I know those cuts would be square. ;)
 
A

Anonymous

Guest
Rating - 0%
0   0   0
Table saw without the right type of blade will chip the acrylic so badly that it is not workable.

Check eBay or local newspaper for used aquarium at cheap price. You don't care if it is all scratched up as a sump.
 

spaulr

Advanced Reefer
Rating - 0%
0   0   0
Got an idea to look for custom cut acrylic pieces. Delvies will cut all of my pieces to the dimensions I want (All are fairly straightforward) for ~$60-70. Pretty stoked on the price of the cut pieces. I'm also going to pick up some Weld-on 3 and a needle solvent bottle.

Any suggestions on assembling the pieces? Do I need to use some sort of jig to keep all the pieces square? How fast does Weld-on 3 dry? Is this a bad idea 8O ? Maybe....but sure sounds like fun :D !!!
 

trido

Advanced Reefer
Rating - 0%
0   0   0
seven ephors":2eqndo08 said:
Table saw without the right type of blade will chip the acrylic so badly that it is not workable.

Very true. I would not use this for anything but little mods to my "stuff". I am just trying to say "Its not nearly as scary as it seems"

I think that 60-70 is reasonable considering I paid 125 or so for my 25gallon sump
 

spaulr

Advanced Reefer
Rating - 0%
0   0   0
I ended up relocating my CL pump to a shelf located ~15 above the bottom of the stand. This allowed me to use the entire bottom area for a sump. I ordered the 1/4" acrylic, weld on #3, and applicator bottle from delvies. Delvies custom cut all of the pieces. The sump can hold ~20 gallons. I'll probably run it around 15 gallons. Total cost, with shipping $115. Hopefully I'll have it by this weekend.

Any suggestions on using Weld on #3 and that applicator bottle? I've only used weld on 16...but that's more like a glue or epoxy, not a "water-thin" solvent.
 

jlneng

Experienced Reefer
Rating - 0%
0   0   0
For cutting acrylic on a table or circular saw I use a plwood blade and put it in the saw backwards. It has worked great for me up to 1/2" thick acrylic.
 
A

Anonymous

Guest
Rating - 0%
0   0   0
If its carbide tipped its not a good idea to run it backwards, the force is trying to pull the carbide off the blade.

Its much safer and you will get a much better cut with less physical force required with a proper blade....
 

spaulr

Advanced Reefer
Rating - 0%
0   0   0
Thanks guys for the tips about the blades. I decided to get the pieces pre-cut when I ordered it. For $25 I got all the pieces cut to the specs I wanted.

Funny thing though, I'm realizing that you never really get what you pay for. 2x4 lumber is really 1.75 x 3.5, 1/4" acrylic is really .223 or something of that nature. Anyhow, my fault for not reading the specs closely enough. Glad its a sump :lol: . The back size is a little long.

Attached are some pics of the acrylic pieces I got and my attempt at assembly. I assembled 3 sides with masking tape. I have weld on 3 and a needle applicator bottle.

Are there any tricks I should know before doing this? Do I need to pull the pieces apart first, then add the solvent, or keep the pieces together and add the solvent. Will the solvent "wick" its way down the acrylic if they're together?
 

Attachments

  • Sumptaped002 (Large).JPG
    Sumptaped002 (Large).JPG
    54 KB · Views: 3,162
  • Sumptaped001 (Large).JPG
    Sumptaped001 (Large).JPG
    44 KB · Views: 3,163
  • AcrylicPieces (Large).JPG
    AcrylicPieces (Large).JPG
    103.6 KB · Views: 3,162
A

Anonymous

Guest
Rating - 0%
0   0   0
After you have it taped up so it stays together and is stable just run the needle applicator along the joint allowing the weldon to flow into the joint. I found it easier to do joints that were on the bottom for some reason.

Also, make sure you drag the needle along, not push it or the needle will fill up with shaving from the acrylic as the weldon melts it.

Good luck!
 

minibowmatt

Advanced Reefer
Rating - 0%
0   0   0
knucklehead":g2fd7jtd said:
After you have it taped up so it stays together and is stable just run the needle applicator along the joint allowing the weldon to flow into the joint. I found it easier to do joints that were on the bottom for some reason.

Also, make sure you drag the needle along, not push it or the needle will fill up with shaving from the acrylic as the weldon melts it.

Good luck!

Thats a good tip. I didnt realize this, and I clogged my first tip! now I realize what happened.
 

spaulr

Advanced Reefer
Rating - 0%
0   0   0
I welded the 5 main tank pieces together. I'll put the dividers in later.
 

Attachments

  • sump002 (Medium).JPG
    sump002 (Medium).JPG
    37 KB · Views: 3,129
  • sump001 (Medium).JPG
    sump001 (Medium).JPG
    63.7 KB · Views: 3,130
A

Anonymous

Guest
Rating - 0%
0   0   0
Lookin go---well rather clear and shiny!

Good job.

Make sure to follow my last tip of the day which is......


Leak test all your creations outdoors. Don't be a knucklehead....

:lol:
 

trido

Advanced Reefer
Rating - 0%
0   0   0
I can vouch for this. As I was a true knucklehead and tested mine on the kitchen counter of our second story apartment. The handyman was quite pissed when I got home from work. :lol: Since its just your sump. A little silicone in those inside corners will never hurt anything if your worried.
 

spaulr

Advanced Reefer
Rating - 0%
0   0   0
Thanks for the advice :D . I was planning on testing it in the garage. I it leaked I was either going to use the weld on again, or use weld on 16. If I can't get it so stop leaking (assuming it leaks 8O ), I'll use 100% silicone around the joints..
 
A

Anonymous

Guest
Rating - 0%
0   0   0
You should be able to see any weak points in your joints, they look like little bubbles. Actually come to think of it they are bubbles...
 

Sponsor Reefs

We're a FREE website, and we exist because of hobbyists like YOU who help us run this community.

Click here to sponsor $10:


Top