• Why not take a moment to introduce yourself to our members?

KathyC

Moderator
Location
Barnum Island
Rating - 100%
200   0   0
I thought this was an interesting idea and have decided to build one for my 120.

I was giving some thought to the issue of not being able to clean out the unit once the crud builds up in the bottom of it and figured there should be a way to clean it out. I found the following while perusing the plumbing aisle...

IMG_6886.jpg

The piece in the lower section of the pic will be the top of the unit with the 2 barbs for the hoses installed there.


IMG_6888.jpg

This is what it will look like once it's put together and I will be able to unscrew the bottom after a couple of years and empty out the build up :) (I think anyway)

I currently have my 70' of tubing practicing to be circular by winding it around the outside of the pipe and might even get around to drilling the holes in the top cap this week!
IMG_6897A.jpg


Not to take anything away from Alfani (great DIY Peter!!!) but here are some well written plans for building one of these units:
http://saltaquarium.about.com/od/diydenitratorplans/ss/sbscoildenitrat.htm


For those of you who have these built - does this look like it will work just as well?
Also curious about the earlier question (by Reef4life) asked if adding some 'cycle' to the cylinder should speed up the process of cycling the unit?
 
Last edited:
Kathy...I did the same thing as you with the issue of cleaning but I got this other clamp sort of thing that's half rubber and half metal to open and close it. I also did the same by teach the tube to coil around the outstide of the tube and it worked pretty well, right before I put it in the tube I put and electric heater next to it and then I let it cool. I hope you're not planning to have it twist off because I was planning on doing so but then I though that would mess up the tubing on the inside as you're twisting it. I'll try to have pics up soon so you can see what I'm talking about with mine

Also...I didn't bother adding the Cycle to it although I'd like to start adding some regularly to my tank like used to, at least when I do wate changes although I think adding Cycle should help out the process within the unit
 
Last edited:

KathyC

Moderator
Location
Barnum Island
Rating - 100%
200   0   0
Reefs - did you use one of these?

Not sure I'd trust the rubber not to leech anything into the water?
Also the article I linked suggested you use hot water to soften the coil and then cool water to 'set' it into holding the shape.

As far as it having the ability to screw off..if the tubing ends as simply a straight piece hanging down toward the bottom (but ending a few inches before the lowest part), mine should be able to unscrew without impacting the tubing as it won't be connected to anything down there. The only way it would mess up the tubing is if the top unscrewed as the tubing is actually connected to the top of the unit.
 
yeah that's exactly it Kathy but I don't think the rubber would leech anything into the wate just for the way that clamp works. You put a piece of the 4" tube on one side and one in the other. The only piece of rubber that's actually being exposed to the wate is about an 1/8" of rubber if that. Also....the way I put the tubing it is connected to the top so if I made it to unscrew it would mess it up. You should also put an exhaust valve right in the middle of that square on the cap just like I did. I'll try to have pics up soon so I can show you mine
 
Here are the pics finally:
- The whole thing....standing right next to my chiller and leaning on the tank stand
p2240911largeA.jpg


- The top of it....as you can see it has an exhaust valve
p2240914large.jpg


- and this is a side shot so you can see what I'm talking about regarding the clamp that can be loosened to open the unit in a couple years
p2240912large.jpg
 
Last edited by a moderator:

KathyC

Moderator
Location
Barnum Island
Rating - 100%
200   0   0
I changed the orientation of that first pic.., was getting dizzy looking at it ..lol :)

I plan to use the piece you used at the top on the bottom of mine so that I can unscrew it there and drop the crud out the bottom. I will be using the 'plain' cap in my pic on the top and drill the holes for the fittings in there.

Where did you get the exhaust valve?

I see that both of your hoses go 'down'..are you using a pump to supply the unit? What type/size?

Very nicely done!
 
Last edited:

NYPDFrogman

Advanced Reefer
Location
Vernon, NJ
Rating - 100%
35   0   0
I changed the orientation of that first pic.., was getting dizzy looking at it ..lol :)

I plan to use the piece you used at the top on the bottom of mine so that I can unscrew it there and drop the crud out the bottom. I will be using the 'plain' cap in my pic on the top and drill the holes for the fittings in there.

Where did you get the exhaust valve?

I see that both of your hose go 'down'..are you using a pumo to supply the unit? What type/size?

Very nicely done!
lowes or HD carry those "john Guest" ball valves get one with MPT on one side and quick connect on the other
 
p2240915large.jpg


That's how I have it set-up...I don't really have a pump that's independently running for the denitrator, I just had that pump connected to my HOB fuge and where it's hooked up to is usually where pumps allow you to put in air to make a sort of venturi effect but I used it to actually pump a small amount of water. I also have a valve at the end of the outlet and it drips at about 5 drops per second. The valves are easily found at Home Depot in the plumbing section
 

KathyC

Moderator
Location
Barnum Island
Rating - 100%
200   0   0
Ah-ha! :) I see.
So you used 2 of those John Guest valves?

The hose in the sump is simply placed near the output to that pump and gives it enough oomph to keep a controlled drip coming from the denitrifier with the help of the second little ball valve? Ingenious! ;)
 
Ah-ha! :) I see.
So you used 2 of those John Guest valves?

The hose in the sump is simply placed near the output to that pump and gives it enough oomph to keep a controlled drip coming from the denitrifier with the help of the second little ball valve? Ingenious! ;)
Yup that's basically it...and thank you lol, I figured I already had the pump running and had the place to attach the hose to it so why run another pump that I'll just be toning down anyways so it won't be too strong to drip.

And yes I used to valves, I call them RO/DI valves but umm yeah one is for the exhaust and the other is to control the speed of the water within the denitrifier with the help of a valave at the end of the output hose of the denitrifier
 

DrDave

Advanced Reefer
Rating - 100%
47   0   0
Diy

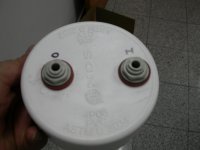
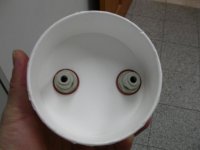
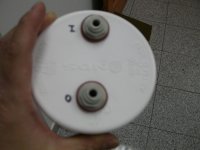
I have a suggestion concerning the inlet and outlet. After a child tipped over the unit the inlet started leaking. My suggestion is instead of siliconing the inlet and outlet stems to the the top. It's better to secure it by placing a John Guess bulkhead stem http://www.savko.com/ViewPart.asp?part=0605002&from=orderdetails, which is plastic on both sides to keep it secure.
 

Attachments

  • DIY Denitrator 001.jpg
    DIY Denitrator 001.jpg
    43.8 KB · Views: 328
  • DIY Denitrator 002.jpg
    DIY Denitrator 002.jpg
    39.2 KB · Views: 330
  • DIY Denitrator 003.jpg
    DIY Denitrator 003.jpg
    64.7 KB · Views: 327
Location
Queens, 11365
Rating - 100%
200   0   0

for being lazy and all, i like to leave it alone and put it in a corner to totally forget about it for a couple of years so no dosing for me. if you are dosing then you need to dose once or twice a week and become another thing to maintain

it's been 35 days since i set it up..so far so good, i'll post my result of the water out from the denitrator vs the nitrate level in my tank next week
 
Last edited:

Sponsor Reefs

We're a FREE website, and we exist because of hobbyists like YOU who help us run this community.

Click here to sponsor $10:


Top