• Why not take a moment to introduce yourself to our members?

TonyHNY

Back from a break
Location
Jamaica, NY
Rating - 100%
32   0   0
Let me share with you my second adventure: Cutting acrylics...

So when you go to HomeDepot by the acrylics/plexiglass section, they have this knife that you can use to scorch the sheet and break it. it is $3.99 and it didn't work well for me. Instead, I broke it in many pieces...

Then I have this dremel multi-max and the cutting tool works great!
 
Rating - 100%
90   0   0
Let me add my $0.02. First of all, I will 100% agree with Tony about pre-tinning all your connectors and wires. It's the most important thing when soldering any two components together. You shorten the time your elements are exposed to soldering iron's heat significantly and that allows to make a clean solder job. Second, if you have money or planning to solder in the future, it's a good idea to have a soldering station, and for $130 it's a pretty good deal IMO. Soldering stations make a lot of difference as they are way more powerful and controllable. I don't have one but if I had the money back when I did my LEDs I would buy one instead of regular iron.
Second thing I would advice everyone who thinks about building a LED light is to get a digital multimeter, preferably one that has a circuit tester with beeper. It's a 20-$30 well spent. It's easy to shorten the star as it is made of aluminum.
Oh, one more thing, that acrylic cutting knife you referred to is good for acrylic up to 1/8 thick but sheetrock knife will do the same trick (I learned myself). You trace the cut and then put the edge of it on some flat surface (table or countertop). Then use force:) It's easy to do, but the cut is never clean and sandpaper is your friend.

I like your built Tony and I'm glad that more and more people decide to pull the plug and go DIY LED.
 

Widdy

Moderator
Vendor
Rating - 100%
75   0   0
Let me share with you my second adventure: Cutting acrylics...

So when you go to HomeDepot by the acrylics/plexiglass section, they have this knife that you can use to scorch the sheet and break it. it is $3.99 and it didn't work well for me. Instead, I broke it in many pieces...

Then I have this dremel multi-max and the cutting tool works great!

Excellent! I went the route of heating it up with a blowtorch and bending it. Let me tell you, mid July in the garage with a blowtorch, gingerly bending the acrylic - just shoot me if I ever had to do it again. G'luck with your build! Pictures please! ;)
 

TonyHNY

Back from a break
Location
Jamaica, NY
Rating - 100%
32   0   0
All the sacrifice for our tanks!! you sure pick the best time of the year blowtorching the acrylics :splitspin

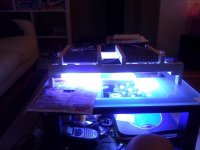
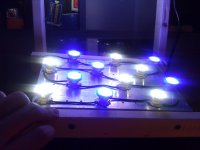
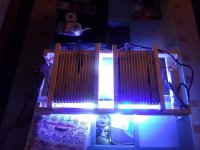
Here are some pictures of my setup. It is not finished yet but I'll post some picture when it goes on a tank with the wires and etc all tied up...


Excellent! I went the route of heating it up with a blowtorch and bending it. Let me tell you, mid July in the garage with a blowtorch, gingerly bending the acrylic - just shoot me if I ever had to do it again. G'luck with your build! Pictures please! ;)
 

Attachments

  • WP_000014.jpg
    WP_000014.jpg
    62.7 KB · Views: 687
  • WP_000015.jpg
    WP_000015.jpg
    59.9 KB · Views: 855
  • WP_000016.jpg
    WP_000016.jpg
    84.7 KB · Views: 715

TonyHNY

Back from a break
Location
Jamaica, NY
Rating - 100%
32   0   0
The Kit was only 205 without heatsinks or fans. With the two heatsinks, it came out to around 260? The reason why my cost was so high was because of all the errors I've made while putting this together which is why I am sharing the information with everyone so we can avoid my mistakes..

Now I am going from a 250W to probably around 54W of lighting (18 bulbs I am using at the moment), I think I can recover the savings over time plus not replacing any bubls say for the next 2-3 yrs.


Wait you telling me that the kit they have for $445.00 does not come with a heat sink or fan!!!!!!!!


Sent from my iPhone using Reefs
 

TonyHNY

Back from a break
Location
Jamaica, NY
Rating - 100%
32   0   0
Thanks!
I've gained a lot of knowledge from members in MR and I feel great being able to share this experience. Now I can add soldering and cutting acrylics to my list of things I've learned :).. If you ever have a chance to use a multimax Dremel cutting tool, you can make some nice cuts. Say if you want to cut a square shape opening in the midding of the sheet, you'll definitely benefit from using that tool since my rotary dremel melts everything away... And that cheap knife I got from HD...It did more damage to my arm and elbow than the acrylics !

Let me add my $0.02. First of all, I will 100% agree with Tony about pre-tinning all your connectors and wires. It's the most important thing when soldering any two components together. You shorten the time your elements are exposed to soldering iron's heat significantly and that allows to make a clean solder job. Second, if you have money or planning to solder in the future, it's a good idea to have a soldering station, and for $130 it's a pretty good deal IMO. Soldering stations make a lot of difference as they are way more powerful and controllable. I don't have one but if I had the money back when I did my LEDs I would buy one instead of regular iron.
Second thing I would advice everyone who thinks about building a LED light is to get a digital multimeter, preferably one that has a circuit tester with beeper. It's a 20-$30 well spent. It's easy to shorten the star as it is made of aluminum.
Oh, one more thing, that acrylic cutting knife you referred to is good for acrylic up to 1/8 thick but sheetrock knife will do the same trick (I learned myself). You trace the cut and then put the edge of it on some flat surface (table or countertop). Then use force:) It's easy to do, but the cut is never clean and sandpaper is your friend.

I like your built Tony and I'm glad that more and more people decide to pull the plug and go DIY LED.
 

TonyHNY

Back from a break
Location
Jamaica, NY
Rating - 100%
32   0   0
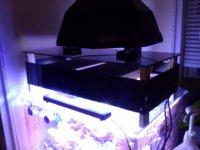
Up and running

Had it running with the 2 small computer fans installed. It runs VERY cool so those small fans are able to dissipate the heat so far.
 

Attachments

  • Photo_1DEE12F5-C983-CA67-4154-2CDE2E77D9F1.jpg
    Photo_1DEE12F5-C983-CA67-4154-2CDE2E77D9F1.jpg
    60.9 KB · Views: 794

batt600

Advanced Reefer
Location
Far Rockaway
Rating - 90%
27   3   0
Ok guy Rapidled is to expensive here is a site that sell that same led kit for alot less. Here is the site reefledlights.com
Deluxe 48 LED Kit

Kit Includes
24 Cree XRE LEDs w Optics
Choose Your Driver Option
2 X Ultra Quiet 23 dB Fan w Powersupply
1 X 24″ x 8.46″ Heat Sink
2 X Thermal Adhesive and End Caps
4 X Leviton Polarized 15A Plug
Everything you need for a DIY Retro except for 20-22 gauge and solder. This LED retro will replace a 250-400 watt MH.

with none dimable driver $394 with dimable driver $519
 

TonyHNY

Back from a break
Location
Jamaica, NY
Rating - 100%
32   0   0
I am not sure if it is that MUCH cheaper.....the 48 set from RapidLed is like 405 without the heat sink. The Reefledlights has the same set for around 500 WITH a heat sink. I dont know how much the heat sink is worth but there may be some savings but not really that signifcant?

Ok guy Rapidled is to expensive here is a site that sell that same led kit for alot less. Here is the site reefledlights.com
Deluxe 48 LED Kit

Kit Includes
24 Cree XRE LEDs w Optics
Choose Your Driver Option
2 X Ultra Quiet 23 dB Fan w Powersupply
1 X 24″ x 8.46″ Heat Sink
2 X Thermal Adhesive and End Caps
4 X Leviton Polarized 15A Plug
Everything you need for a DIY Retro except for 20-22 gauge and solder. This LED retro will replace a 250-400 watt MH.

with none dimable driver $394 with dimable driver $519
 

wonderballz

Advanced Reefer
Rating - 100%
35   0   0
The other thing I noticed is that you only get a 24" heat sink from reef led lights. I have a36" tank, but want to do 36 leds, and I would be able too choose 2 heatsinks from rapid led for $50, rather than only one heatsink from reef led lights. I didn't see if there was an option to change the heatsink on the site.

Not sure if you you understand what I'm saying, I am typing this on my phone
 

qy7400

Member
Location
Long Island
Rating - 100%
28   0   0
It came out to $8 in favor of ReefLED but you need run out and buy both the power and hook up wire. Rapid was one stop shopping for $8 more.

The savings is marginal at best.
 

TonyHNY

Back from a break
Location
Jamaica, NY
Rating - 100%
32   0   0
+1 yea...I forgot about that one too. I bought 2 heat sinks so I can "spread" the light apart. Otherwise I wont be able to get the coverage 4 inches from the water...

The other thing I noticed is that you only get a 24" heat sink from reef led lights. I have a36" tank, but want to do 36 leds, and I would be able too choose 2 heatsinks from rapid led for $50, rather than only one heatsink from reef led lights. I didn't see if there was an option to change the heatsink on the site.

Not sure if you you understand what I'm saying, I am typing this on my phone
 
D

DA fisherman

Guest
Rating - 100%
32   0   0
I don't know if I'm on topic here but how much LEDs are you suppose to put on a 24" Heat sink???


Sent from my iPhone using Reefs
 

Sponsor Reefs

We're a FREE website, and we exist because of hobbyists like YOU who help us run this community.

Click here to sponsor $10:


Top