• Why not take a moment to introduce yourself to our members?

mgranato

Experienced Reefer
Rating - 0%
0   0   0
Here's my journey to put fish in the kitchen that weren't for eating :)

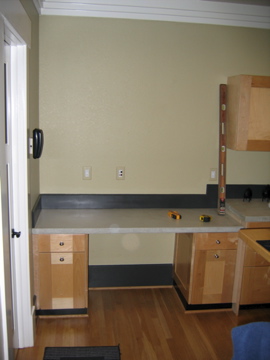
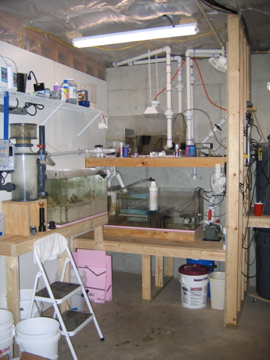
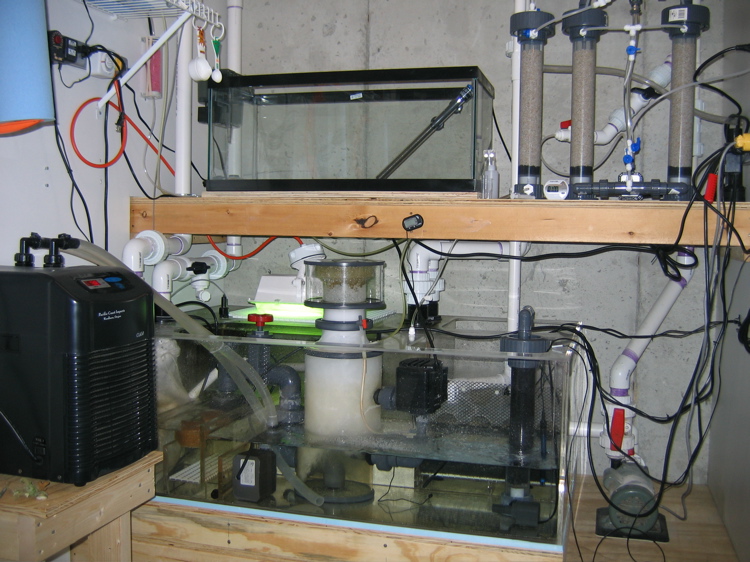
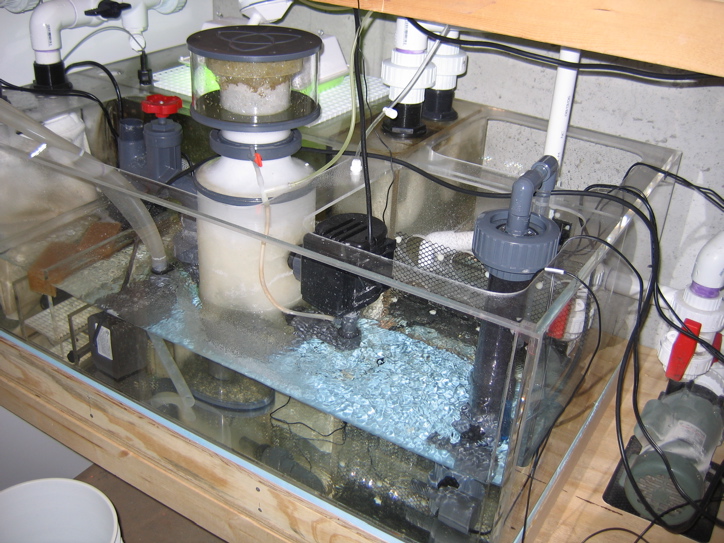
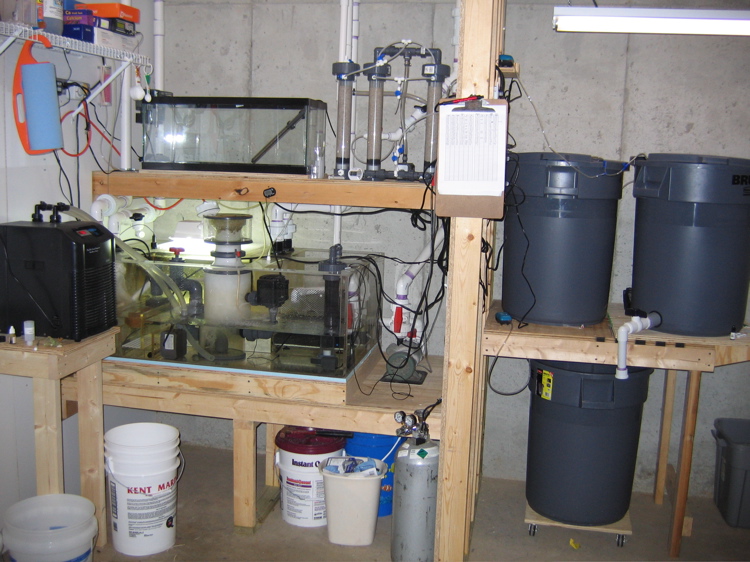
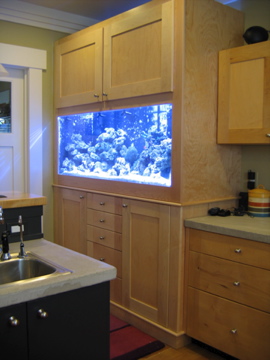
A brief history - I built our house about five years ago with the hopes of putting an aquarium in the foyer. Once things were built and we got settled, I realized just how little we would actually see and enjoy such an investment. So, we decided to get a couple of dogs and leave it at that. Five years past, and the fish bug bit again. We discussed placement and came up with the kitchen. The tank would replace a desk that was never used, and all plumbing would be run to the basement below.

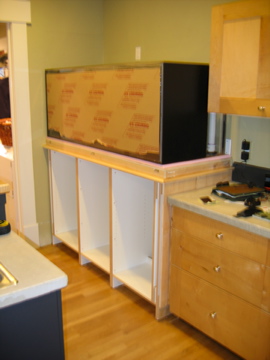
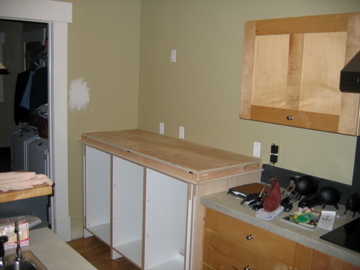
Everything (display included) but a few pieces of equipment was made by yours truly. I make cabinetry and furniture for a living, so I've got way too many tools laying around. Some things were a little more difficult than others, but mostly it went pretty smooth. Sites like this were huge sources of knowledge and guidance. Thanks to all the posts and replys, you all helped.
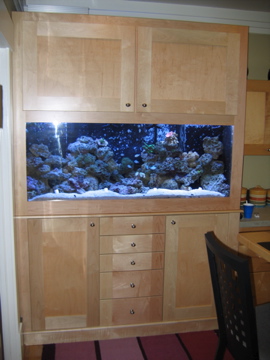
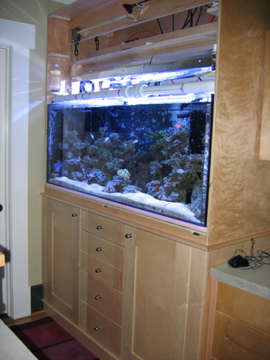
 

Attachments

  • IMG_0302.jpg
    IMG_0302.jpg
    29.2 KB · Views: 2,839
A

Anonymous

Guest
Rating - 0%
0   0   0
That's a nice spot.

I think the kitchen is much better than the foyer. I had a foyer tank and you have to keep it pristine at all times because it is the first thing people see when they come in. Plus I ended up leaving a chair in front of it because I wanted to sit and watch the tank, so then there is a chair cluttering up the foyer.
 

mgranato

Experienced Reefer
Rating - 0%
0   0   0
Here's some more....
 

Attachments

  • IMG_0356.jpg
    IMG_0356.jpg
    33.4 KB · Views: 2,740
  • IMG_0355.jpg
    IMG_0355.jpg
    28.8 KB · Views: 2,740
  • IMG_0354.jpg
    IMG_0354.jpg
    33.1 KB · Views: 2,744

Ben1

Advanced Reefer
Rating - 0%
0   0   0
I like the high wall outlet for your lights, may want to GFCI those outlets while you can
 

LA-Lawman

Advanced Reefer
Rating - 0%
0   0   0
great progress!

since you are pumbing all the major stuff downstairs. I would have a nice big skimmer built. a large needle wheel recirc. Geosreef builds a nice dart needlewheel skimmer and all skimmers for that matter.

since you are custom on the design. why cover all basis. do you have plans for your sump yet?
 

mgranato

Experienced Reefer
Rating - 0%
0   0   0
Here's the display in place. The tank is 65x24x24 with two large(8x14) over flow towers in each rear corner. Each over flow is plumbed with 2 x 1.5" drains, the right over flow is also plumbed with one 1.5" return. This pick shows the original return manifold around the top, 1.5" loop with six 3/4" returns. The cabinetry below the tank is 44" tall x 27" deep x 72" long. The finished height of the canopy is 96".

The display is about 32" from the cooktop, so to insulate the tank from heat and odors, I decided to have just one viewable side. The actual acrylic is at least 1.5" from any walls or cabinetry. All outlets in the kitchen are GFCI.
 

Attachments

  • IMG_0374.jpg
    IMG_0374.jpg
    42.3 KB · Views: 2,727

mgranato

Experienced Reefer
Rating - 0%
0   0   0
My origianl plumbing has changed somewhat. I was using an Iwaki 100 as the sole means of circulation (at this head about 1500gph). About 3 months ago I came across the OceansMotions products and decided to give them a try. My reef was beginning to evolve into strictly SPS and clams, so I wanted to get more flow. (My original skimmer was a large DYI Beckett style model that was being fed by a Mag 24. A few months into the project I came across a Euroreef skimmer at a really good price; I scrapped the Beckett skimmer which left me with an unused Mag pump.) I had enough room in my over flow tower to drop in the Mag 24 to use for a closed loop with an OM Super Squirt. One of the best changes I've made. I'm now getting nearly 3,900 gph of circulation. My Iwaki is feeding a return manifold that is now vertical rather than horizontal. It's got three 3/4" returns in the rear top pointing down along the back wall and a spray bar running the length of the back wall pointing to the front at 4" above the sand. The closed loop is feeding four 3/4" outlets in the bottom front (under the sand) aimed at the top back, and four 3/4" outlets at the top front also pointing towards the top back. If you were facing the tank from the right side, all that directional flow is creating a very dynamic, clockwise rotating current.
 

Attachments

  • IMG_0604.jpg
    IMG_0604.jpg
    45.1 KB · Views: 2,716

trido

Advanced Reefer
Rating - 0%
0   0   0
Is this your first reef? Wow! You are truely a craftsman. you must have done alot of research or have a very good knowledge base to work from.
 

mgranato

Experienced Reefer
Rating - 0%
0   0   0
Yep, first time trying a reef. Years ago I had a fairly neglected FO (damsels and triggers). My knowledge base was at ground zero, so yes, lots and lots of research. I figured there would be too much money at steak to go in half cocked :) . Acutally, I enjoyed learning how to almost as much as I enjoyed doing it.
 

mgranato

Experienced Reefer
Rating - 0%
0   0   0
A description of what lurks below.

My orginal setup was a three sump design. Sump 1 (12x30x18) would receive the raw water from display and house the Beckett style skimmer. Sump 2 (12x36x18) was a DSB refugium receiving about 350 gph from sump 1. (The Euroreef skimmer was mounted externally to sump 2.) Sump 3 (18x36x18) received its water from the first two sumps, went through a few baffles, then back to the display. This 3 sump setup worked fine, but was a little bit of a hassle from a maintenance point of view. One of those designs that lost a little from paper to reality.
 

Attachments

  • IMG_0631.jpg
    IMG_0631.jpg
    52.3 KB · Views: 2,696

mgranato

Experienced Reefer
Rating - 0%
0   0   0
A couple of months ago I decided to consolidate all three sumps into one large container. The new sump is 30x46x16. It includes a 15x36x16 DSB refugium. Two of the four drains flow directly into the refugium which then flows into the main chamber to the sump. I now have all the major equipment (skimmer, ozone, chiller, carbon reactor, heaters, and probes) in one location. With 12' of drop from display to sump, I get a ton of micro bubbles. To eliminate the bubbles, I've got the other two drains not going the the fuge going into a filter sock (changed out every 4-5 days), then through several baffles, and finally through a 2x14x4 sponge to trap any remaining bubbles.

The Brute on the upper far right is holding for the raw RO/DI water. The Brute on the upper left is the buffered RO/DI water used for top off by way of a Reef fanatic auto unit. (The system uses about 25 gals every 7 days.) The bottom Brute is new saltwater. I change 10 gallons every week, so there is always a nice blend of "new" and "aged" water in the can.

Probably the best investment made to date is the empty 20 gal tank above the sump. Adhering to a religious QT regimen has saved a ton of money and regrets.
 

Attachments

  • IMG_0005.jpg
    IMG_0005.jpg
    195.2 KB · Views: 2,685
  • IMG_0002.jpg
    IMG_0002.jpg
    202.6 KB · Views: 2,685
  • IMG_0001.jpg
    IMG_0001.jpg
    187.8 KB · Views: 2,688

mgranato

Experienced Reefer
Rating - 0%
0   0   0
My latest build has been a calcium reactor. The design is extremely simple to operate and build. I'm using two reaction chambers with a third chamber to buffer up the PH. I'm using Koralith media at 30 bpm with an effluent rate of 17 ml/m. The effluent readings are: PH of 6.71, ca 480, and KH 30. My system water is steady at: PH 8.41, ca 350, and KH 11.6. I could not be happier with the way this reactor has been performing. I also made a carbon reactor with the leftover fittings and a spare power head.
 

Attachments

  • IMG_0003.jpg
    IMG_0003.jpg
    213.7 KB · Views: 2,681

mgranato

Experienced Reefer
Rating - 0%
0   0   0
I had full confidence in myself that I would eventually scratch the front of the tank, so I milled a sheet of 1/4" acrylic into a removable face frame. Now when I bump my golf bag into the tank, I can just replace the protective sheet rather than trying to buff out the main display acrylic :)
 

Attachments

  • IMG_0629.jpg
    IMG_0629.jpg
    40.5 KB · Views: 2,666
  • IMG_0624.jpg
    IMG_0624.jpg
    41.6 KB · Views: 2,665
  • IMG_0601.jpg
    IMG_0601.jpg
    47.3 KB · Views: 2,665

trido

Advanced Reefer
Rating - 0%
0   0   0
Is that maple? I really like how you made that bank of drawers in the middle out of three pieces of wood. It has a nice vertical flow to It that way.
Now where are those close ups of your tank?
 

Sponsor Reefs

We're a FREE website, and we exist because of hobbyists like YOU who help us run this community.

Click here to sponsor $10:


Top