• Why not take a moment to introduce yourself to our members?

garagebrian

Advanced Reefer
Rating - 0%
0   0   0
I don't want to hyjack your thread, but with your woodworking skill I wanted to ask you a question. I made a "skirt" for lack of a better term to go over my 75 gallon stand. I needed it to be removable so I could get my sump out. I figured I could just remove the skirt when I needed access to my sump, but it is a PAIN to remove. So I need to make doors out of the skirt. I would like to borrow your idea for your door where you put the trim on the top of the wood.

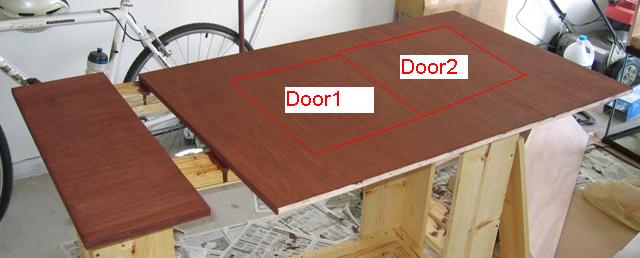
Here is a pic of my skirt before it was put together with the left side piece and front piece(it doesn't need a right side piece to stand up good). I'm not that good a wood working, so thought I would ask before I cut.

I would like to cut two doors out of the skirt and I will try to cut them as straight as possible, but is it alright if they come out a little crooked? I figured I could cover up any minor mistakes by glueing the trim on top of the doors I cut and they will still look straight. Make sense?

Will I need to sand off the stain and polyeurthane before I glue the trim on?

Thanks,

B.
 

Attachments

  • skirt1.JPG
    skirt1.JPG
    71.4 KB · Views: 2,036
  • skirt2.jpg
    skirt2.jpg
    26.2 KB · Views: 2,046

Foosinho

Reefer
Rating - 0%
0   0   0
garagebrian":2786j2sg said:
I don't want to hyjack your thread, but with your woodworking skill I wanted to ask you a question.
Well, it looks better than it actually is. You can see the flaws up close - I could have done better with proper tools. :) I've learned a lot in building the stand, enough that I wouldn't be intimidated taking on a larger furniture project, provided I had some money in the budget for a table saw, band saw, and drill press. :D

garagebrian":2786j2sg said:
I would like to cut two doors out of the skirt and I will try to cut them as straight as possible, but is it alright if they come out a little crooked? I figured I could cover up any minor mistakes by glueing the trim on top of the doors I cut and they will still look straight. Make sense?
I would use a straightedge to get it as straight as possible, but yes - the trim will cover for some mistakes. You *may* have to remove a little bit of wood around the door to get it to swing freely, depending on how you hinge it and how much material your blade removes.

My door has three problems. The first? I didn't cut the plywood square. Along one edge, I managed to flex the wood and get the circular saw blade closer to the straightedge than it should have been. Not sure how I did it, but I did. If you look carefully at the following photo, you can see the problem in the lower-right corner of the door - and you'll notice that the plywood does not go all the way out to the edge of the trim like it does on the lower-left corner. After applying the frame, you cannot see this at all.

door_assembly.jpg


The 2nd problem is that my door opening is ever so slightly out-of-square. Meaning that after I went thru all the trouble of making a perfectly square door with a 1/8" gap all the way around - it didn't quite fit. I had to sand down the upper right corner to get a clean fit. You can't really tell unless you get up close, but the error is there.

The 3rd problem? The door is slightly cupped, and while the trim helped, it did not eliminate the cupping of the plywood. I addressed this by orientating the door when I mounted it such that the upper right corner is the one that pulls furthest away from the frame, and then I mounted the latch magnet there. When closed, it "uncups" the door with the magnetic force.

garagebrian":2786j2sg said:
Will I need to sand off the stain and polyeurthane before I glue the trim on?
No, I don't think so. If you use glue (and you probably should) in addition to nails, double check the glue instructions. It may need "virgin wood" in order to properly bond. In my case, I didn't even use nails - just glue and clamps overnight. Hope it holds up. :)

I'm no Norm Abrams, but I manage to get by. Good luck!
 

Foosinho

Reefer
Rating - 0%
0   0   0
garagebrian":1ahpheii said:
I just read your thread in the nano buildoff, you are doing some AWESOME work. It turned out beautiful and I love the false table look, I should have done mine that way!
Thanks! I appreciate the kind words.

garagebrian":1ahpheii said:
As far as cleanup crew I would stay away from bumblebee snails, I have one in my tank and he doesn't do anything that I can see. I have some astreas(the smaller turbo) and they do a great job(although I hear the slowly die in high(80+) temps). Red hermits are OK, I like blue hermits better, although they sometimes attack and kill snails for the shell.
Thanks. As I mentioned in my buildoff thread I added a cerith snail and a scarlet hermit today. The pet store around the corner has about 100 bumble bee snails, and I like the look - that's why I asked. I'm thinking one sand snail will probably do me unless the algae gets out of control. I'd rather there be too few of 'em than too many, so there is enough food to go around.

garagebrian":1ahpheii said:
I've heard the ultimate cleaner snail is the trochus snail, like warmer water, reproduce easily in tanks and mow down algae. Hard to find them though.
I'll keep my eyes open. Thanks.

Boy, I said thanks alot! Deserved, tho.
 

garagebrian

Advanced Reefer
Rating - 0%
0   0   0
Foosinho":3emsahe5 said:
garagebrian":3emsahe5 said:
I don't want to hyjack your thread, but with your woodworking skill I wanted to ask you a question.
Well, it looks better than it actually is. You can see the flaws up close - I could have done better with proper tools. :) I've learned a lot in building the stand, enough that I wouldn't be intimidated taking on a larger furniture project, provided I had some money in the budget for a table saw, band saw, and drill press. :D

garagebrian":3emsahe5 said:
I would like to cut two doors out of the skirt and I will try to cut them as straight as possible, but is it alright if they come out a little crooked? I figured I could cover up any minor mistakes by glueing the trim on top of the doors I cut and they will still look straight. Make sense?
I would use a straightedge to get it as straight as possible, but yes - the trim will cover for some mistakes. You *may* have to remove a little bit of wood around the door to get it to swing freely, depending on how you hinge it and how much material your blade removes.

My door has three problems. The first? I didn't cut the plywood square. Along one edge, I managed to flex the wood and get the circular saw blade closer to the straightedge than it should have been. Not sure how I did it, but I did. If you look carefully at the following photo, you can see the problem in the lower-right corner of the door - and you'll notice that the plywood does not go all the way out to the edge of the trim like it does on the lower-left corner. After applying the frame, you cannot see this at all.

door_assembly.jpg


The 2nd problem is that my door opening is ever so slightly out-of-square. Meaning that after I went thru all the trouble of making a perfectly square door with a 1/8" gap all the way around - it didn't quite fit. I had to sand down the upper right corner to get a clean fit. You can't really tell unless you get up close, but the error is there.

The 3rd problem? The door is slightly cupped, and while the trim helped, it did not eliminate the cupping of the plywood. I addressed this by orientating the door when I mounted it such that the upper right corner is the one that pulls furthest away from the frame, and then I mounted the latch magnet there. When closed, it "uncups" the door with the magnetic force.

garagebrian":3emsahe5 said:
Will I need to sand off the stain and polyeurthane before I glue the trim on?
No, I don't think so. If you use glue (and you probably should) in addition to nails, double check the glue instructions. It may need "virgin wood" in order to properly bond. In my case, I didn't even use nails - just glue and clamps overnight. Hope it holds up. :)

I'm no Norm Abrams, but I manage to get by. Good luck!

Thanks for the detailed response! You brought up a lot of things I was thinking about and just didn't know how to put into words. The picture you provided is exactly the thing I'm afraid of happening when I cut. Unfortunately my jigsaw is all I have available and the sawdust tends to accumulate right where the blade is cutting or where I'm about to cut, so hard to see exactly where it is cutting. Any suggestions on how to minimize this?

Now I just need to find trim to match my stand and canopy and the time to do this :)

Thanks for your help!

Brian
 

Foosinho

Reefer
Rating - 0%
0   0   0
garagebrian":3iygyq1u said:
Thanks for the detailed response! You brought up a lot of things I was thinking about and just didn't know how to put into words. The picture you provided is exactly the thing I'm afraid of happening when I cut. Unfortunately my jigsaw is all I have available and the sawdust tends to accumulate right where the blade is cutting or where I'm about to cut, so hard to see exactly where it is cutting. Any suggestions on how to minimize this?
(Ghetto) Option 1: Tape the hose of a shop-vac to the side of your jigsaw, so it sucks up the dust as you cut. :D

Option 2 (suggested): Get a long straightedge - I used a very long level - and clamp it to the work piece so that the edge of the guard on the jigsaw runs against the straightedge. You'll have to take care to position the straightedge so that it runs parallel to the cut at the right distance so the blade falls right on the line. If you take your time, you'll get a very straight cut.

garagebrian":3iygyq1u said:
Thanks for your help!
My pleasure.
 
A

Anonymous

Guest
Rating - 0%
0   0   0
WOW! What an incredibly informative thread. Thanks to both of you.
 
A

Anonymous

Guest
Rating - 0%
0   0   0
Foosinho":2iqk4pmm said:
(Ghetto) Option 1: Tape the hose of a shop-vac to the side of your jigsaw, so it sucks up the dust as you cut. :D

If you have a lil helper, she can hold a blow dryer a foot or so away while you cut. Very handy, helpers with blow dryers :)
 

Buckeye ME

Reefer
Rating - 0%
0   0   0
Nice work on the stand. I am just in the process of setting up a 15g with a 10g for a sump and I think I'm going to try a stand much like that. I like the compact footprint of it, that's the best way to get it to fit in my apartment. :roll:

Did you use 2x4's for the frame? They look thinner but I wasn't sure.

Unfortunately I've already got live rock curing so I have to get moving.

BTW: I'm a student at OSU, man I wish I would have had tickets for that Illinois game.
 

Foosinho

Reefer
Rating - 0%
0   0   0
Buckeye ME":1yr9mp09 said:
Nice work on the stand. I am just in the process of setting up a 15g with a 10g for a sump and I think I'm going to try a stand much like that. I like the compact footprint of it, that's the best way to get it to fit in my apartment. :roll:

Did you use 2x4's for the frame? They look thinner but I wasn't sure.
Thanks. The legs are 2x4 - the upper and lower boxes were 1x4 that were laying around. The thing is rock solid, so I expect that 1x4's would be overkill for you too. I could probably stand on the thing without any problems.

Buckeye ME":1yr9mp09 said:
BTW: I'm a student at OSU, man I wish I would have had tickets for that Illinois game.
I graduated from OSU in Dec 2000 with a BSEE. I was also about 45 credits from completeing a BSME. Thankfully, my football ticket for this fall is the Texas game! I haven't been to any hoops games since the 2000-2001 season, so I'm thinking about trying to score some tickets this year. I miss it.
 

Buckeye ME

Reefer
Rating - 0%
0   0   0
Well I started my fooinho inspired stand this weekend. I would post pics but, uh, I don't have a digital camera, so that sucks.

It's pretty hard to do without any real tools. I got all the lumber cut to size at Lowes, and am drilling with a dremel I bought just for the occasion. I have the main from all set up and I'm pretty happy with it.


Nice luck with the Texas tickets. It is so tempting to sell mine and have it pay for the rest of the year's tickets. I can't justify missing a game though. Especially being my final year. The best part of engineering is the fifth year of football tickets.
 

garagebrian

Advanced Reefer
Rating - 0%
0   0   0
Foosinho,

I finally found time to finish my 75 gallon skirt, here is the result:

Here is the stand when I was setting up the tank:
standold.jpg


Here I'm starting to cut the skirt with my high tech jigsaw and Sawdust Rapid Spin Removal Device(TM pending).
cut01.jpg


The large piece of wood cut to make into two doors:
cut02.jpg


The piece cut into two doors:
cut03.jpg


Continued in next post....
 

garagebrian

Advanced Reefer
Rating - 0%
0   0   0
I had to trim the skirt a little to fit the stand properly, here I was testing the skirt fit:

place01.jpg


Here it is with the doors on and open:
place03.jpg


And finally....my pretty skirt all closed up hiding the ugliness underneath!
place02.jpg


I learned a few things during this project I would like to share:

1. When drilling starter holes for cutting an interior hole in a piece of wood, drill them so the entire hole is inside the space you want to cut out, otherwise your corners had these little rounded holes.

2. When staining wood, do NOT believe the claim on the Elmer's wood glue that it can be painted or stained over. It probably can be painted over, but it will not adsorb stain. I did one door staining before glueing and one staining after glueing and the one staining after glueing looks terrible.

3. Jigsaw blades will bend to one side if side pressure is applied, resulting in a uneven cut. I'm guessing more experienced woodworkers knew this, but I would say a jigsaw is a bad tool for this job. Suggestions for an alternative?

4. Elmer's wood glue says to clamp your pieces of wood together for 30 minutes. In the Texas heat and humidity, I would say you need to clamp them together for a minimum of 3 hours, otherwise when the clamps are removed, your wood will pull apart. I left mine clamped overnight to be safe.

I did this so I could save money(did a little), learn some stuff and to leave two sides of the stand open to the air to allow better circulation in the stand. There are a lot of things I did wrong, but I'll know better for the next one! Questions or Comments?

Foosinho, thanks for the earlier pictures and advice so I could accomplish this!

B.
 
A

Anonymous

Guest
Rating - 0%
0   0   0
You used the right tool, a jigsaw is probably the best way to make that cut unless you have a nice stable table saw.

If you want an even smaller hole in the corner showing where you start the jigsaw blade use about a 1.8" drill bit and drill a series of holes close together in a line and then push the blade through them -- wallah it looks like you knew what you were doing.

There are almost no glues that you can stain over with great results. the best thing to do is stain and poly first and then fasten the pieces together.

its still nice looking though, nobody but you will ever notice!
 

Sponsor Reefs

We're a FREE website, and we exist because of hobbyists like YOU who help us run this community.

Click here to sponsor $10:


Top