• Why not take a moment to introduce yourself to our members?

bad coffee

Inept at life.
Rating - 100%
27   0   0
Next month I'm building a kalk stirrer for myself. Since I'll have everything out to build one, I can build a few at a time with out much trouble.

Mine will be a stir rod style, not a Maxi Jet pump style. I'm using cast acrylic, and decent components. So it's not gonna be a $10 reactor. But it's not going to be the $450 price deltec charges, either. I think I'm doing mine in an 8" tube. If you want smaller, let me know, I can do it. I can basically build them to any specs you want.

I'm not looking to make a killing on these money wise, just defer some of my costs- cast tubing isn't cheap! I'm thinking they're going to end up costing around $200 or so. Probably (HOPEFULLY) quite a bit less.

I'll be ordering supplies in the next few weeks, so let me know. Before i plunk down the cash for anything other than mine, I'm going to ask for a deposit, which will guarantee you won't back out.

All profit I do make will be donated to the site.

b
 

GreshamH

Advanced Reefer
Location
SF Bay Area, CA
Rating - 0%
0   0   0
Where are the pics :arg:

pointlesswithoutpics1.jpg


It's not really pointless, I just like the pic :lol:
 

bad coffee

Inept at life.
Rating - 100%
27   0   0
EEK. I haven't updated this in a while.

I made a prototype of the motor/stir housing for Randy.

Did I take pictures? Um, No. Not that I didn't have the camera, but I just didn't take pictures. Maybe Randy will post some here.

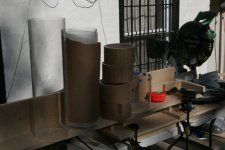
I do have a pic of the 6" tube I cut yesterday to start working on the reactors. (I know, I said "next month" in December, but my work schedule has been a bit hectic this year.)

In the pic you see:
20" reactor tube
18" reactor tube
a bunch of ~3.25 motor housing tubes
7" cutoff that I'll use as a jig for molding pieces.

I still have a 60" piece of uncut tube, I figure I have enough stuff for 4 total reactors

B
 

Attachments

  • kalktubes.jpg
    kalktubes.jpg
    90.9 KB · Views: 1,180

masterswimmer

Old School Reefer
Vendor
Location
NY
Rating - 99.6%
450   2   0
Looking forward to seeing a completed one. You know better than anyone, posting something like this in the DIY forum, without pix, is equivalent to posting a thread in the photography forum without pix. :smash:

swimmer
 

bad coffee

Inept at life.
Rating - 100%
27   0   0
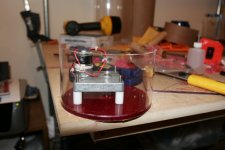
here's the first motor housing. This is kinda ugly so it's gonna be mine.

my tap kept melting in the holes for the top cover, so I had to repair a hole. I figured out a better way than drilling-tapping-screwing the cover on.

B
 

Attachments

  • kalk1.jpg
    kalk1.jpg
    79.2 KB · Views: 528

bad coffee

Inept at life.
Rating - 100%
27   0   0
Leo, I ended up using lotion soap for the screws. (I bought thread-cutters to skip a step)

This pic is the ring and the o-ring that are going under the motor housing. I might cut the o-ring and just sit the motor down on the tube.

I ran out of acrylic while 'experimenting' on the best way to cut the ring. Tomorrow morning I'll hit the plastic store and get more.

What's left to do:
Make the bottom half of the reactors:
---Cut the tubes to size
---Glue the tubes to the bottom pieces, Add the gussett band around the bottom, rout off the excess.
---make the input/output holes and shims for the fittings.
---Make a jig and make the stir rods. I've got to do a little work on the motor-to-stir rod connection.

I'm waiting for the switches and power supplies to get here so I can finish the electrical.
 

Attachments

  • kalkoring.jpg
    kalkoring.jpg
    71.4 KB · Views: 225

bad coffee

Inept at life.
Rating - 100%
27   0   0

artie1209

Advanced Reefer
Location
Mount Vernon, NY
Rating - 100%
2   0   0
Sorry did not intend to infringe or insult you. Your stirrer design seemed very complicated to me. I did not know if you were aware of this design and was trying to help. I am handy but not an engineer. I was able to buy the stirrer for under 100 bucks and 20 bucks for the timer, had some acrylic leftover from previous projects. Was only suggesting this design because it seemed less labor intensive not a better product.
 

bad coffee

Inept at life.
Rating - 100%
27   0   0
How did it turn out, got pics?

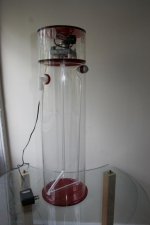
It turned out nice. Not exactly perfect, but definitely usable. I decided to put my in and out plumbing 90deg. apart, rather than 180. It will fit my application this way.

Things I'll do differently on the next ones:

Smaller bottom dimension on the stir bar. This one is about 1/32 away from the wall. I'm probably going to rebuild this one as well. I'll probably just cut and glue it, and be done with it. Or I might just make a new one when I make the next three.

Get a sharp router bit when I cut the bottom plate. I used one I had and it's quite dull. (anyone know of a saw sharpening shop?)

I tried 'gusseting' the inside of the bottom with Weldon 16. It worked, but it's just plain ugly. I need to figure out something different.

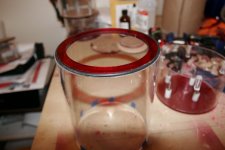
anyhow, here's the finished product!

B
 

Attachments

  • kalkdone.jpg
    kalkdone.jpg
    24.7 KB · Views: 236

Sponsor Reefs

We're a FREE website, and we exist because of hobbyists like YOU who help us run this community.

Click here to sponsor $10:


Top