• Why not take a moment to introduce yourself to our members?

A

Anonymous

Guest
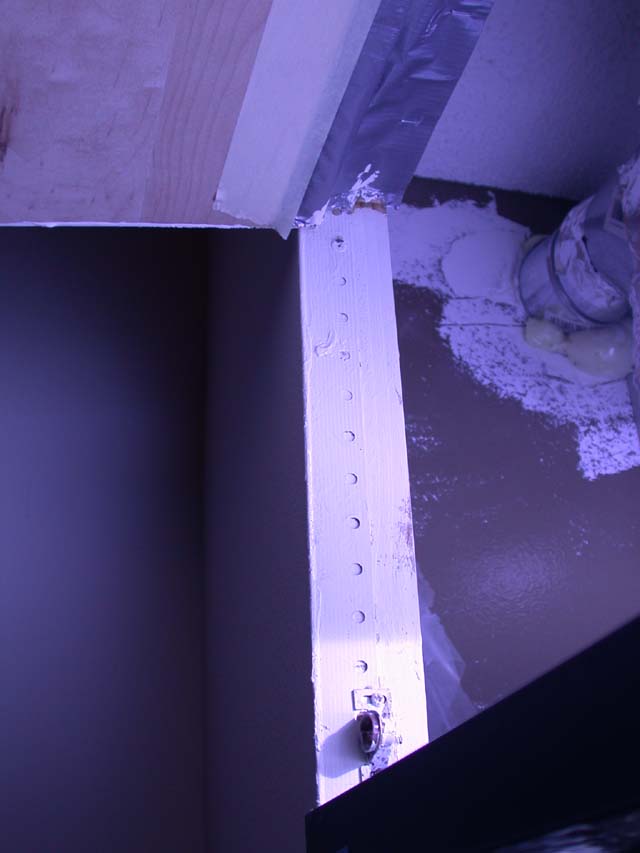
Here a couple of shots of the center post that I installed to have a way of proping the door open. The post is hinged in the center so that it will fit when the door is closed. I also installed a magnetic holder that holds the folded post in place when I close the lid. This thing works great.

Louey
 

Attachments

  • Tank Door 006.jpg
    Tank Door 006.jpg
    28.5 KB · Views: 4,014
  • Tank Door 009.jpg
    Tank Door 009.jpg
    34.2 KB · Views: 4,009
A

Anonymous

Guest
Here's a picture on the corner bead that is run on the sides and the top of the opening. I creates a problem at the top where the piano hinge screws in.

There is also a picture of the top where the piano hinge is installed, but it is covered in duct tape. I did that to keep light from shining though. I also stapled the duct tape in place because it kept falling off.

Louey
 

Attachments

  • Tank Door 011.jpg
    Tank Door 011.jpg
    30.4 KB · Views: 4,009
  • Tank Door 010.jpg
    Tank Door 010.jpg
    24 KB · Views: 4,008
A

Anonymous

Guest
Ahhh, the elusive corner bead........

Those are called RV catches?


I was just kidding you about your carpenter ya know. I really like the looks of the whole thing. The center leg is an excellent idea and having it fold up and stick to a magnetic catch looks like something I would do.

My favorite picture is number 12

Man that is a nice looking tank...
 
A

Anonymous

Guest
Beauty! That answers my questions! The piano hinge is exposed, its just painted. I am looking into euro hinges, which should eliminate the light shining through and the exposed hinge stuff, but they are harder to install.

Thanks again, and sorry if I hijacked your thread! :D

Gotta love Rockler - except when they send you the wrong stuff!

Oh- marked for archiving

:mrgreen:
 
A

Anonymous

Guest
Righty wrote:

sorry if I hijacked your thread

No, that's okay. I had originally intended to post the detail of the flap door, but forgot.


am looking into euro hinges, which should eliminate the light shining through and the exposed hinge stuff, but they are harder to install

There are a million different options available. Post pics of what you do.

Louey
 
A

Anonymous

Guest
Hey Louey,

How long did you let your starboard with sand cure before it went in the tank? Did you soak it in water or anything?

Sorry if this is buried in this thread already!

RR
 
A

Anonymous

Guest
I let it dry for a day, I think. Then I hosed it off and put it in the tank.

I used caulk to fill the seams inside the tank. I pushed some sand into the caulk. That didn't last every well. It's hardly noticeable, but if I had to do it over again, I would use PVC glue on top of the caulk 9after the caulf dried) so that the sand would completely cover the seam more effectively. You'd really need to do a good freshwater flush of the tank to get the PVC glue nasties out of the tank, but it would be worth it in the long run. Thankfully, the longest seam in my tank is along the back side of the tank behind the rock, so it's not noticeable from the main viewing side.

Louey
 
A

Anonymous

Guest
Rating - 0%
0   0   0
gregx wrote:

I get so upset when I see someones sump that is bigger than my display.

I know the feeling. Nathan Paden has a 1200 gallon refugium. 8O

Louey
 
A

Anonymous

Guest
Rating - 0%
0   0   0
Lot of people have asked me how my starboard is looking over time. Below as some pictures that shows how it looks after 7 months. Lots of coraline algea coverage now. That has really started to take off in the last couple of months. You'll also see baby poccilopora all over the bottom. Those babies are starting to turn into little bitty colonies now.

Louey
 

Attachments

  • starboard update after 7 months 001.jpg
    starboard update after 7 months 001.jpg
    81.9 KB · Views: 3,634
  • starboard update after 7 months 003.jpg
    starboard update after 7 months 003.jpg
    94.6 KB · Views: 3,632
  • starboard update after 7 months 004.jpg
    starboard update after 7 months 004.jpg
    56.4 KB · Views: 3,634
A

Anonymous

Guest
Rating - 0%
0   0   0
More starboard shots:
 

Attachments

  • starboard update after 7 months 007.jpg
    starboard update after 7 months 007.jpg
    64.3 KB · Views: 3,629
  • starboard update after 7 months 006.jpg
    starboard update after 7 months 006.jpg
    60.5 KB · Views: 3,630

MartinE

Advanced Reefer
Rating - 0%
0   0   0
That looks Great to me, I have a 58 Oceanic I'm about to start and I think I will try it.
Is it easy to clean? Seems as though it would be because stuff does not sink into the sand and accumulate.
 
A

Anonymous

Guest
Rating - 0%
0   0   0
It real easy to clean. In fact the only cleaning I have ever done is occasionally siphoning detritus that accumulates underneath the ledges.

Louey
 

Unarce

Advanced Reefer
Rating - 0%
0   0   0
That looks really good. Damn near came close to doing that on the cube. Sometimes I wonder, "What if?". :P
 

MartinE

Advanced Reefer
Rating - 0%
0   0   0
I noticed that detritus accumulation in my sand bed is one of the biggest problems in my other tank, so starboard might be the end of that problem. Great idea.
 
A

Anonymous

Guest
Rating - 0%
0   0   0
The great thing about is is that you can just point a powerhead underneath the ledge a blow it out that way. But some will always re-settle. But if you take the time to siphon it out you can really get the tank spic and span.

Louey
 

Unarce

Advanced Reefer
Rating - 0%
0   0   0
Louey,

Let us know how the Reeflux 10K look after they break-in. I can't remember if you're running actinics, but I switched mine out as a stand-alone bulb.

Karl
 
A

Anonymous

Guest
Rating - 0%
0   0   0
I'm not running actinics.

I change my refugium lighting over to Reeflux 10K's (175W) a couple of months ago and like the color just fine.

So I know I will like the color of the tank, so the question will be if corals grow faster or color up any differently than they did with the XM 15K's.

I'll definitely report my findings in a few months.

Louey
 

Unarce

Advanced Reefer
Rating - 0%
0   0   0
Coupled with my HQI ballast, I didn't get the blue tint that others would get with an electronic ballast. The HQI just overdrives everything. I liked how it made the blue corals stick out, but all the other colors just looked dull.
 

Sponsor Reefs

We're a FREE website, and we exist because of hobbyists like YOU who help us run this community.

Click here to sponsor $10:


Top