

By Paul Whitby
 In the previous two installments of this series, I discussed some of the aesthetic principles that can help with the design of your aquascaping. Armed with these ideas and rules on composition, a picture can be built in our heads, or on paper, of how we want the final product to look. In this, the last article of the series, I want to shed some light on the actual process of construction. Obviously, our raw material is rock, originally derived from a reef, but this may come in many forms from dry through to recently collected live rock. In addition, there are multiple types of rock which each have their own physical structures. Choosing the correct rock for your aquascaping is half of the problem solved. In general, there are two ways to work with rock. The simplest form is using gravity to hold it all in place by simple stacking, or using some form of a rigid structure to provide the template for the design. Both of these approaches will be discussed in this article and shown step-by-step in the accompanying slide shows.
Pillar Construction: Drilling and Stacking
 Probably the simplest method of aquascaping is simple stacking of live rock to create pillars. This is most readily performed by selecting relatively flat pieces of rock, drilling and mounting them sequentially on a rigid pole such as PVC or acrylic rod. Accompanying this article is a slide show, detailing the steps involved in simple pillar construction. For the most part, when building pillars I tend to use ¾ inch PVC pipe. I find it is easy to work with, it holds the rock well and has a number of fittings that can be utilized to help support the overall structure.
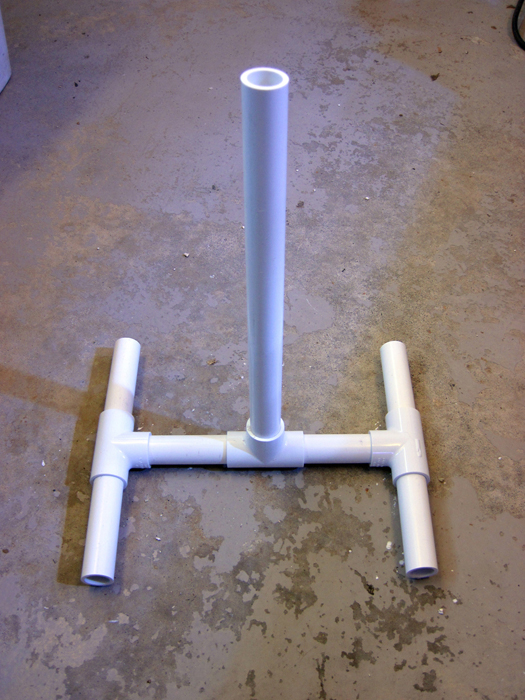
The first step is deciding the overall height of the structure. This is easy to do since we know the water height in our tank and we should by now have a rough idea of how high we would like the rock work to be. Based on this determination, a length of PVC is cut to our requirements. This is mounted to a PVC “T” fitting which is then mounted to two further “T”s. Small extensions of PVC pipe make an H at the base of the pillar which stabilizes the column and holds it upright. I would suggest that each of these fitting is glued to help keep the structure intact while you work. This part of the construction will ultimately be hidden by the sand bed.
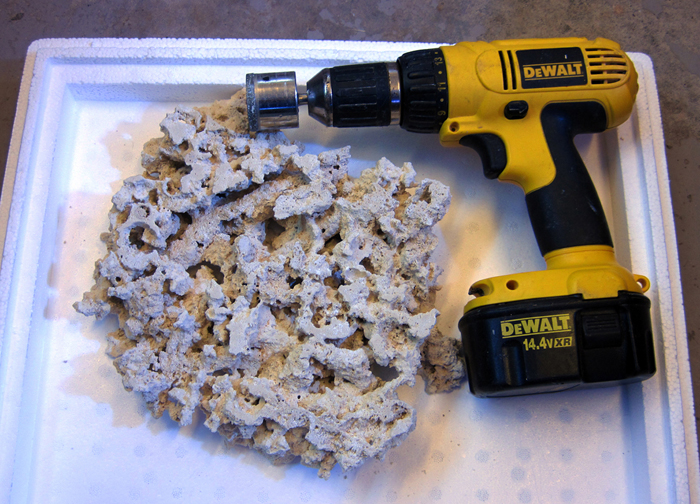 The next step is the actual drilling of the rock. For pillars I am a huge fan of shelf rock. In the past, this was readily available- albeit quite expensive. Unfortunately, the availability has dropped to almost none. Recently I have started taking a more environmentally friendly approach to building aquascapes and have become a huge fan of the dry rock supplied by Marco Rocks. This vendor has a range of flat type rock under the name of Prime Cuts which is ideally suited for aquascaping. This material is very easy to use, and due to open structure it is really easy to drill and to lock into place. Now, before drilling, a few words of warning. Safety with power tools is a major concern. Safety glasses are a must, I also recommend using cordless appliances as water and electricity are a bad combination. Until you are comfortable drilling rock I would also like to suggest that you proceed with caution. Drills have a tendency to snag in the rock causing the rock to jump, so please be careful.
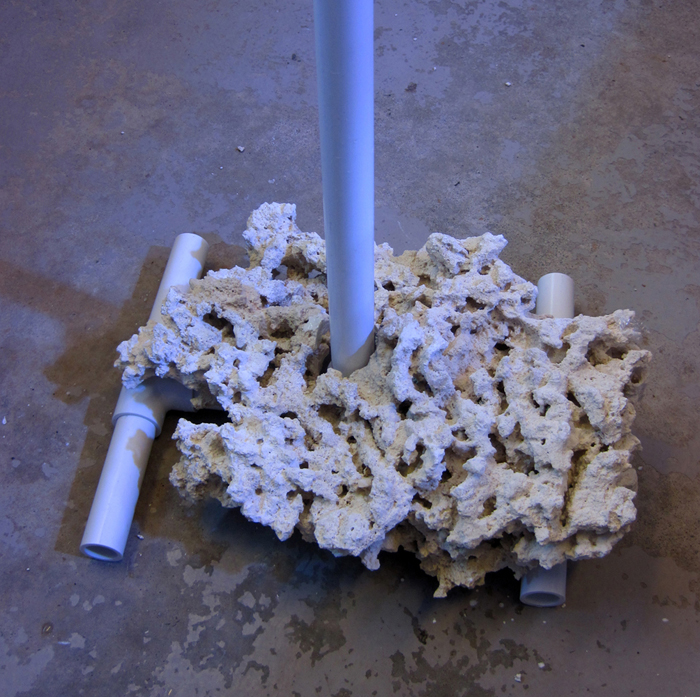 When drilling rock, be it dry or wet such as Marshall islands type or Fiji, I use a diamond hole saw. This is sized such that it fits over the PVC pipe we are using. This is important as we want a certain amount of “wiggle room” for the rock to settle onto the top of the rock beneath it, and lock itself in place. If the hole is too tight, the rock will resemble a string of beads as opposed to a solid structure. In this case I am using a 1 ¼ inch diamond hole saw from Gl*******s.com. While drilling, I usually employ the help of a friend who trickles water over the rock to keep the drill bit cool. When building a pillar, the bottom piece of rock should be the largest piece you have, and should be drilled in such a way as to partially, if not completely cover the base of the pillar. This will help stabilize the entire structure when it is in the tank.
After the drill has penetrated a short way it will likely stop, this is due to the plug of rock touching the inside of the drill. To continue, remove the drill and using a screwdriver pop the rock plug out of the hole, and then complete. Once the first piece is done, slide it over the pipe and drill the rest of the rock. With regards choosing the order of pieces on the pillar, there are no rules. Simply select pieces of rock and drill them, trying to avoid the center where possible. As each is drilled, slide them onto the pipe, twist until the rock settles, and you are done. When the last piece is added, mark any remaining PVC at the top of the rock, remove the rock and recut the pipe such that the top is hidden. This is best done outside the tank, but can also be done within the tank.
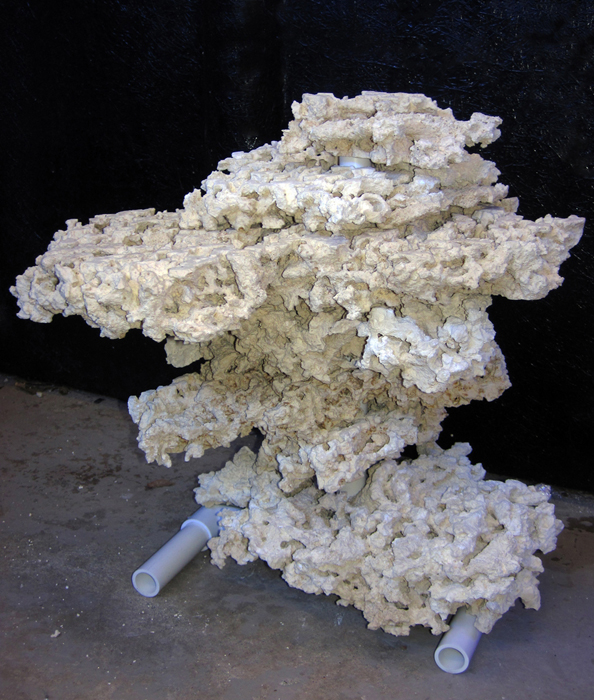 For best results, I have found that being totally random and not trying to stack rock in any order works really well- but your design may be a pillar that tapers from the base to the top, or completely the opposite with a large top and a smaller base, giving a larger sandbed. A great thing about pillars is the ability to experiment as you go. Small pieces make great fillers, larger pieces make great ledges for corals to sit on. The pillar shown below was constructed with the Prime Cuts rock. Build time was under 30 minutes. The structure was randomly assembled, is very stable and would look natural once encrusted with corals.
[wonderplugin_slider id=”8″]
Arch Construction: Drilling and Zipties
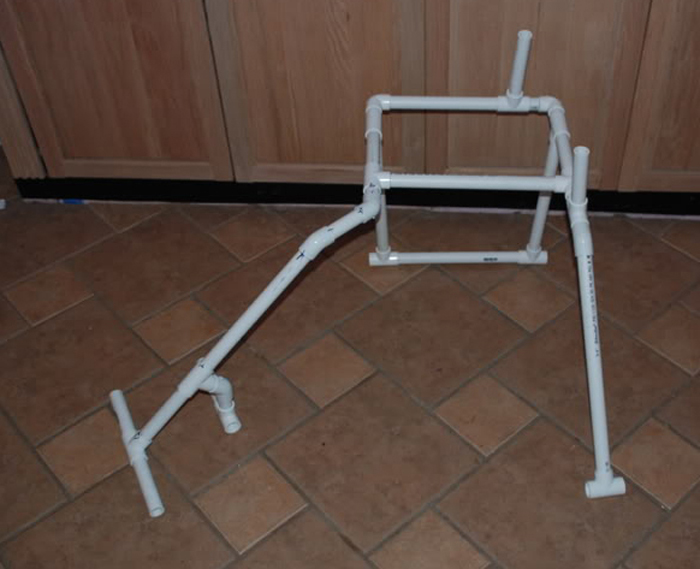
The easiest and simplest way to build an arch is to construct a PVC frame that will ultimately be encased with rock. By doing this, you can initially play with the PVC to obtain the best shape for the system you are building. With arches, it is more important to take note of the various rules discussed in the first two installments of this series. Remember that refraction will increase the angle of the slope, if the arch is coming forward. The Golden rule can also be applied to the spacing of the legs and the overall height of any arch when compared with other features of the tank.
Similar to the simple pillar, I prefer to use ¾ pvc pipe for arch work. On tanks up to 24 inches deep, I generally build an arch that connects onto a pillar structure and bring the arch at a slight angle forward. This is the build detailed in the slide show. By bringing the arch forward at a slight angle the “uniformity” is broken and the image appears to be more natural. In tanks over 24 inches deep, I like to build a multi leg structure that has at least one arch as a leg, if not more. I also usually incorporate small pillar like extensions as well to break the image up and introduce random elements. Since the rock is suspended and held by the PVC it is essential that a solid firm structure is created. Care needs to be taken that all the pieces fit together to make a stable structure, all the fittings are seated well and are firmly locked in place. Due to the nature of the construction, I generally do not glue arches together.
To build an arch, I cut the pieces and assemble the structure. At the base of the legs usually a “T” is fitted or the “H” frame described above can be used. To create an interesting and more natural looking structure, the PVC for the arch can also be sculpted to add flats, curves, angles etc. In general, I use a combination of 45 degree bends along the arch to provide flat areas along its length for mounting corals as well as bending the arch backwards and forwards. This removes the “straight line” of pipe, effectively hiding its origins. While this technique initially appears to be quite daunting, it is in reality a very simple approach to structure building. It does however take time to perform.
 The key to success is ensuring stability as you work. The first step is to secure the structure by adding the initial rock piece on the bottom, then working upwards, ensuring each piece of rock is securely anchored to the framework. At the base, a heavy rock is generally placed over the pipe similar to that for the pillar. This can be easily achieved by drilling at an angle through the base piece and sliding down the pipe of the arch. Alternatively, we can begin to drill and zip-tie the rock to the pipe. Much like pillar building, arch work also requires certain shapes of rock, in this case long thin pieces, ideally with a slight curve on one face that can be wrapped around the pipe. If such pieces of rock are not readily available, small pieces can be used to the same effect, but this ultimately requires more work.
Taking each piece of rock separately, I begin by fitting the rock to the pipe to find an orientation that gives the best fit. In this case, best fit means to cover as much pipe as possible and make a good alignment with any other rock already incorporated. Once a rough idea of placement is achieved, the rock can be drilled. I use 6 inch long zip-ties and each of these requires a hole of around 1/4 inch to be drilled, unless the rock already has a convenient hole. Once I have the placement of the rock figured I look for an area that can be drilled such that a zip tie can be passed through the hole, loop around the back of the PVC and hold the rock tightly in place. Preferably, the hole should be in an area not readily visible from the tank front- or one that will be later obscured by a coral or another rock.
To drill the rock I use a masonry bit. I find this drill works very well for smaller holes- but I do not use a hammer setting on the drill since I have found this to sometimes crack thinner pieces of rock. Once drilled, the zip tie is threaded from the back of the rock through the hole then around the pipe. This keeps the bulk of the zip tie out of sight. The rock can then be mounted to the frame simply by aligning, connecting the zip tie and pulling it tight. It is likely that the zip tie may twist the rock slightly, however the next rock piece can be used to force the first piece back into alignment- this makes for a stronger overall structure. When pulled tight, the excess of the zip tie is cut with scissors, or wire cutters. This process is repeated on the back of the pipe to create a covering, on all sides, that runs along the length of the structure. It doesn’t matter if the pieces do not fit perfectly, this adds to the natural look, and corals or small pieces of rock can be used to fill in any apparent gaps in the structure. To ensure that the rock cladding does not slip on the pipe, every so often I also drill a hole through the pipe at the place where a rock is zip tied. The tie is then pushed through the hole and cinched tight. This allows the rock to be very tightly bound to the frame and prevents it from moving. Doing this really ensures stability and permanency of the build.
 Another aspect of the arch, is adding platforms for corals. A feature that I personally think looks good are several ledges along the length of an arch, and at various angles to each other. These can be easily added by drilling shelf rock (discussed above) at a slight angle and sliding onto the pipe much like a pillar. Alternatively, if available, a larger hole saw can be used and the hole obscured by rock above and below. If taking this approach, it is obviously important to not glue the PVC frame together and to incorporate flat sections into the original design. As opposed to drilling, rock shelves can be also mounted by simply zip-tieing the rock to the PVC frame and the other existing rock structure. In this instance it is a good idea to drill the PVC pipe as well since this will firmly seat the shelf in place and stop it from tilting.
In the accompanying slide show detailing the construction of a simple pillar and arch I am using pieces of fiji live rock, old corals skeletons, and the dry Prime Cuts rock from Marco Rocks to clad the pipe. The individual pieces of rock are chosen for their shape and how they fit around the PVC. In the slideshow, a piece of shelf has been drilled with a larger hole saw and slid onto the pipe, then zip tied to hold it in place. Another Shelf piece is used on the top of the flatter section of the arch.
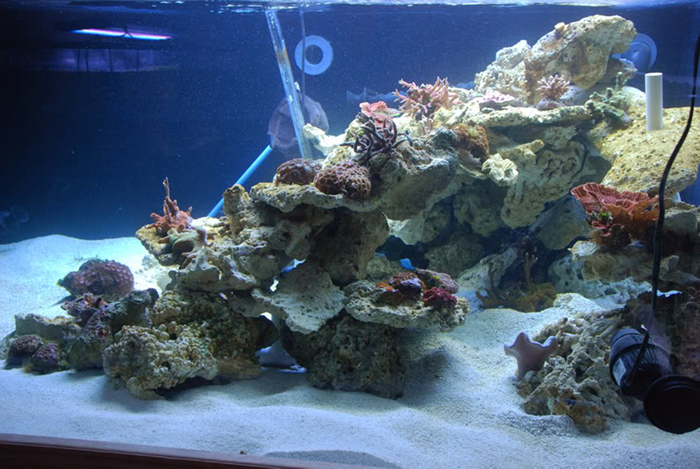
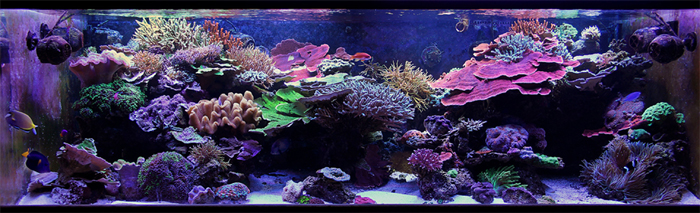
The examples shown above are of the initial construction of a large complex arch structure that resides on the right side of my 600g tank. Initially I designed a PVC rack subframe that would ultimately hold the rock. This structure is shown out of the tank so you can see the overall shape. It is also shown sited inside the tank straddling the pipework of the closed loops. Since it has 4 legs, and each is braced, I was able to begin adding rock at the top, flatter section of the arch and building down, hiding each of the black penductors of the closed loop as I progressed. As can be seen, ledges were incorporated by zip-tieing shelf rocks to the frame. Overall, this PVC based arch structure has provided a very open space within the tank. Once corals were added and allowed to colonize the rock, the overall effect became one of a large natural arch. The single piece of exposed pipe stood straight up on the right side was ultimately used to create a small pillar which can be seen in the final aquascape images of my system in this, and in previous articles.
[wonderplugin_slider id=”7″]
Finishing Touches
The above two discussions really focus on the large scale structure of the system. However, aquascaping is more than just the big rocks. In a lot of structures, I also add smaller rocks to break up an otherwise flat shelf and obscure straight edges. There are two ways to do this, one is to drill and peg the rock and the other is to use a commercial cement type compound to glue the rocks together. The cement I use, and like a great deal, is “E-Marco-400” again available from Marco Rocks. I have used this with many types of rocks and it works equally well with all. My reasons for preferring this compound are that it can be used under water, which is great for finishing touches, it bonds well, has a great track record and is very simple and easy to use. It is also non-toxic which makes it ideal for our needs. I mix about a half cup at a time to a thick consistency and use it exactly like cement to bond the rocks together. Since it will have a slightly smooth finish, I often drop crushed gravel or sand onto the finished edge to obscure the flat texture. This process works well for any rock that is already stable and holding itself in place reasonably well.
 If there will be tension on the joint, or the rock is not stable, such as a rock that overhangs the one it’s joined to, I drill and peg the pieces. The process is very similar to that discussed above for pillar building, but on a smaller scale. Generally, I cut 3-4 inch lengths of 1/4 inch or 1/2 inch acrylic rod. The two pieces of rock are then aligned at the best angle to incorporate the rod determined. Each rock is drilled for about 2 inches and pegged with the rod. More than likely the fit is not exact- but with the use of the rock cement discussed above, it can be corrected, and locked into place to make a very firm structure. This is the technique used to create the “bonsai” tree arrangement of branches coming from a central spindle.
[wonderplugin_slider id=”9″]
In Summary
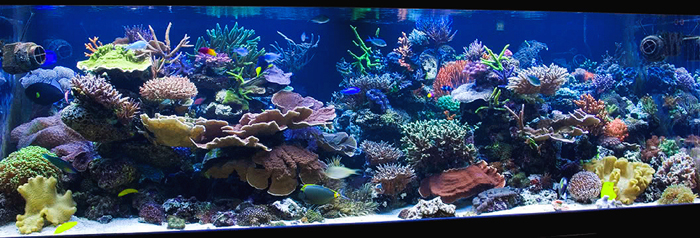
In the three articles of this series I have tried to give you insight into the creation of an aquascape that is both functional and pleasing to the eye. Some of the ideas are based on scientific principles, some on art, some on design and some on common sense. Hopefully, after reading these articles you can decide what would work for you and your tank with the resources you have available. Everyone’s situation is different, so it is difficult to propose an aquascape plan that works for everyone. It is my hope that I have given you inspiration, and that you can take these ideas, expand upon them and create a final product that is visually stunning.
 Years ago, my aquascapes were piles of rocks with corals growing on them. Water flow was impeded and the corals lost their dramatic beauty. When I began incorporating complex structures based on these techniques, I was surprised by how easily they were built and how the overall visual impact was improved. Having lectured on aquascaping at various clubs and conferences for several years, I have also had the great delight to see many tanks that people have scaped taking these principles into account. Again, all of these people were as amazed as I at the ease of the build and the results that could be obtained. So, in closing I encourage you to think outside the box, do something different, play with your aquascaping and create a living image…and if you do create something wonderful – please send me a photo!

Dear Paul,
I am concerned about the way you have suggested using pipework to support your structures. These structures are not filled with air, but water. After a month or two, the whole reef is destined to crash as the water becomes populated with microorganisms many of which are facultative anaerobes. As you are probably aware, anaerobic bacterial in the presence of iron within anoxic zones produce significant quantities of hydrogen sulphide gas. As dissolved oxygen diminishes to zero, the water in your pipework will stagnate. H2S gas kills fish and corals for fun and creates long term pH instability. Your reef supports will become sulphuric acid factories in around one to two months. Everything will perish.
Your background is in microbiology is it not? If pipework supports are used, traditionally they are drilled with large holes to prevent water within from becoming stagnant. Please do not feel obliged to post this comment. I would hope you feel it necessary to amend the article so the techniques suggested within are not so hazardous to life. Suggest air is permanently sealed within. The weight of the rock will ensure it stays put. However, there is always a risk in time that UV light and saltwater will degrade the UPVC and perforate the pipe permitting the ingress of water. Chris Aslett BSC (Hons) MRes., Reef Ranch®