
Originally published on Ellery’s Reef Notes Facebook page on 2/15/2019. Edited to reflect today’s prices and available parts.
In Part 1 I covered some cheaper but short-term power outage solutions. They were simple, but limited based on the power source chosen. This article will cover my long-term solution to save a reef system in a single family home during longer power outages. Long power outages will most likely result in heavy livestock casualties and higher chances of emotional distress resulting in getting out of the hobby. Hence every effort should be made to plan for such disastrous events.
Long Term Solution
After performing some research and benchmarking various solutions I found the best option that met my basic requirements.
- High enough capacity to power my entire reef system and the primary living necessities like the furnace and refrigerators. (I like cooking on my grill better anyways.)
- Economical enough to avoid a high cost investment like a whole house standby generator (~$10,000 – $20,000)
- Multi-fuel source for gasoline, propane, and natural gas.
- Manually connected and started but can be automated
Primary Shopping List: <$2200 ( Compared to <$1500 in 2019)
- Harbor Freight – Predator 9000 Generator (#63969) $799
- Harbor Freight – 8” Never Flat Generator Wheel kit (#68531) $34.99
- Harbor Freight – 25 ft x 10 Gauge Generator Duty Extension cord $54.99
- Harbor Freight – 12 Volt, 10Ah Sealed Lead Acid Battery (#62586) $49.99
- Harbor Freight – 5 Amp 3 Stage Onboard Battery Charger/Maintainer $19.99
- Harbor Freight – 2000W Continuous/4000W Peak Power inverter $179
- Reliance Controls 31410CRK 10 Circuit Transfer Switch Kit $399
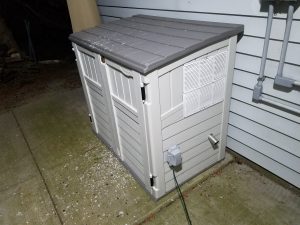
- Suncast Plastic Utility Shed 4.29ft W x 2.63ft D $329
- 12” 12VDC Radiator Fan $30
- Vent Grates $20
- Exterior Connector Cover $8
- 1¾” Diameter Flexible Exhaust tube kit $10
- Portable Generator Tri-fuel Conversion Kit w/ Propane tank attachment option $200
Project Installation Overview
- Start by wiring up the manual transfer switch to the circuits you want the generator to power. Be sure to follow all steps for electrical safety or hire a licensed electrician to perform the install if you are not comfortable working with high voltage. While you are performing this step a best practice is to label all outlets to their matching circuit breakers in the main panel box and documenting this in a spreadsheet to refer to and to be printed out and stored near the panel for emergency quick reference.
![]()
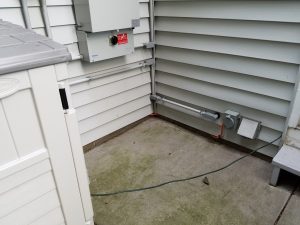
- Wire and mount the main 30-amp input connector box close to where you would like the generator to reside.
- Assemble the generator w/ wheel kit and install the Tri-Fuel Conversion kit to your generator. You may have to modify the generator frame to mount the air filter box properly. With the adapter installed there was not enough in the shed. The pressure regulator was relocated from the rear to the left side.

- Assemble and level the shed on a hard surface.
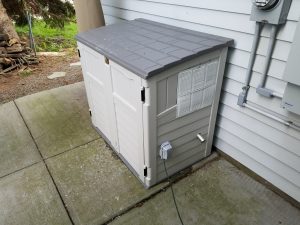
- Modify the shed to create a high exhaust and low cold air intake vent. Place the vent covers with bug screening on the back side to prevent bugs from entering the shed. For the 1 vent cover that did not come with the screening, I glued the screen to the vent cover back frame.

- Mount the radiator fan on the inside and wire the leads to an automotive 12 VDC cigarette lighter connector. Make sure that you wire the polarity of the fan so that hot air is exhausted out of the shed. This will plug directly in the generator’s 12VDC outlet to exhaust the internal heat generated.
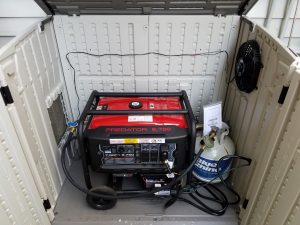
- Drill a 1 7/8” hole for the exhaust tube. Hold in place with a hose clamp. If you think it is too hot for the plastic, add fire proof insulation wrap to space the 2 surfaces. Update: After I used this, I may extend the exhaust pipe up to direct the exhaust higher and away from the house.

- Drill a 3.25” diameter hole and mount an outlet enclosure on the exterior where the 30-amp generator cord and the extension cord for the battery trickle charger can pass through.
- Once fully assembled, test the generator with gasoline and then switch over to propane. I keep a 20# Propane container hooked up in the shed and add fuel stabilizer to the gasoline.
- Check to make sure that the generator output power frequency is 60 Hz (in USA) with a Kill-a-Watt Meter or Voltmeter w/ Hz function. You may need to adjust the rpm of the generator by adjusting the throttle.
- Caution: Some new appliances (i.e. furnace motor and control boards) may not start up if the frequency is not within range.
General Operation
- Shut off the main breaker when using the generator. This step protects power company workers working on external lines.
- Connect the 30-amp generator power cord from the generator shed to the house input outlet.
- Turn on the generator and allow it to come to a proper idle.
- On the manual transfer switch, change the source for the specific breakers from “line” to “generator”.
- Reverse the steps to revert back to main power.
Maintenance
- Run gasoline generators every couple of months for 15 minutes for proper maintenance and readiness. The use of propane or natural gas will help keep the carburetor cleaner.
- Gasoline:
- Pros: Combusts more efficiently to achieve generator peak power output. Duration with 8 gal = 13 hrs. @ 50% load
- Cons: Fuel with ethanol absorbs moisture, even with stabilizer it may go bad and not run properly. Carbon buildup from gasoline requires more maintenance.
- Propane/natural gas:
- Pros: Does not degrade or go stale like gasoline. Natural gas can be plumbed directly from the house as a constant available source.
- Cons: Does not combust as efficiently as gasoline. Propane efficiency is impacted by temperature and humidity. It will not be in gas form if it gets too cold. Place the propane tank near the generator exhaust tube. The heat generated will warm the tank. A standard 20# propane tank uses 2-2.5lb per hour @ 50% load on a 5-7kW generator or ~8 hours.
Where to go from here?
The system has been running great. Fortunately I have not needed to use it since install.
Some potential options to optimize the system are:
- Have a licensed contractor run a natural gas line from the house meter to fuel the generator (and my grill).
- Reduce the generator run noise. Currently runs as ~83 dba standing 10 feet away with the shed closed.
- Automate the starting of the generator with a start relay from my aquarium controller. I would have to keep the generator permanently wired to the house and still manually switch the lines over inside.
This cost is just like buying insurance. It is better to be prepared and not have to stress all over again. I hope this little article stirs up some thoughts on being more proactive than reactionary. It will protect you from heartaches caused by total system losses that could have been prevented. Be a more responsible hobbyist while also keeping your family safe and comfortable too.
Till next time, happy reefing!


0 Comments