

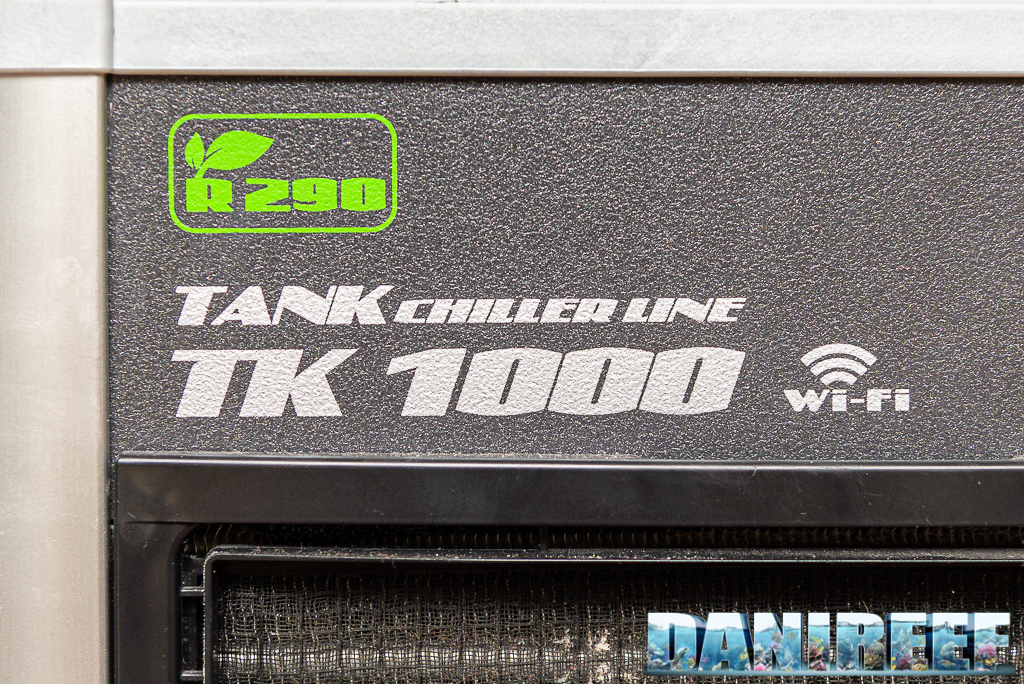
We tested a new product from the Tank Chiller Line, the Teco TK 1000 by Teco with the new r290 coolant. We tested the little brother TK 500 years ago and we are excited that the king is back again.
There has been great hype for this release because it was announced the replacement of the r134a with the r290. It should bring a lot advantages, as Teco itself explained in preview last year (I nuovi refrigeratori Teco consumano la metà e riscaldano meno l’ambiente – Italian article).
The three bigger chillers switched to the new coolant while the smaller TK 150 remained the same as the older versions. Let’s see the technical characteristics of these three chillers compared to the old series they replace.
The shape is the same, so we reproposed the photo we took the first time we had all the chillers together. The picture is archival material, but the only aspect that changed is the inside and the colors.

TECO, a company based in Ravenna, Italy, has several chillers in its catalog. The range actually consists of the following specific models for Aquariums (in parentheses are the replaced models).
| Technical Data | TK 150 | TK 500 | TK 1000 | TK 2000 |
| Cooling Power | 210 w | 240 w | 270 w (340 w) | 350 w (480 w) |
| Ecological Gas | R134a | R290 (R134a) | R290 (R134a) | R290 (R134a) |
| Minimum water flow | 400 lt/h | 400 lt/h | 500 lt/h | 600 lt/h |
| Tank volume (water temp. 25° C-ambient temp.° C 30-thermal load 0.5 w/lt) | fino a 150 lt | fino a 500 lt | fino a 1000 lt | fino a 2000 lt |
| Dimensions | 215x361x315 (h) mm | 310x310x416 (h) mm | 310x310x458 (h) mm | 310x310x500 (h) mm |
| Weight | 12,2 kg | 16,5 kg | 19,7 kg | 21,4 kg |
| Connections | by fitting 1/2 “-12 mm hose int. diameter | by fitting 3/4 “-16 mm hose diameter int. | by fitting 3/4 “-16 mm hose diameter int. | by fitting 3/4 “-16 mm hose diameter int. |
In the previous series, its biggest models, the TK 500, 1000 and 2000, had an inner heater thermostat of 400 watt. They chose to cut the heater thermostat, at least for now, so the units can only chill but not heat. Obviously the little TK150 doesn’t have the thermostat.

Our presentation video of the TECO TK 1000 r290
This is our presentation video of the TECO TK 1000 r290. It’s in Italian, but you can turn on English subtitles!
Construction
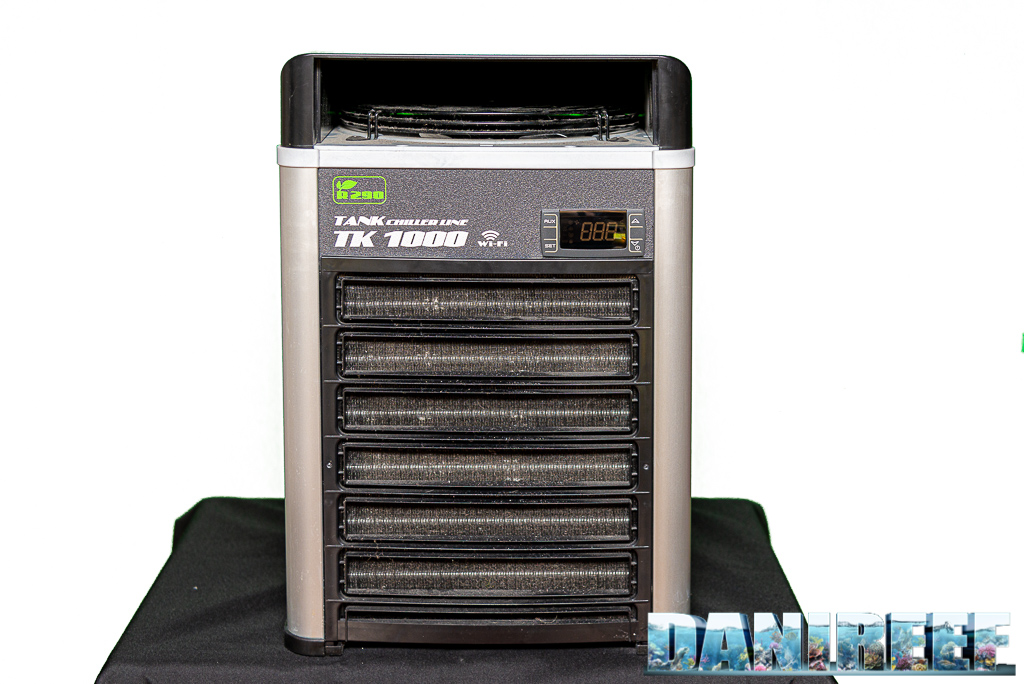
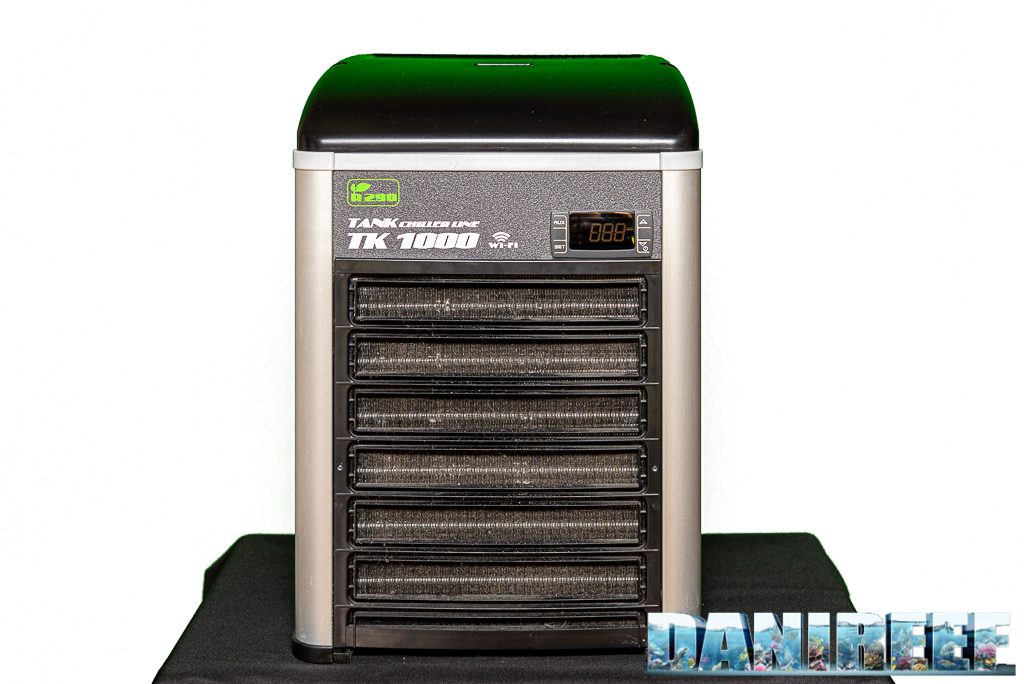
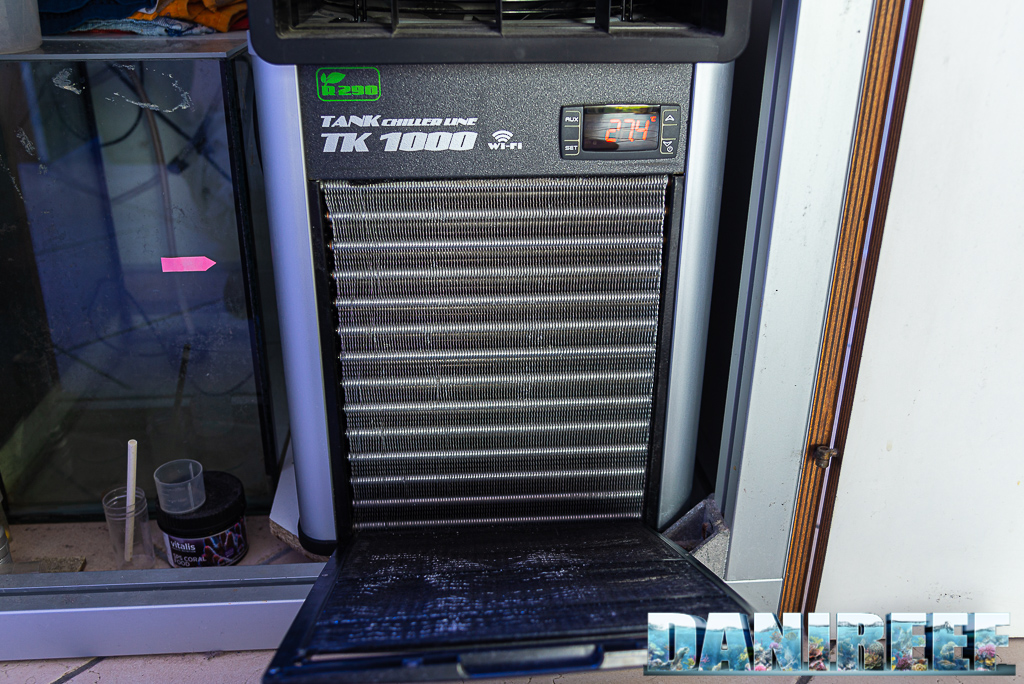
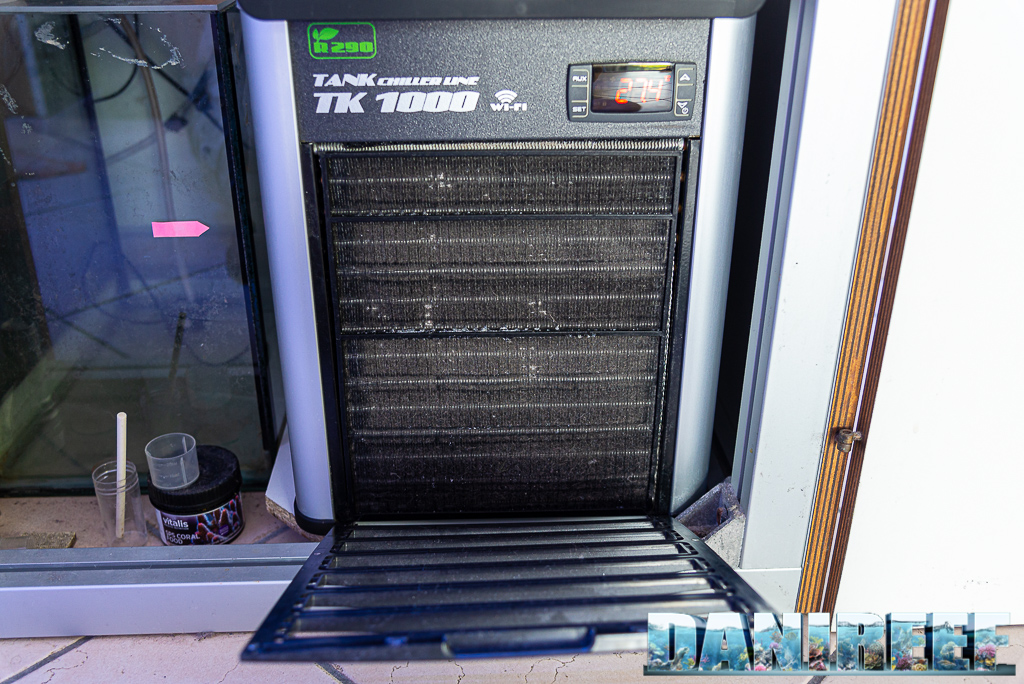
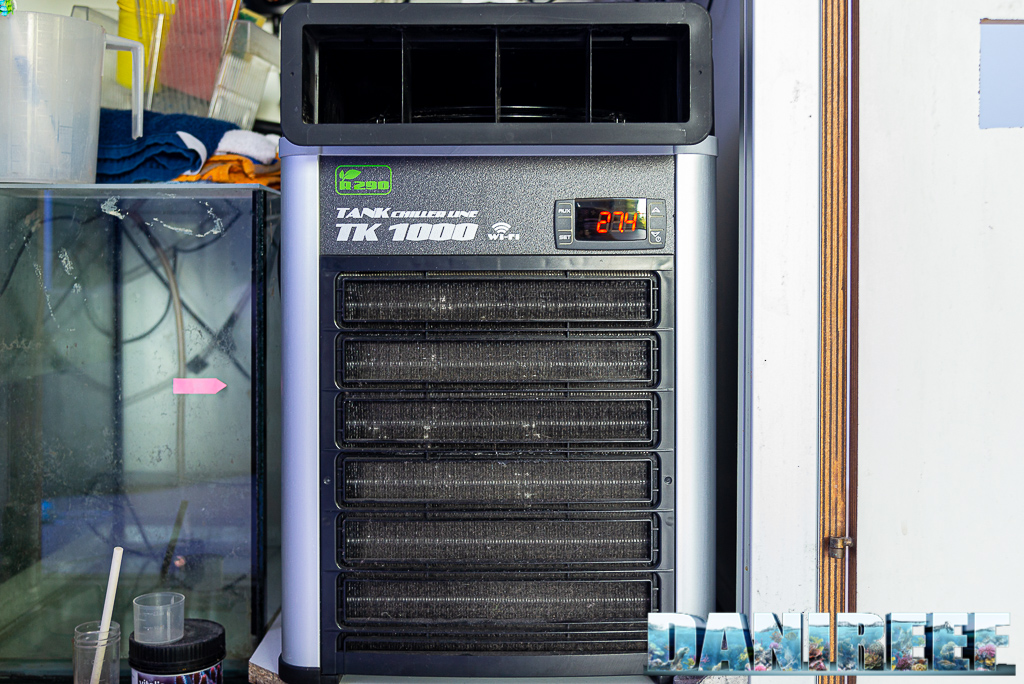
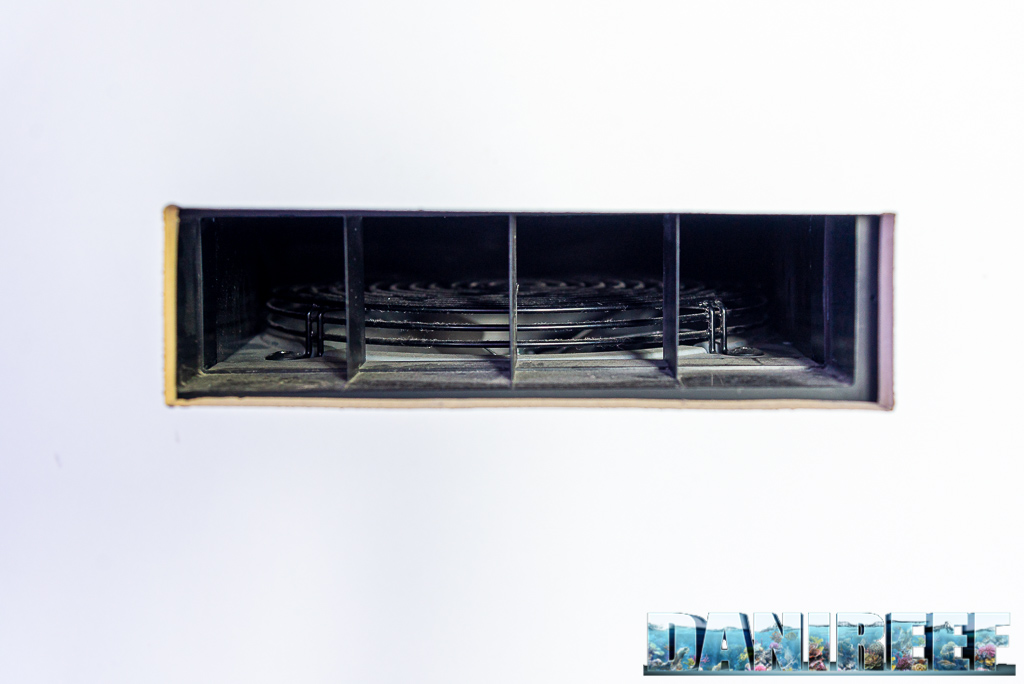
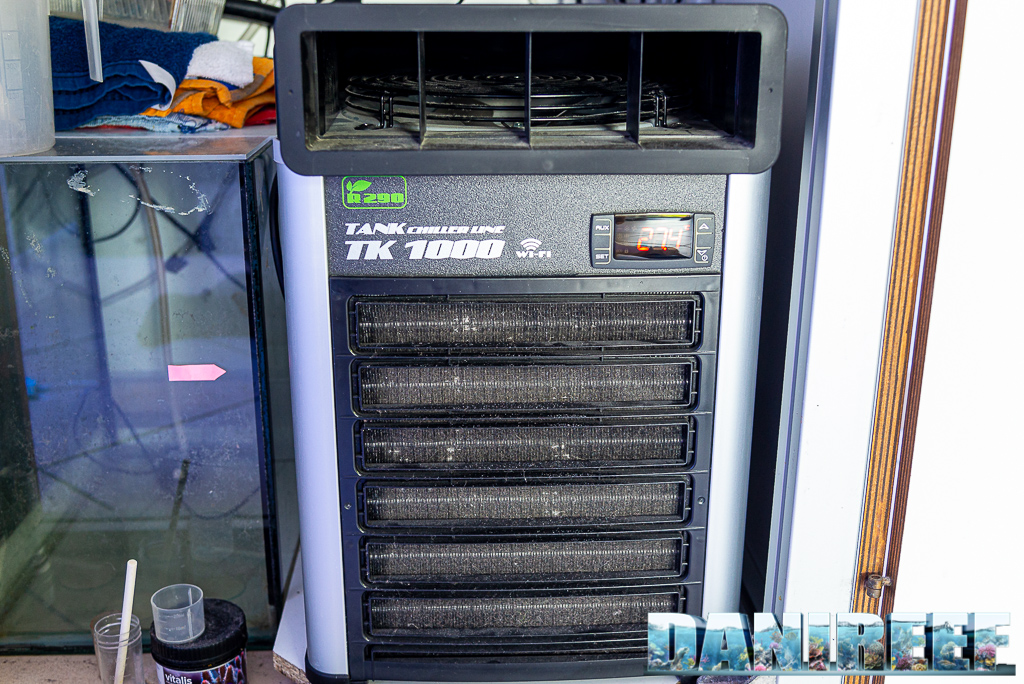
The Teco TK 1000 chiller is practically identical to the previous TK 1000, but it improves upon the winning philosophy of its predecessor by adopting a more efficient coolant. It starts with a 31 cm of square base inside where there’s the cooling coil and on the top there’s a big vent that disperses the hot air coming from the cooling system.

This system is very efficient. First of all the disposition of the elements: the air inlet is placed at the front and the top outlet uses the convective motion of hot air that is naturally inclined to go high, then the big vent keeps the noise low, because, given its size, it can rotate slowly.

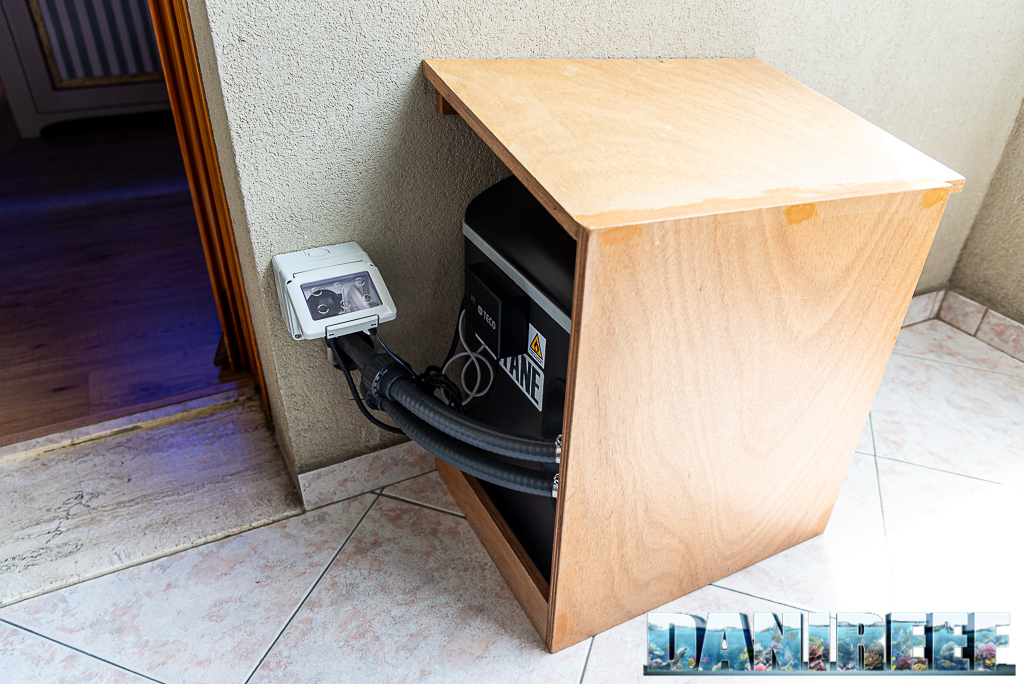
But the news isn’t over yet, because Teco‘s designers really had a great idea, that we at MagnaRomagna suggested at the first Teco Open Day at the Cattolica aquarium (Italian article), where we asked for an additional outlet for air on the back, so that we wouldn’t have any problem in placing the old models inside the cabinet (as you can see here – Italian article). But Teco took this suggestion and expanded it, designing a removable top that can be rotated in every direction.
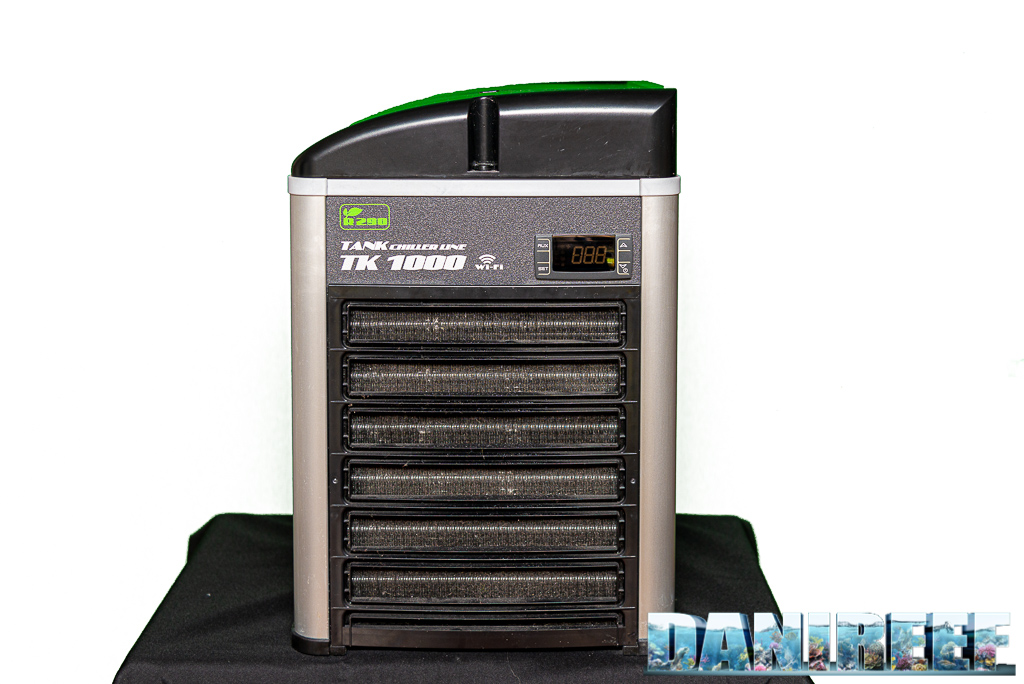
In this way the system is extremely clever and versatile. Moreover, the top is built in such a way that it can be connected to an “extender” that can be easily placed through a hole in the cabinet, for which Teco also provides a template to cut the hole precisely. These extenders can be matched in order to cover a bigger space.
Very practical and clever. Surely a big step forward compared to the old chillers.


As we said before, the air inlet is placed on the front, instead of under the unit like in the old chillers, and is linked to the main body through a series of magnets. In this way it will be easier to extract the air intake to clean it.
But the news continues.
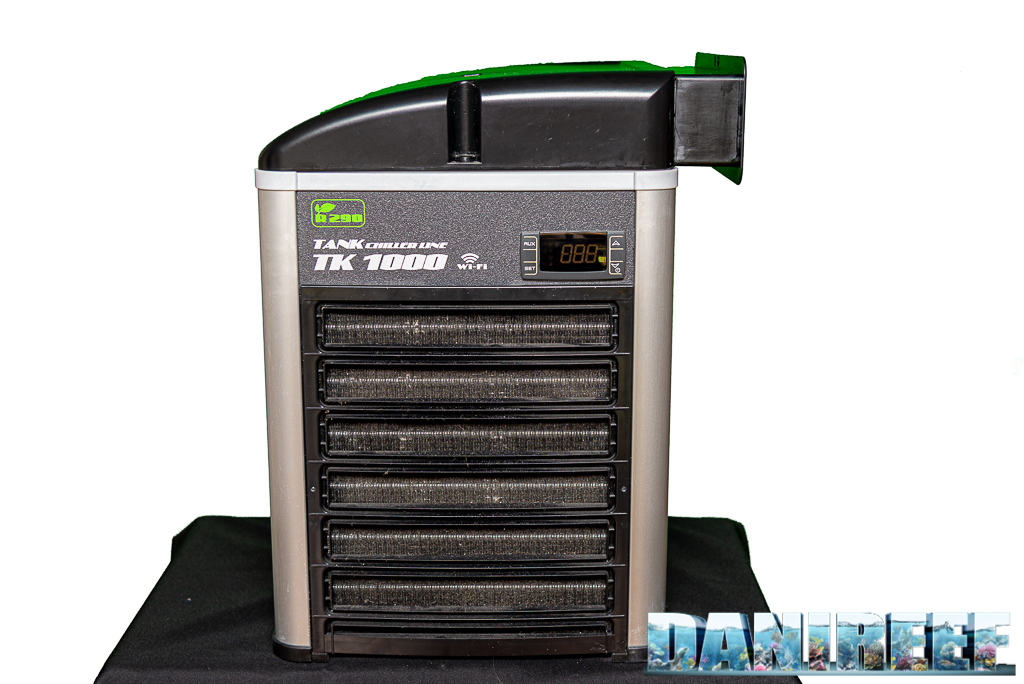
The two hoses for the inlet and outlet of the water are placed on to the back of the chiller. The hoses aren’t fixed and can rotate and, depending on how they’re istalled, can stick out from the side or the back. In this way you can place the unit against the back wall with the hoses on the side, or against side wall with the outlet on the back. It’s a very smart system that always leaves two closed sides free.
To block the hoses on the two adaptors there are two spring clamps included. They’re a bit hard, but they tie the hoses perfectly and guarantee the total water tightness of the system, though over the years the springs tend to loose their edge and should be replaced.

But it’s not over yet. Teco left us with a last gift, a couple of tube clamps that block the water inside the hose: with these, if you have to unplug the chiller, you can use the clamps to block the water and the hoses won’t loose a drop… except for that part between the clamps and the end of the hose.

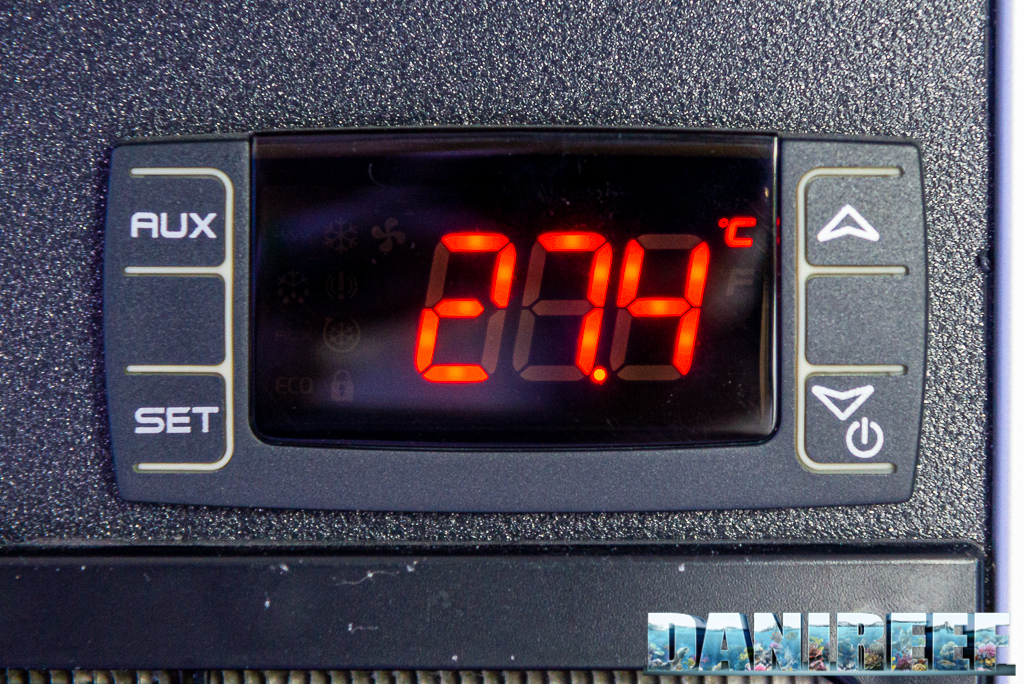
And then there’s the red LCD display, that although it can be easily read, it’s perhaps a bit limited for advanced modifications.
The probe
A relevant constructive element surely was placing the temperature probe inside the chiller. Teco designed the probe to be on the water inlet hose, thus you can detect precisely the real temperature of the aquarium, because the water isn’t cooled by the chiller. For the same reason you could not detect any cooling on the display even after quite a while from the switch. If the probe was placed on the outlet hose, the water would have been affected immediately by the cooling, and you would have detected a lower temperature, but it wouldn’t have been the real one. And this would have caused the unit to switch off an on too frequently.
Installation
The installation is extremely easy, because you can get insulated hoses of exactly the right size from Teco. Then you insert the hoses on the sinks and block them with the springs in dotation.
In order to clean it perfectly, before you use it, I suggest unplugging it from the sump (with the clamps that come with it, it’s very easy), then insert the return pump and the hoses inside a basket in which you pour water and chloridric acid (muriatic acid) at 5%, let it rest for ten minutes and the acid should dissolve any residue of limestone inside. But I highly recommend not using concentrations higher then 5%. After the cleaning, wash with plenty of water, to take out any limestone residual. There’s no reason to use osmosis water.

Once you get the chiller into operation with the right pump, and Teco suggests one of at least 500 liters per hour, you will immediately notice the noise. The frequency of the noise is changed; this big vent makes less noise than the previous models.
The video of the phases of the installation and the set up
When we installed a new TK 500 at Jonathan‘s house, we created a video of the installation that we reshow here in its full version. Even though we were talking then about the TK 500, not the new TK 1000 in test, the procedure is exactly the same.
The video is in Italian, but you can turn on English subtitles.
The display continuously shows the temperature measured in tank, which is the temperature of the water conveyed inside, up to one tenth of a degree. In the same way the control temperature can be set for tenths of degree. The intervention cycle is fixed at one degree. You can change it on the menu even to half degree by pressing the set button, but Teco discourages because it could bring to many cycles of turning on and off that in the long run could damage the compressor and surely lower the efficiency.
To set the expected temperature you press the “Set” button for three seconds when the chiller is on, then the display will blink showing the temperature of intervention and you can change it with the buttons with the arrows on the sides.
Once turned on you will notice the power of the compressor that also generates a not so elevated noise, compared to other chillers I had and listened to in other aquarists’ houses.
The field test
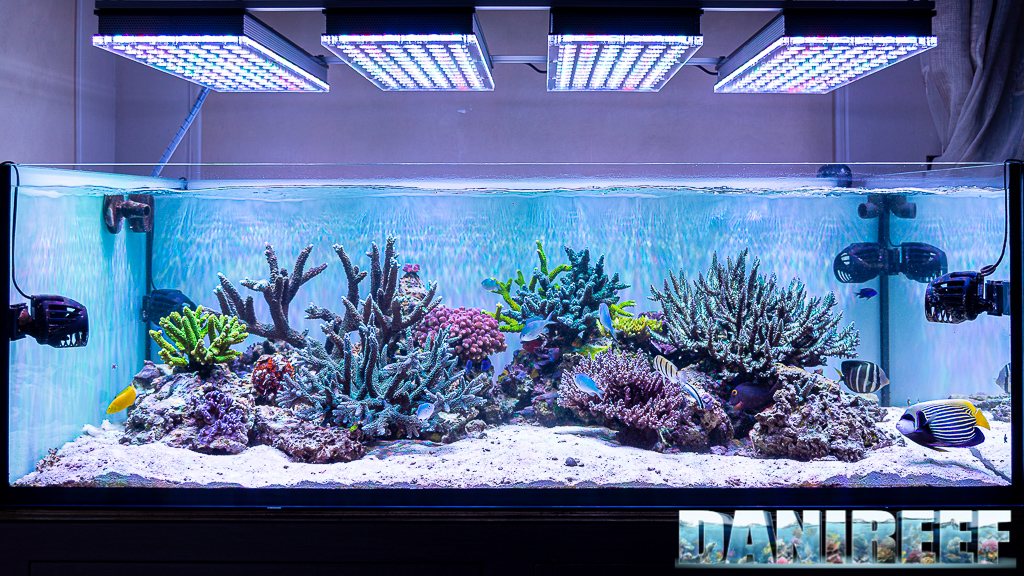
We installed and used the chiller for the test in two aquariums during last summer: one is mine, the other is my friend Jonathan Betti‘s that you can see in the following picture, given that his aquarium is much more beautiful than mine. You can read the full article about it here: The wonderful Jonathan Betti’s marine aquarium of the month.
I installed the chiller under the aquarium inside the cabinet, while Jonathan was able to place it on the terrace, as you can see from the pictures below and from the video.

From the cooling point of view it all went well for Jonathan’s aquarium, even if the chiller remained on for long periods. The aquarium always remained under 27.5° (81.5 F) and it was also helped by an external vent, without any problem. Consider that we live in Rimini where the temperature in summer is over 30° (86 F). In my case, I removed the vents to reduce the evaporation and I managed the temperature with the chiller only, without any problem. I have a 400 liter aquarium and Jonathan’s is about 600 liters, in order to give you some references.
The functioning
The inner temperature controller has a cycle of intervention (hysteresis) of 1°C, as I wrote before, then if we set 27°C the chiller would turn on once reached the temperature set plus the hysteresis, that is 28°, and it would turn off once reached again 27°. Instead the resolution of the device is at the tenth of a degree, allowing us to read and follow the decrease of the temperature in aquarium.
The cycle of 1°C could seem too wide, but this only if the chiller is oversized compared to the tank, because in this case you would have remarkable fluctuations in a short period of time given by the strong cooling power. Otherwise the tank would be constantly kept under control. In any case, you can always set the control at steps of half degrees.
The noise
One of the major problems of us aquarists is the noise, and the chiller is usually a rather noisy accessory. If you don’t have the option to install the chiller outside the house, for example on the terrace as Jonathan did, or in a dedicated room (like my friend Lumaz did), the noise might be something to consider.
We measured the value with the conveyor on the front, so towards the sound level meter, at one meter of distance, as always.
In order to measure the noise I used the VOLTCRAFT 320, a Type II IEC 651 digital sound level meter that is quite reliable. Given the nature of the noise, all the measurements have been done with the attenuation curve dBA. We did our measurements with closed windows, the sound level meter on a stand at 1 meter of distance, with a minimum measurement range of 120 seconds. They gave the following results:
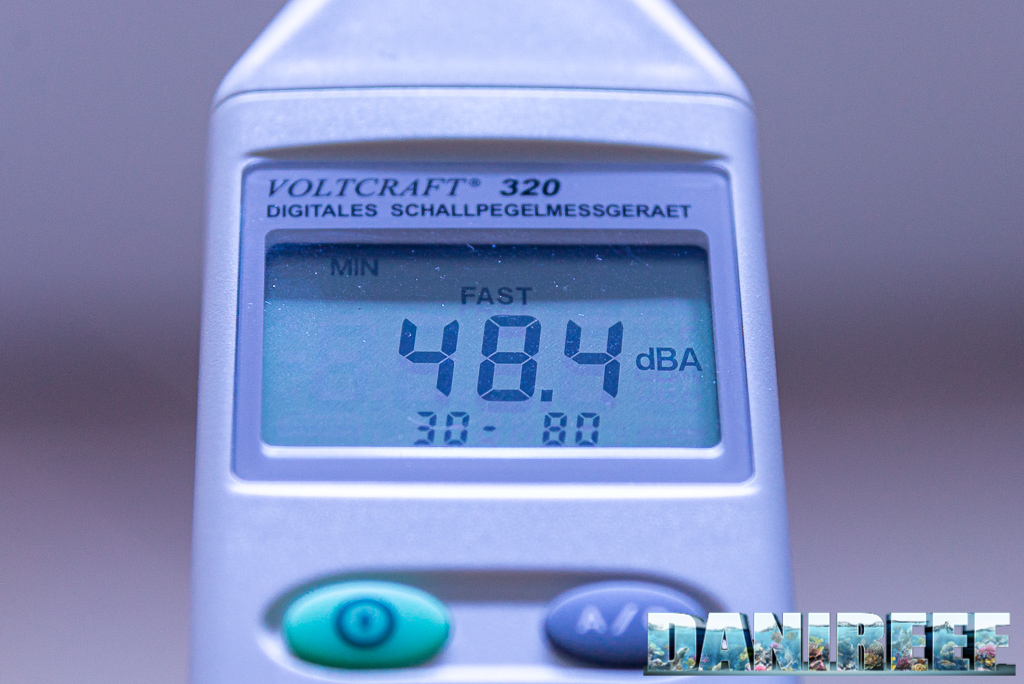

If we compare to the TK 500 we had 46 dB with the chiller off and 51.6 with the chiller on and side outlet, a big improvement. We can say that the amount of noise is about the half of the previous unit.
Let’s see the comparison with other chillers already tested:
| Measurements conditions | Teco TK 1000 r290 | Teco TK 500 | Teco TR 15 | Aquamedic Titan 250 – italian |
| Aquarium on | 48.4 dB | 46 dB | 41.5 dB | 48.7 dB |
| Aquarium on with chiller on | 50.4 dB | 51.6 dB | 53.8 dB | 52.1 dB |
| Environment noise recording | 40.4 dB | 35.0 dB | 35.8 dB |
The aquariums in which we did the tests were different, but it stands out that the noisiest aquarium, at 48.4 dB, still has the lowest value when the utilities were on, with 50.4 dB.
The collected values unique to the environment in which we did our tests, so in other conditions the noise measured might be very different.
The power consumption
When choosing the perfect chiller, one should also consider the power consumption. We aquarists know just how much the power consumption of the aquarium affects the electric bill. Teco claims that the TK 1000 has consumption of 270 watts, very small in absolute value. But we also wanted to measure the difference with the previous Teco TK 1000, measured in Teco‘s headquarter. And as you can see the difference is relevant.
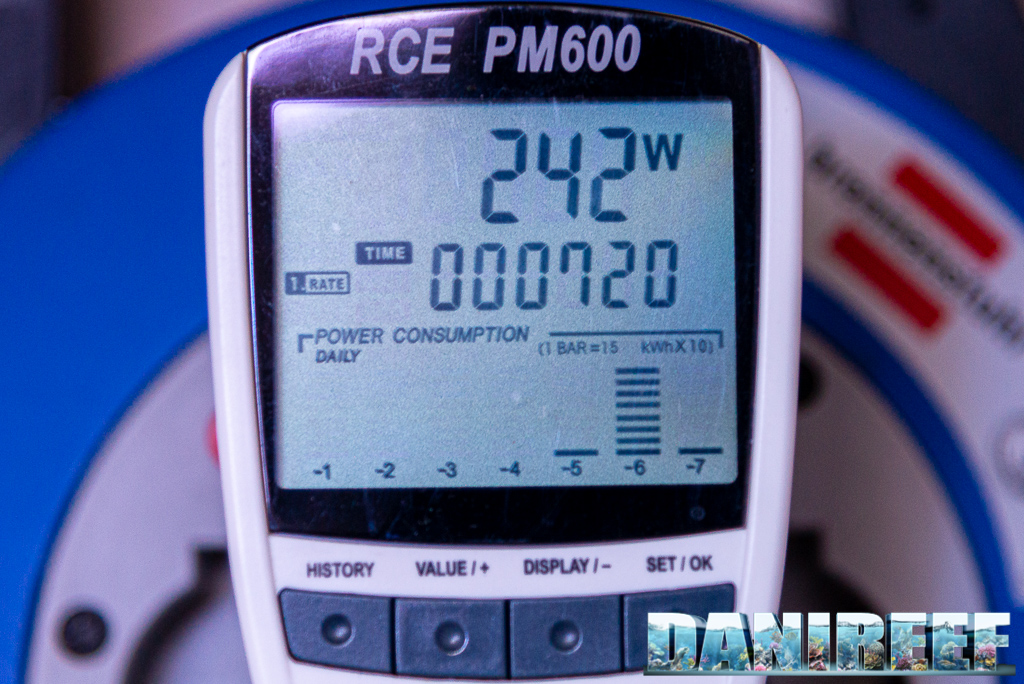

We can say that the energy consumption is rather less than we expected. Even if 240 watt isn’t a very small amount, if we consider the hottest period of weather, the chiller could work just 8 hours per day (which would be 52 cents per day in these conditions).
Important: the water speed in the chiller and the choice of the supply pump
The speed of the water inside the chiller is fundamental data. Usually we tend not to think of this feature as very essential, because we think that if the water flowed through rather quickly it would be cooled less but it would flow more in terms of quantity, as opposed to flowing slower, but more cold.
But this argument, when we talk about chillers, is simply wrong.
In fact we wouldn’t consider the efficiency of the chiller, that increases at the increasing of the temperature. That is, when the water enters the unit it is cooled, but if it passes through slowly, the chiller would cool a lot, but have a problem to cool more of the water. A rather fast transition would allow the water to stay more warm and to maximize the intervention of the chiller. The faster the water flows, the more powerful is the pump, the greater the performance of the chiller, and the aquarium will cool down quickly. The difference, believe me, isn’t small. You can even reach the double of the whole efficiency.
Teco recommends a pump of a real rate of at least 500 liters per hour, but we think that you could go up to double that value because.
I suggest to anyone that is installing the chiller outside the house to measure the real rate of the return in sump, because the distance and the turns that connect the aquarium to the chiller greatly reduce the rate, especially with corrugated pipes. Moreover, I highly recommend protecting it from the weather that would affect its performance. Teco presents it as an indoor chiller.


Wi-Fi and Teconnect
Teconnect is a device that only connects to Teco chillers like, our TK 1000 r290. Teconnect acts through an app that allows you to control your own chiller, read the temperature, and see different graphs related to the trend of the temperature in aquarium.

On the front is also the Wi-Fi module., which is what allows you to use Teconnect. You can have exact copy of the display of the chiller on your smartphone. In this way we users can control the device as if we were in front of the chiller. Maybe it isn’t the most necessary feature, but it gives the chiller more versatility.


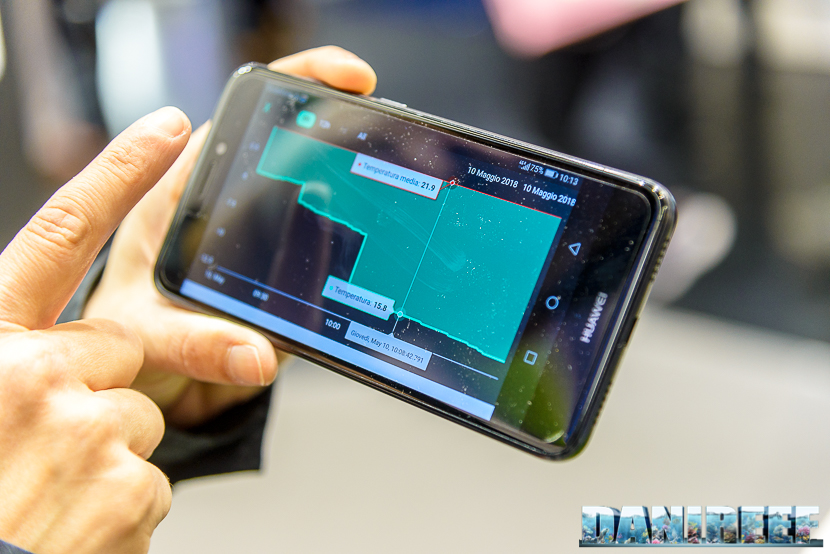
Obviously Teconnect has to be purchased separately, so we will dedicate an article to that in the future.
Useful advice
The most important hack for the best functioning of the is to place it in the best operative conditions. One of the biggest problems is that the chiller could cool the sump too quickly and that it wouldn’t spread in the tank with continuity.

In this regard it’s necessary that the flow is as equal as possible to the amount that the return pump can bring back into the tank. It’s not enough to check the technical data of the pumps, because the hydraulic head that the pump has to beat in order to bring the water back into the tank decreases the rate considerably.
At the end, the most important thing for optimizing the functioning should be placing the supply pump of the chiller right under the water return. In this way it would always be supplied with “hot” water coming from the aquarium. Otherwise you risk cooling down the sump too quickly and then you’ll create cold zones in sump without managing to move the cold water into the aquarium.

Creative alternatives may be to use the return pump to first supply the chiller and then to move the water into the aquarium, or to place the return hose of the chiller in tank as a second return pump. In the first case you’d have to boost the return pump in order to make up for the lack of power due to the hydraulic head, in the second case it would be necessary to provide a powerful pump anyways. Last year I organized everything by using a return pump only, a Hydor Seltz D6000 (review) that conveyed all the flow inside the chiller and then directly into the tank.
Conclusions
The Teco Tank TK 1000 chiller can be found for about 900 euro ($964 USD), a reasonable price for the unit, but the price may vary from shop to shop.
The chiller is perfectly built and nothing has been left to chance. Thanks to the adoption of the new r290 coolant, the unit is more efficient than the previous one and with less hot air out: the choice to put the vent above is flawless engineering. And technically it is beautiful. During the tests we did the units behaved flawlessly. They handled 400 and 600 liters without any problem, even with the weather at 32-34°C (90-93 F), at least in my case.

The coil of the coolant is made of titanium, the chiller has a protection fuse in case of overcurrent or shot circuit, and it has a front filter magnetically held up and of super easy to extract that prevents dust from entering the coil. The attention in the construction is at the highest level and even the choice of plastics is remarkable. The option of the Teconnect is a great plus, though it’s a pity it doesn’t come with it for free.
With the use of the chiller the evaporation is reduced to a minimum, which gives you some great side effects: you will need to fill the refill tank less often, and you will have more autonomy in case you have to stay far from the aquarium, like, for example, during a holiday, and finally, less water is wasted because there will be less demand. All with the big advantages to having a more stable temperature in aquarium at a not very high cost. If we assumed 8 hours of work per day for 4 months in summer (June – September), the cost would be a total of about 70 euro ($75 USD) (8h*270w*120gg/1000*0.27€/kwh).

It’s obvious that the capacity of chilling is related to the temperature of the environment and the temperature we want in the aquarium.
A chiller is a good purchase in any case, and the Teco TK 1000 r290 is a great chiller, very quiet for its power, very well built and, at least under the conditions of our test, very efficient.
What we liked
- Efficiency;
- Quality of the construction;
- Silence and consumption.
What we don’t like
- The lack of the heater thermostat integrated as in previous versions;
- The Teconnect is not included
- The display.
We really want to thank Teco for providing us with the TK 1000 chiller, the object of the test.
[Translated by Agnese Poggi]


0 Comments