
After Orphek’s announcement, were extremely curious to try out the brand new Orphek OR3 Red Plus Grow/Refugium, a ceiling light designed and dedicated for refugium, the first that we have been able to get our hands on and try out in the now famous DaniReef LAB.
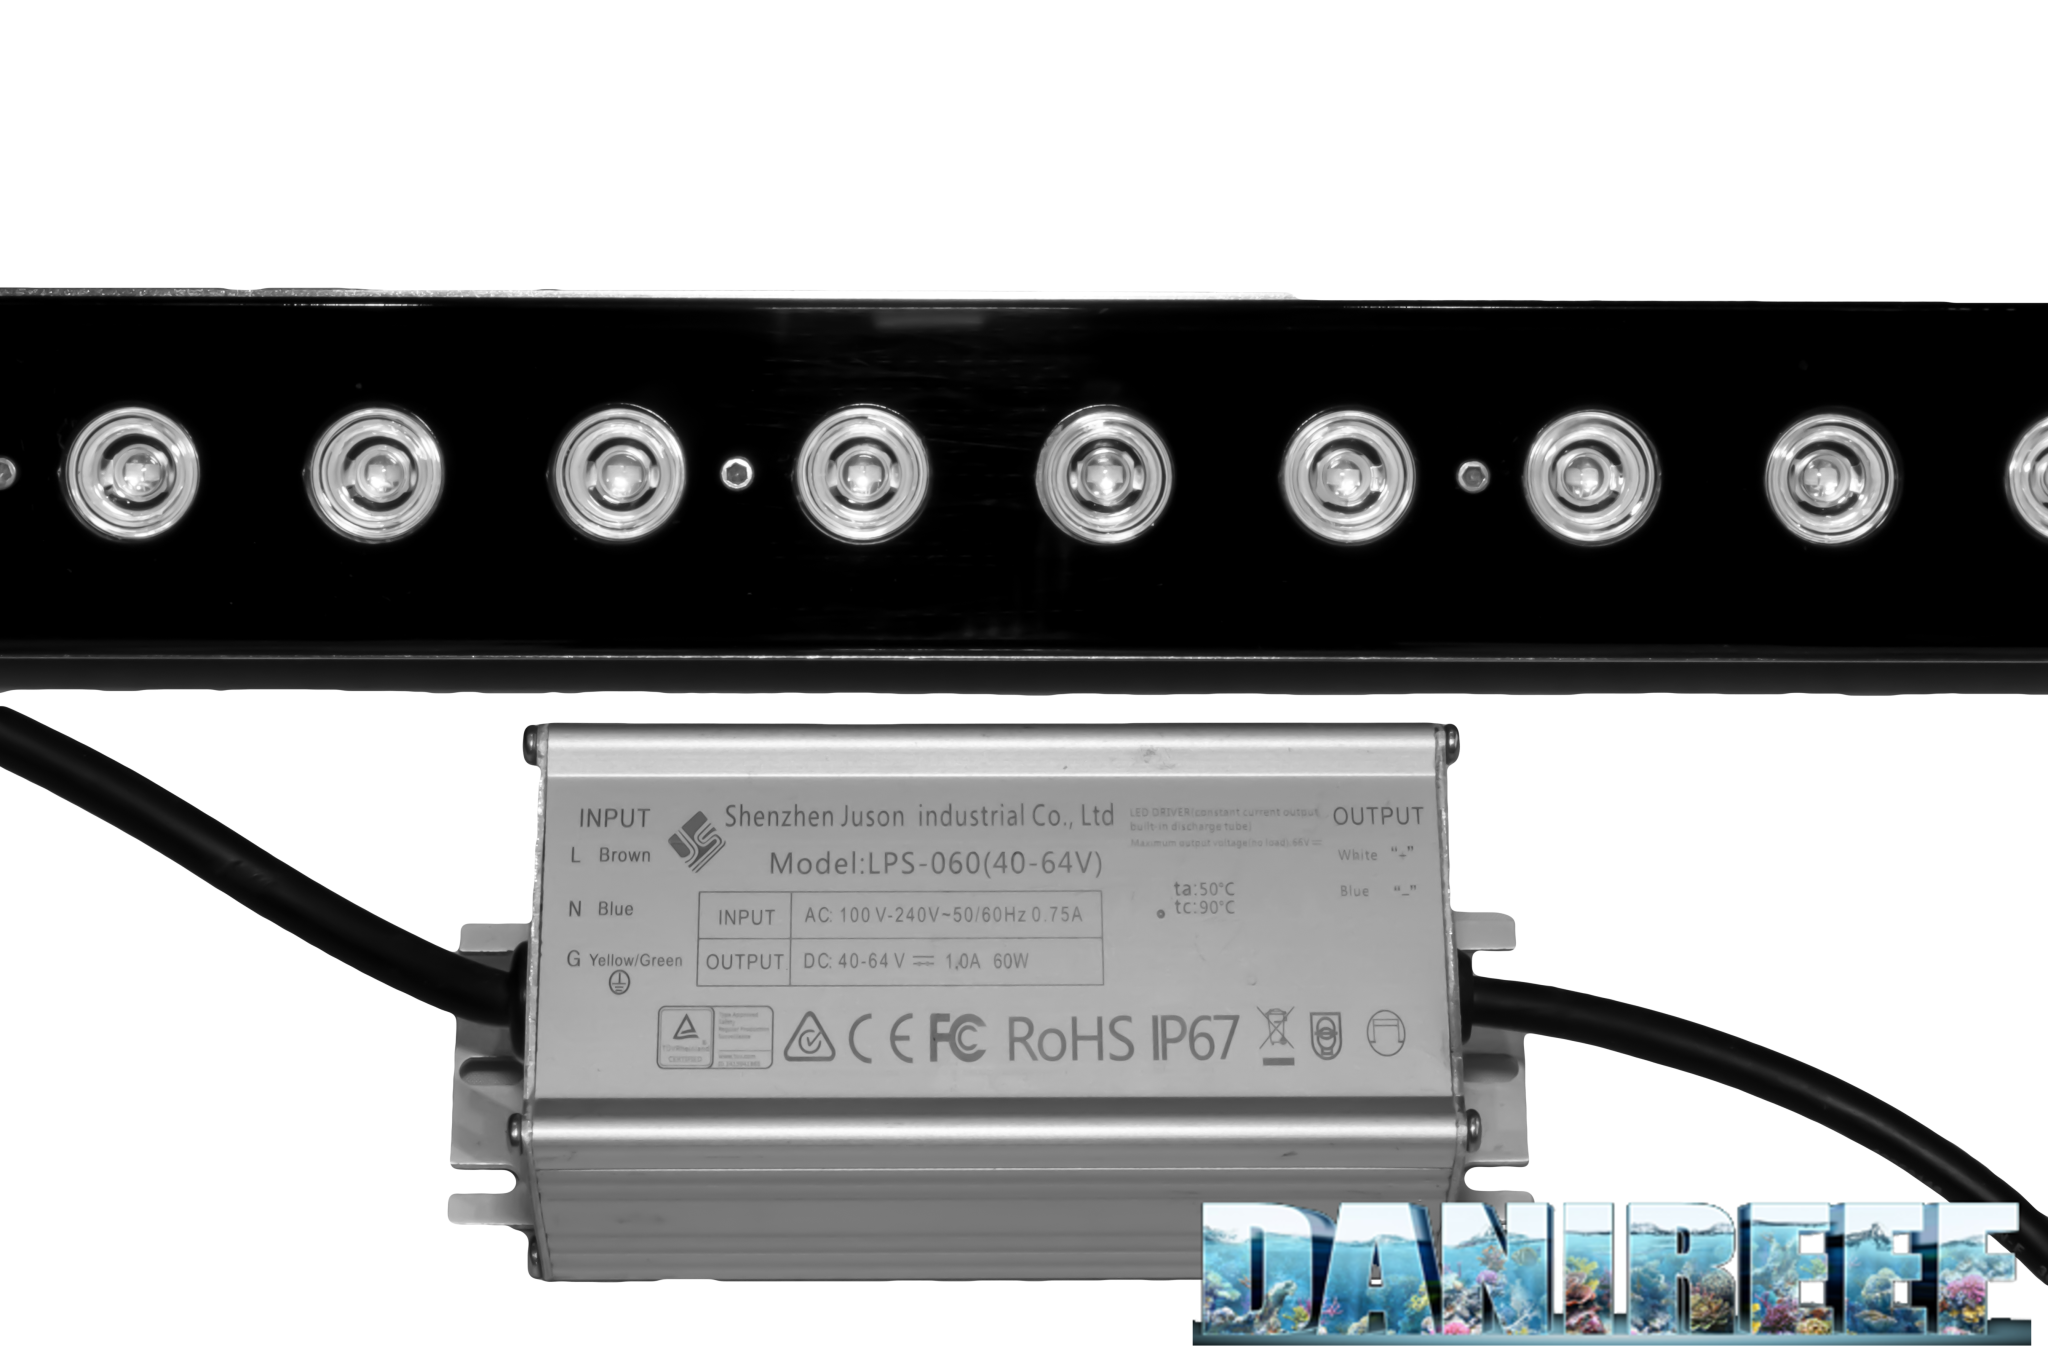
The bars are beautiful and solid, and appear to be very well made, as is Orphek’s way. us to. In addition, Orphek has finally made a dimmer, called Osix, which allows on-off dimming. A dimmer that we have been eagerly waiting for, as its possibly the one thing these ceiling lights have been missing, even though with LED bars, the dimmer is much less important than with actual ceiling lights. But this is something we will see later, as we are testing it for you. And also because, honestly, we think that a dimmer in a dedicated refugium LED bar is rather unnecessary.
Technical Specifications, Orphek OR3 Red Plus Grow/Refugium 60 LED Bars
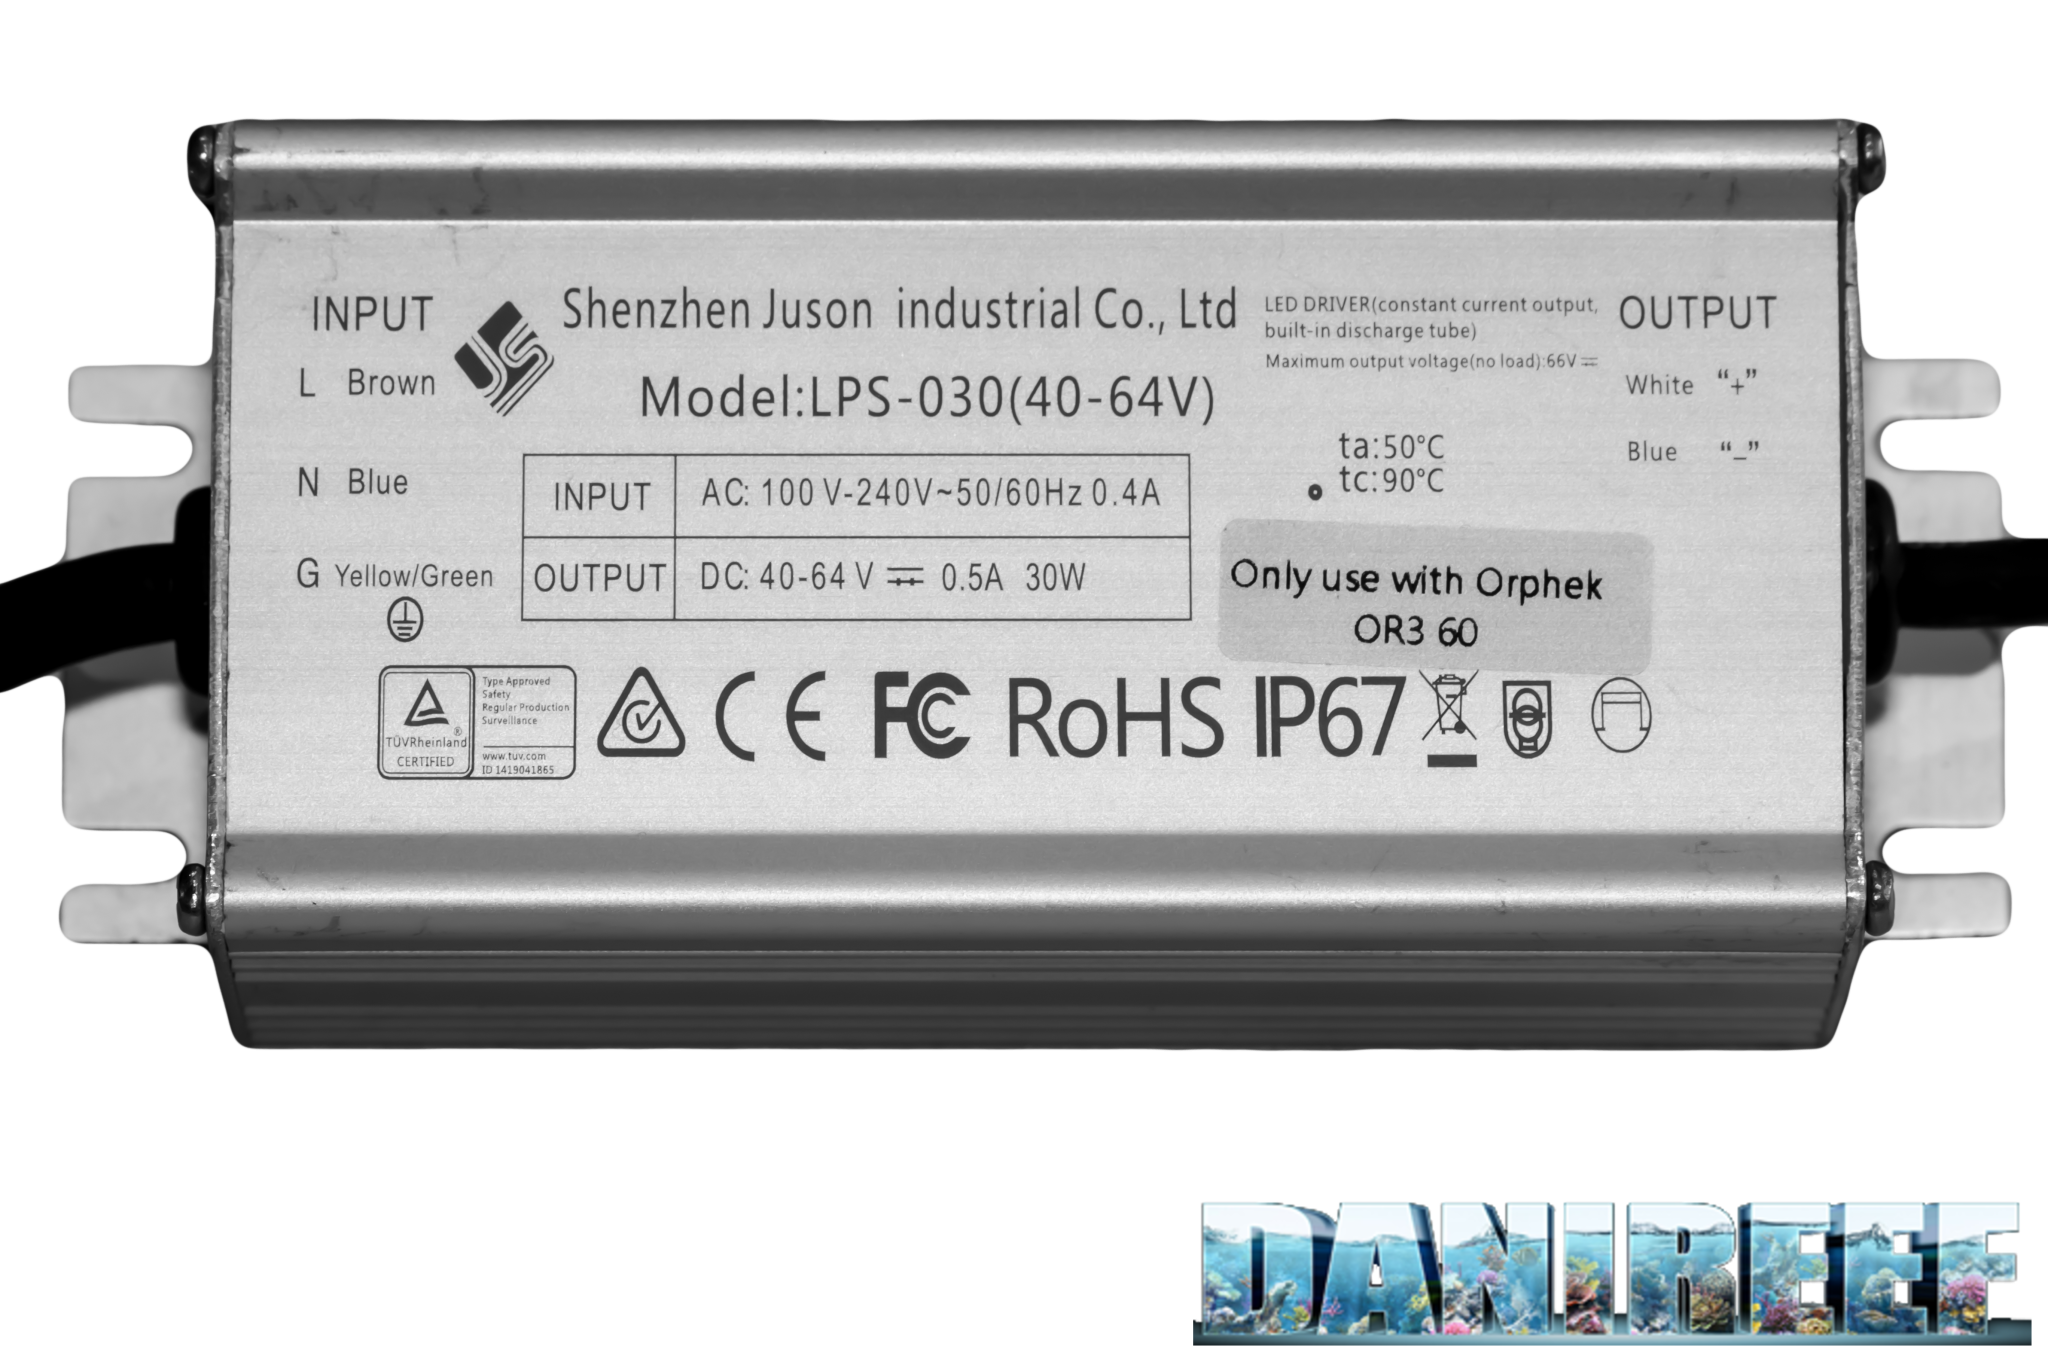
- Driver: exterior;
- Input Voltage: 100-240VAC;
- Frequency: 50-60Hz;
- Consumption: 30 watts +-5%;
- Cos(phi) > 0.9;
- Input Current (Amps) 0.55;
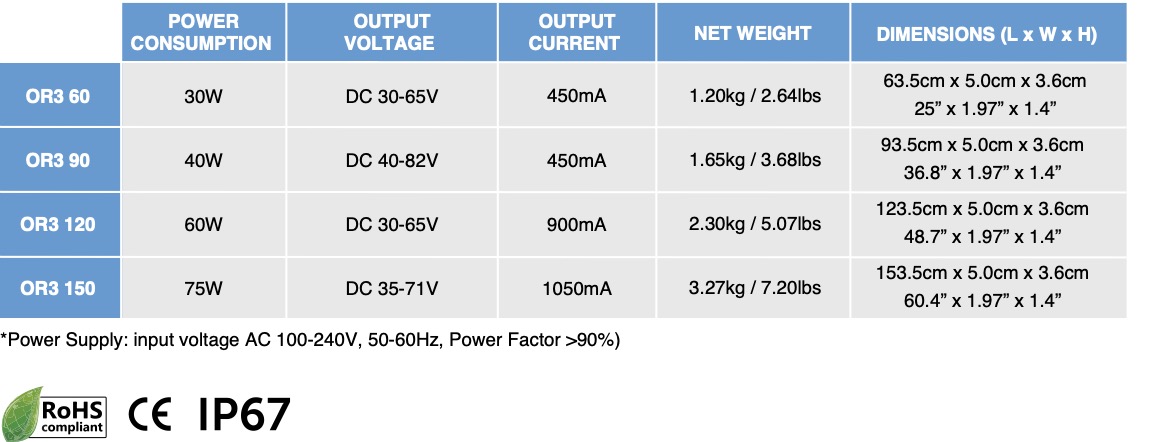
- Length: 63.5 cm;
- Width: 5 cm;
- Height: 3.6 cm;
- Weight: 1.20 kg;
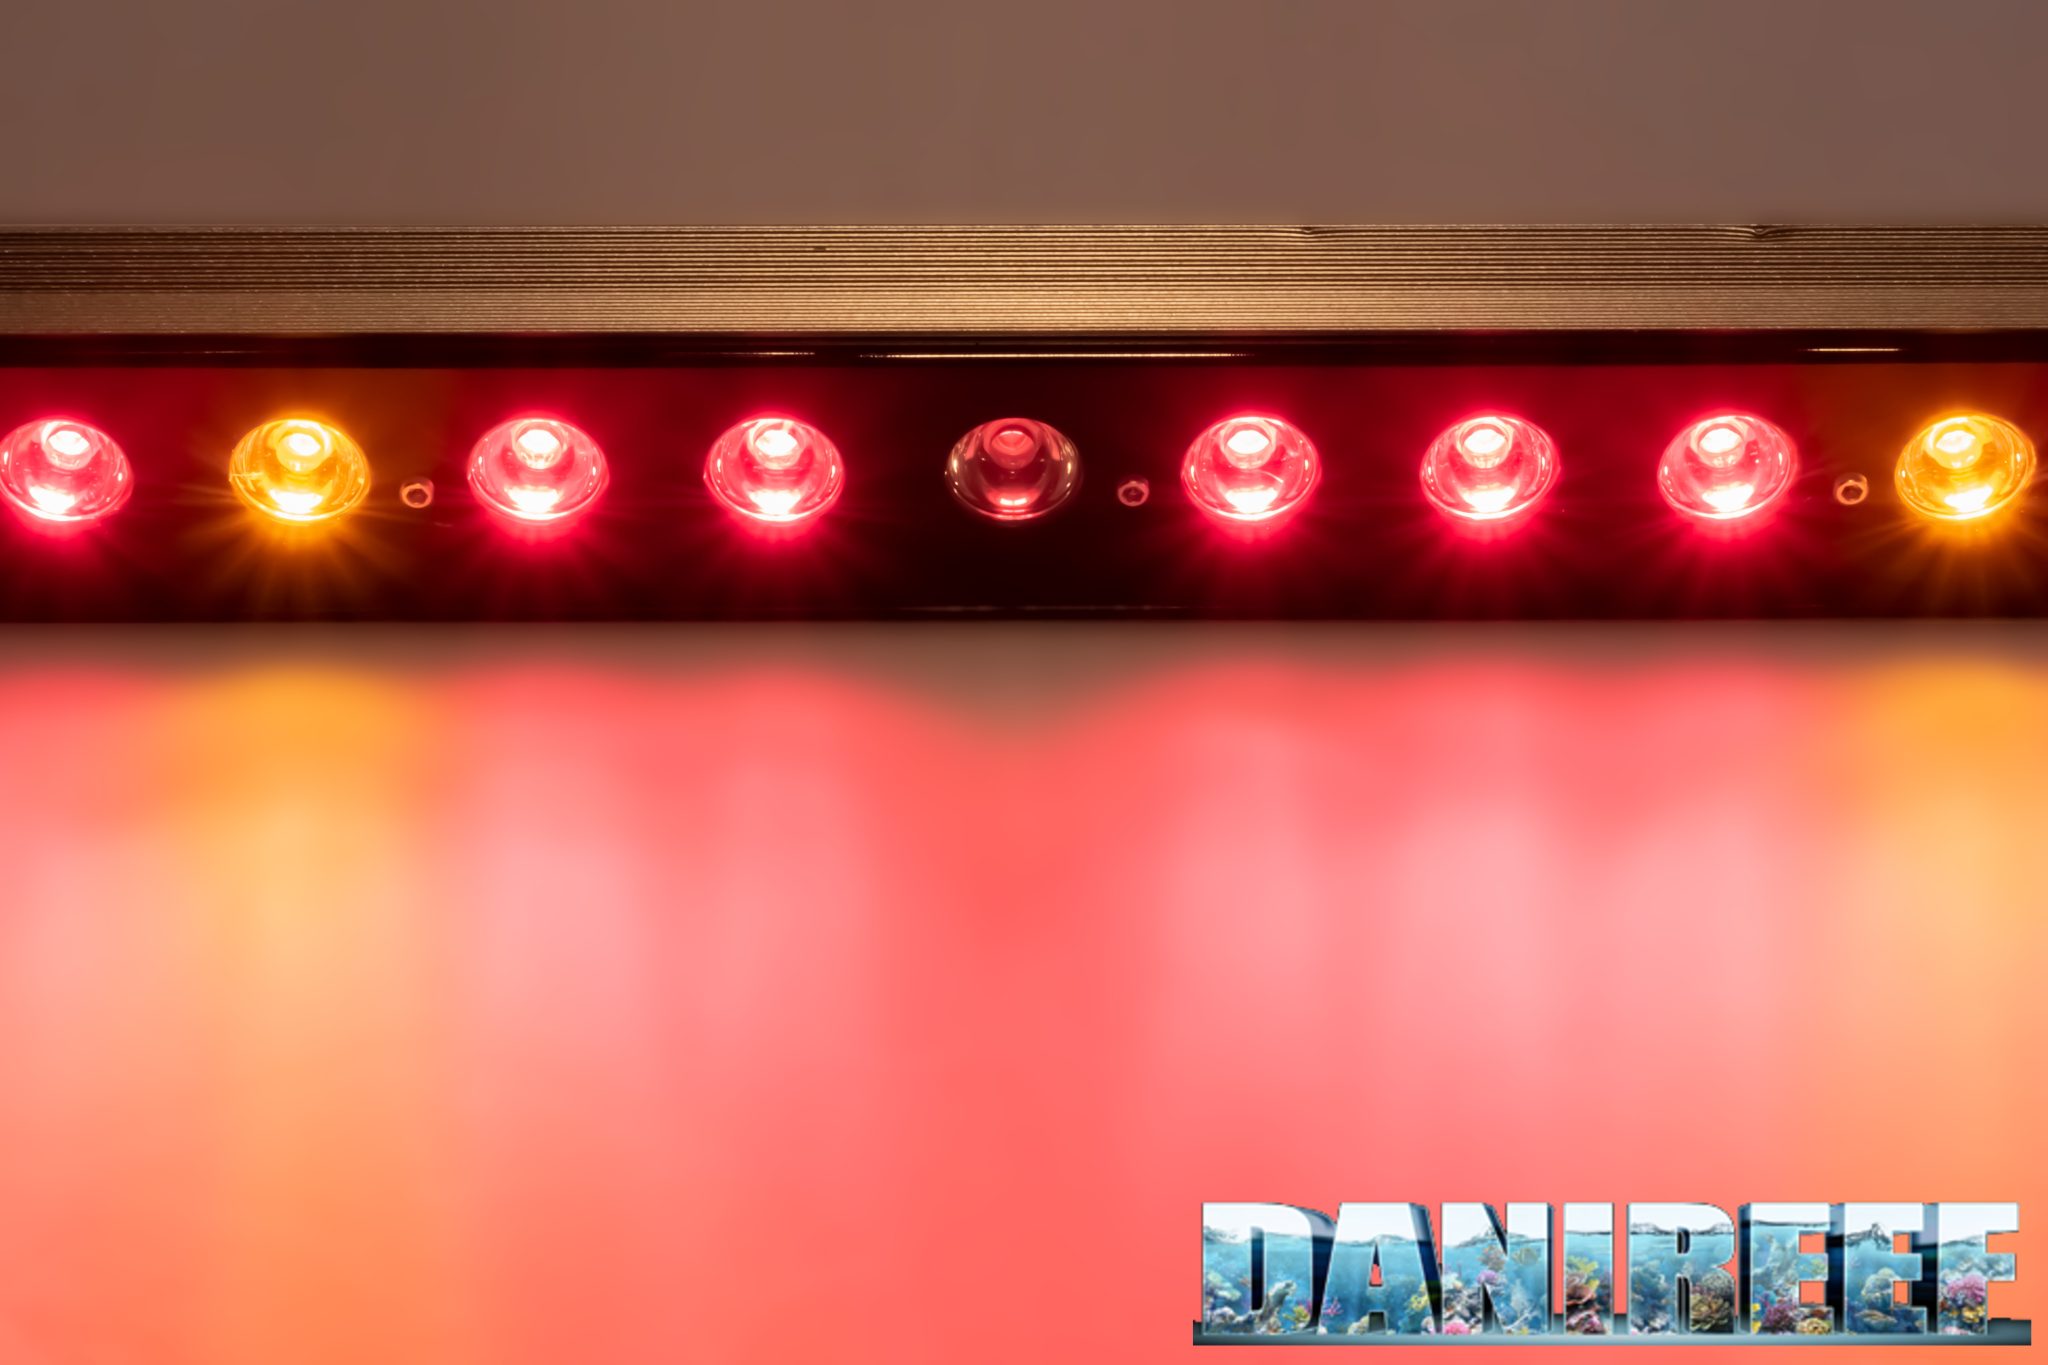
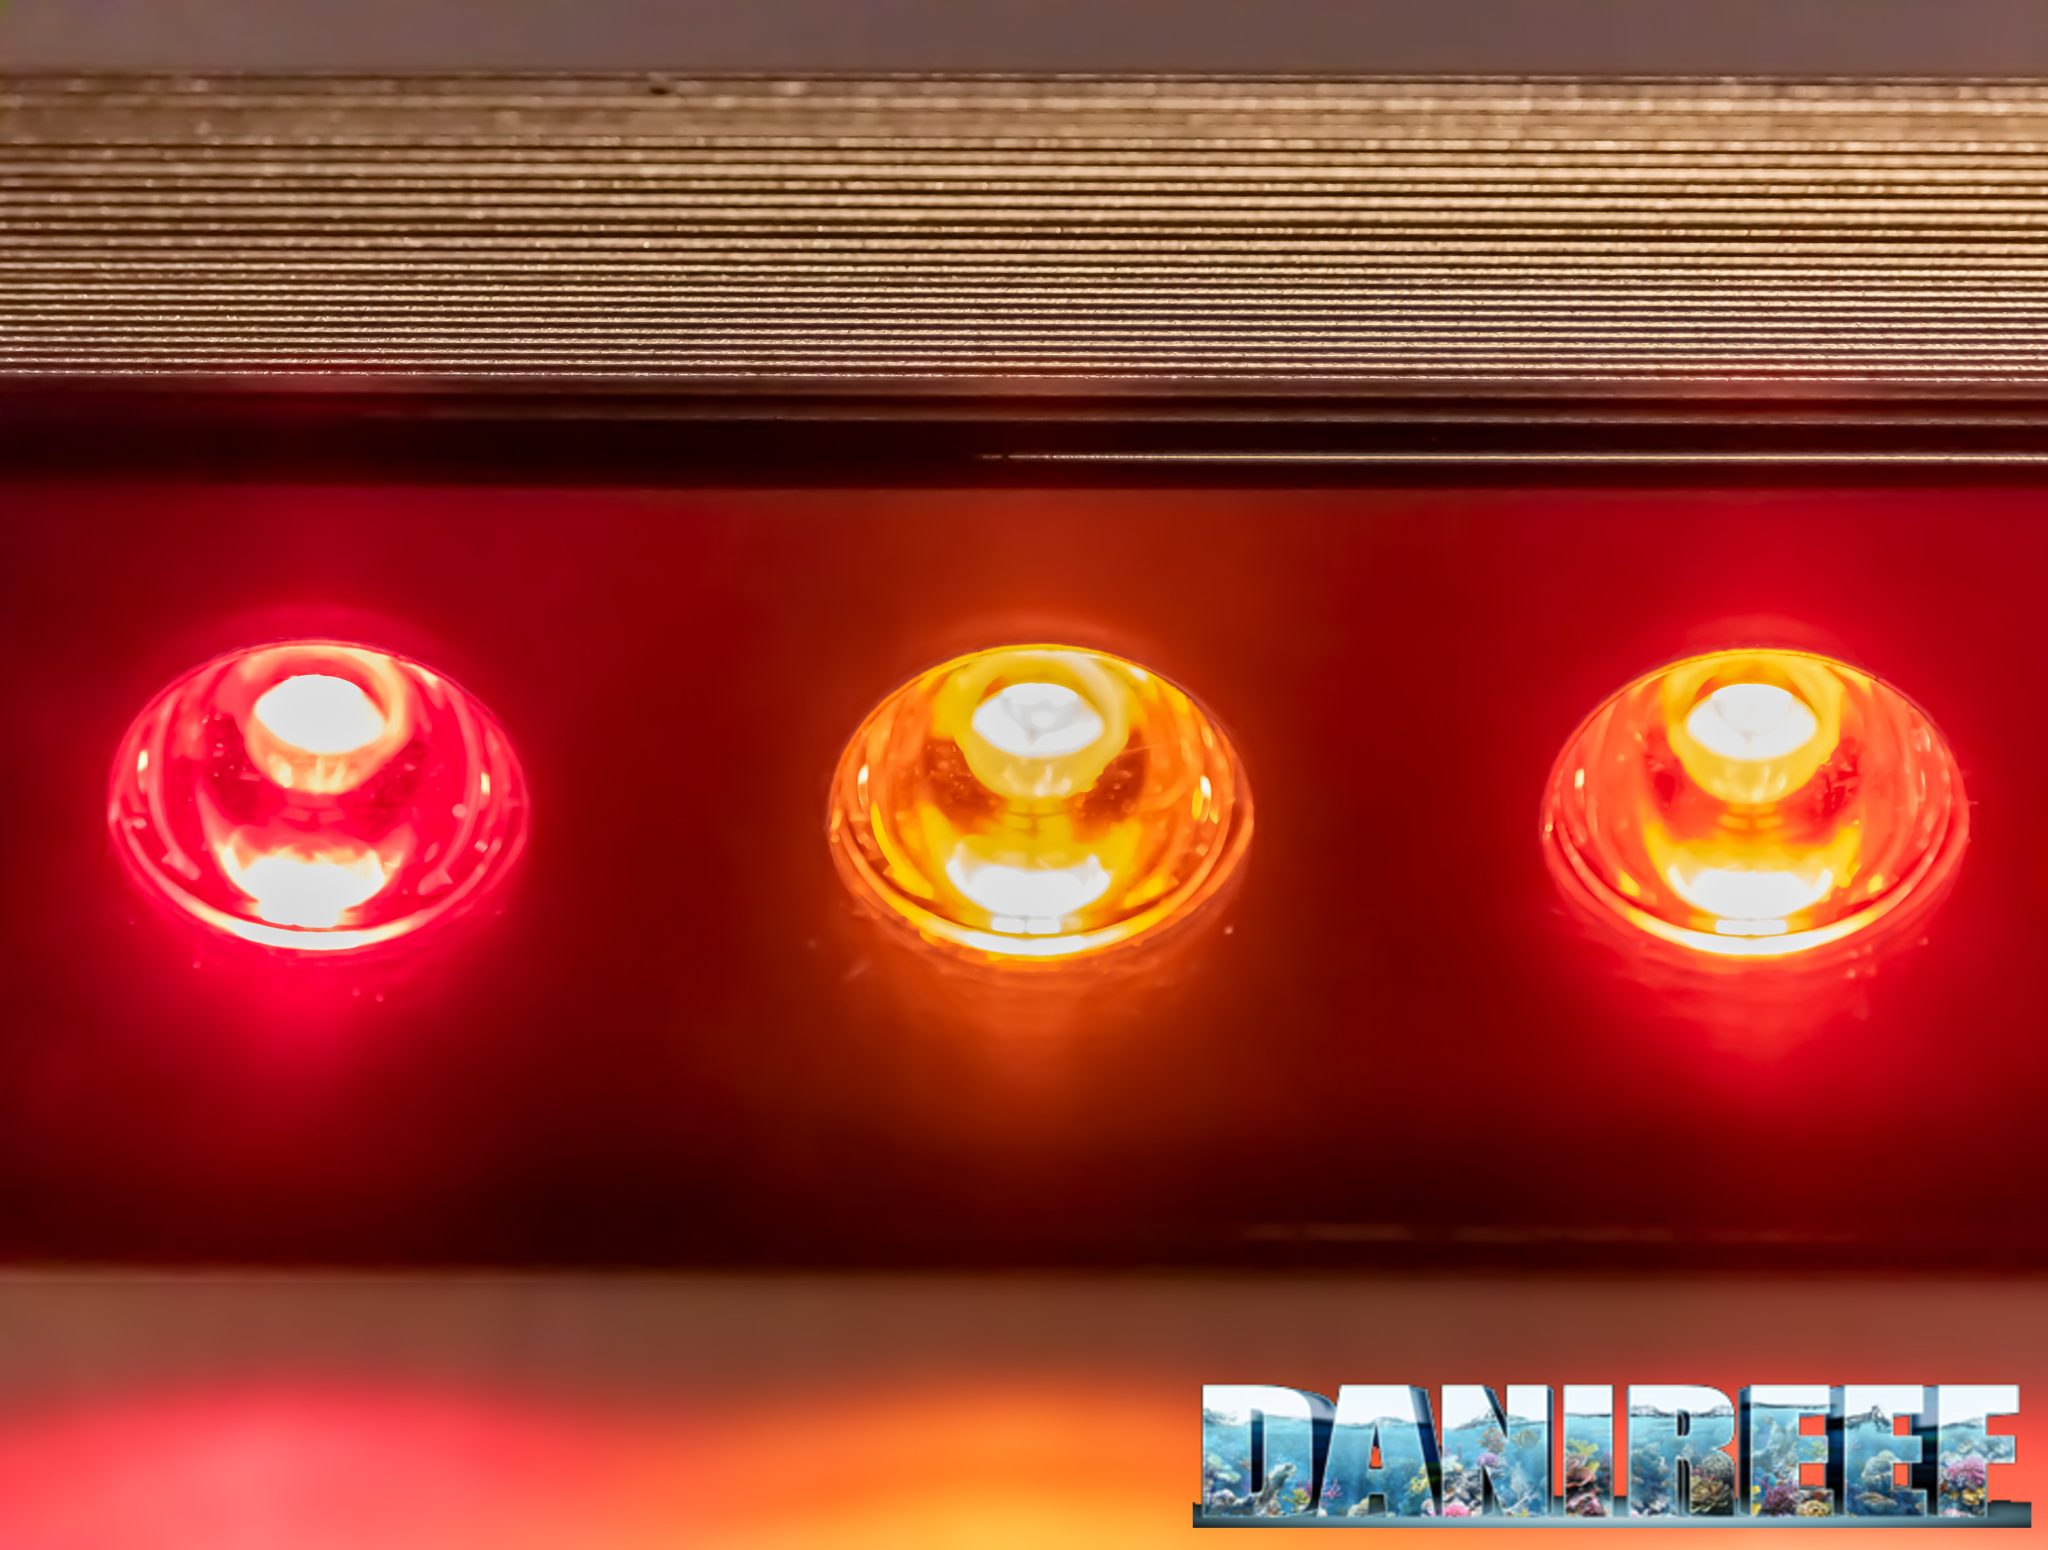
- LEDs employed: 2×585/595nm, 2×600/610nm, 2×620/630nm, 6×655/665nm, 2×670/675nm, 2×680/690nm, 2×730/740nm.
- Price to the public: $200.
The Orphek OR3 Red Plus Grow/Refugium 60 cm ceiling light is obviously suitable for use above a refugium about 60 cm wide. It also exists in longer lengths, namely 90, 120, and 150 cm, although we have a hard time imagining such a large refugium. But perhaps it is better suited for refugiums found in large public aquariums rather than small home aquariums. There, even 500 liters can seem small.

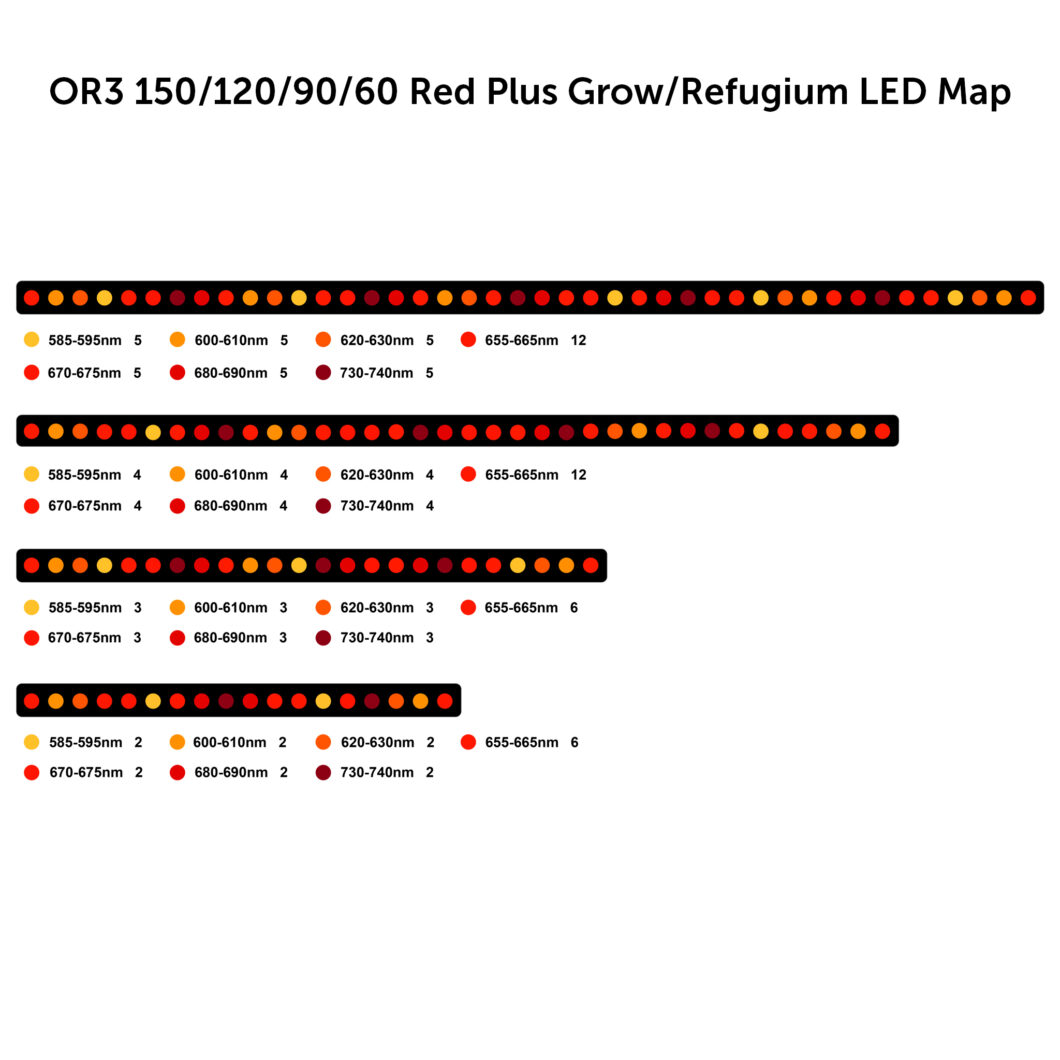
Above is the extended spectrum, and also the type of LEDs used in the OR3 LED bars of various lengths.
The special feature of Orphek OR3 Red Plus Grow/Refugium.
The new LED bar of the highly successful OR3 series was born with an advanced and broad spectrum, stated to be red, orange, and infrared. The spectrum ranges from 580 to 780 nm, and is optimized to grow many types of macroalgae. These absorb nutrients that other types of unwanted algae take up to grow, thus biologically counteracting the growth of algae in the aquarium and promoting their development in the refugium. It follows that the development of macrolgae reduces phosphate (PO4) and nitrate (NO3) levels in the aquarium.
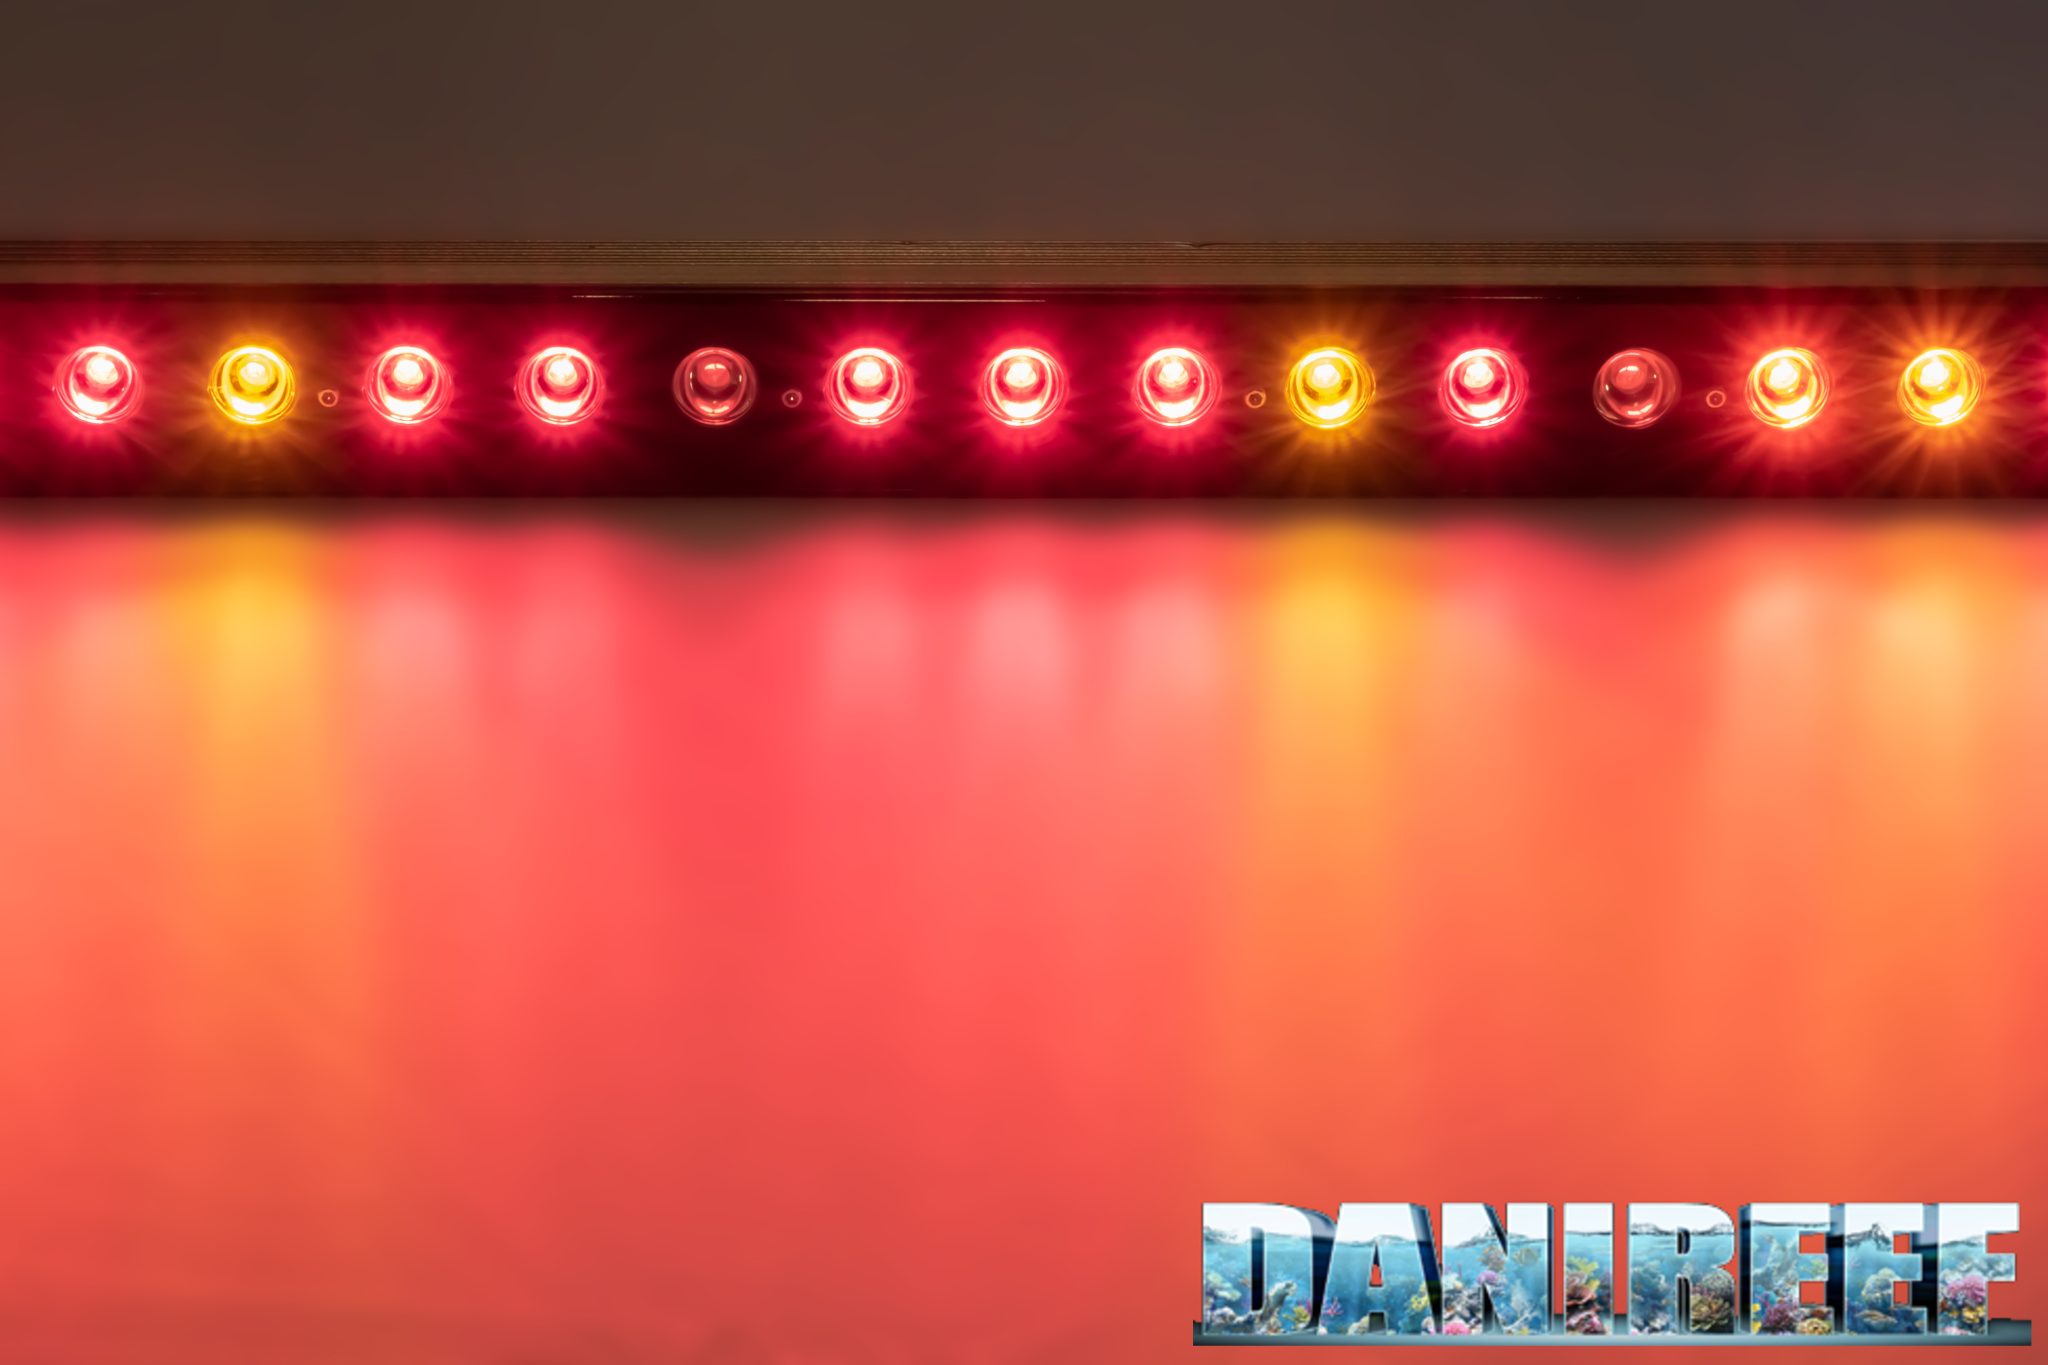
The coloring is odd, since it is dedicated just for refugiums with a predominance of red orange and yellow colors, since we are used to seeing ceiling lights that are basically blue. But that matters little, given where we’re going to put it…. On a refugium.
The suspension kit
The bars are sold together with a suspension kit, which is very short and not very suitable for hanging from the ceiling (which, by the way, would not make sense here), but if you want to hang them in the sump it will do the trick. It’s a kit that might be good for connecting to Orphek suspension arms. We’ve said it before, but we’ll say it again, the Orphek OR3 Red Plus Grow/Refugium rods are excellently built. The aluminum exterior finish functions as a passive heatsink, and given the weight and volume of the aluminum, we are pretty sure these LED bars will never have overheating problems. The assembly is virtually flawless.
The Programming
LED bars generally are not programmable, and the Orphek OR3 is no exception, at least for now. Some competitive bars come with, or have available for purchase separately, a controller that allows dimming, on, off, and total intensity. Orphek has long announced the arrival of a dimmer, and we are just testing it for you, soon we will share the article about the long-awaited Osix. Although using a dimmer on a refugium seems to us a rather strange practice… we think that a very normal on-off is already more than enough.
Unlike our other reviews, this time we cannot give you the power consumption and values of the various LED channels, because the LED bars all light up simultaneously.
Our new DaniReef LAB working method for measuring PARs
In the long nights spent on our forum (here) we have always wondered how we could compare the PAR values of the different ceiling lights. Until now, although we have the appropriate instrument, the Quantum Meter MQ-500 from Apogee, we have always referred only to the value measured at the center about 20 cm away from the ceiling light.

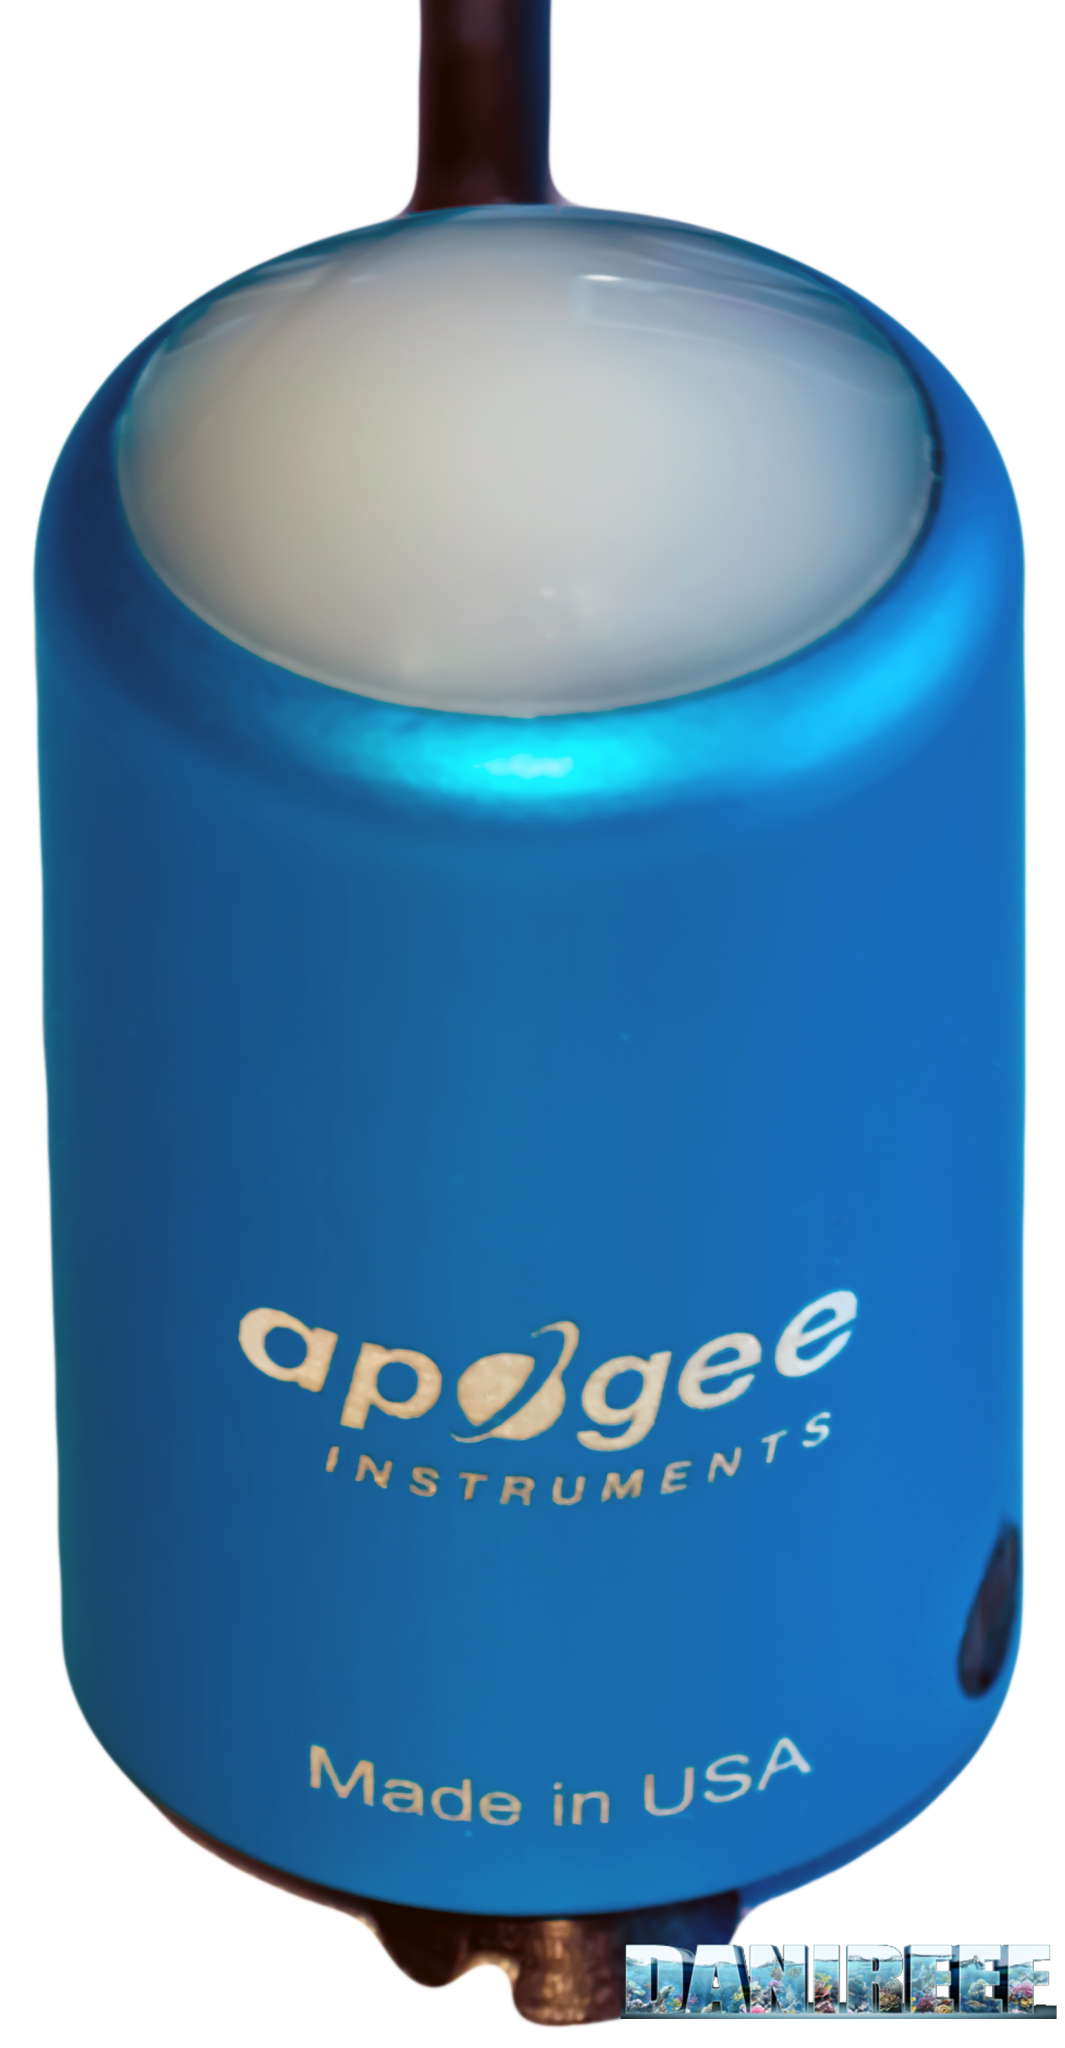
The Quantum Meter MQ-500 measures PAR, expressed in PFFD or photosynthetic photon flux density (photosynthetic photon flux density) in μmol m-2 s-1. This instrument is calibrated to work out of water, so used in water the measured value must be multiplied by 1.32 which is the immersion factor. Since there is no water involved in this test, we do not have to do the conversion. The values that you will see will be those read by the instrument.
So we decided to build a 70×70 cm base, where we indicated 25 fiducial points where we would place the sensor of the Quantum Meter MQ-500. To test ceiling light fixtures, we created elevations of 20, 40, and 60 cm, so that the values will always be read at the same distance from the sensor. This will allow us to create curves in space that can be compared with those of other ceiling lights, again at the given distances. Note that this distance is measured between the base of the sensor and the base of the ceiling light. In reality, the distance must be decreased by 3.5 cm which is the height of the measuring cylinder and increased by 0.5 cm which is the size of the spacers that allow us to hold the ceiling light fixture up.
In total, the three measurements will then be taken at 17, 37 and 57 cm apart, in the air.
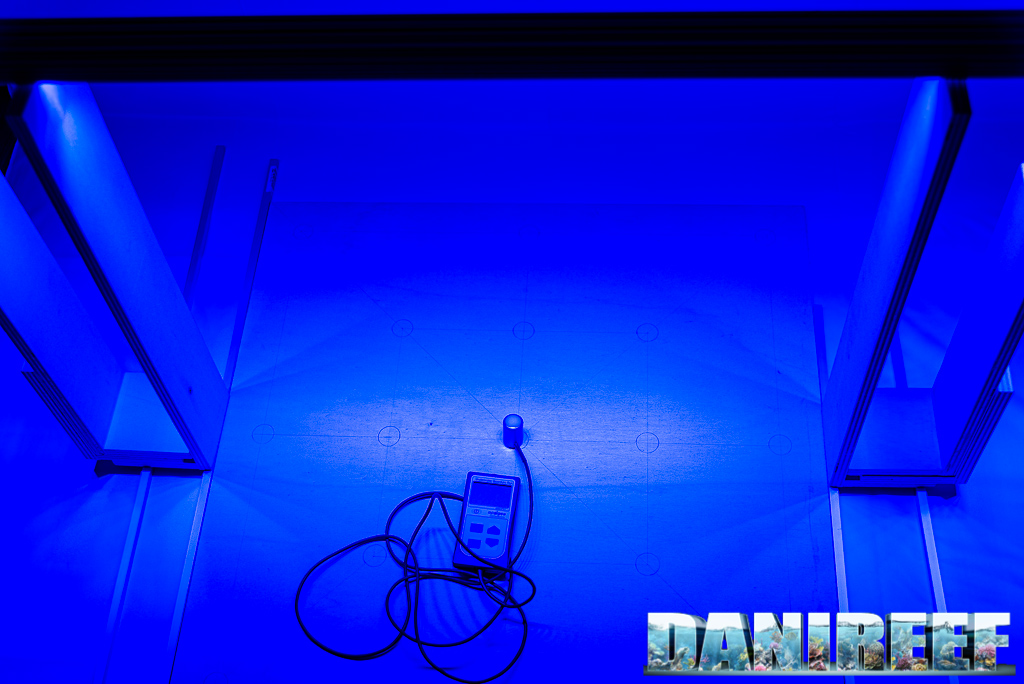
The measurement of PARs at a distance of 17 cm
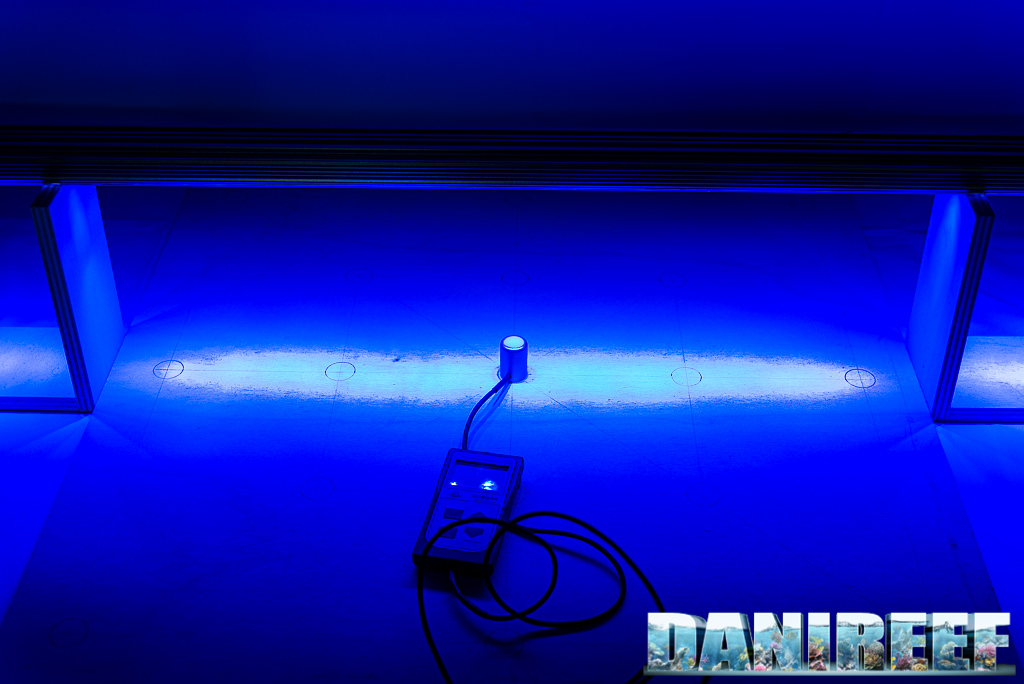
This is the test situation. Below you see the scoreboard, and the instrument, and above you catch a glimpse of the bar resting on the spacers. Points not shown on the board have been estimated in the table below.
These are the measured values:

And this is the corresponding graph; for uniformity we will use the same scale for ceiling lights of homologous class, in this case talking about bars we have lowered the value of the maximum scale. In the next bars you will find the same rating scale.
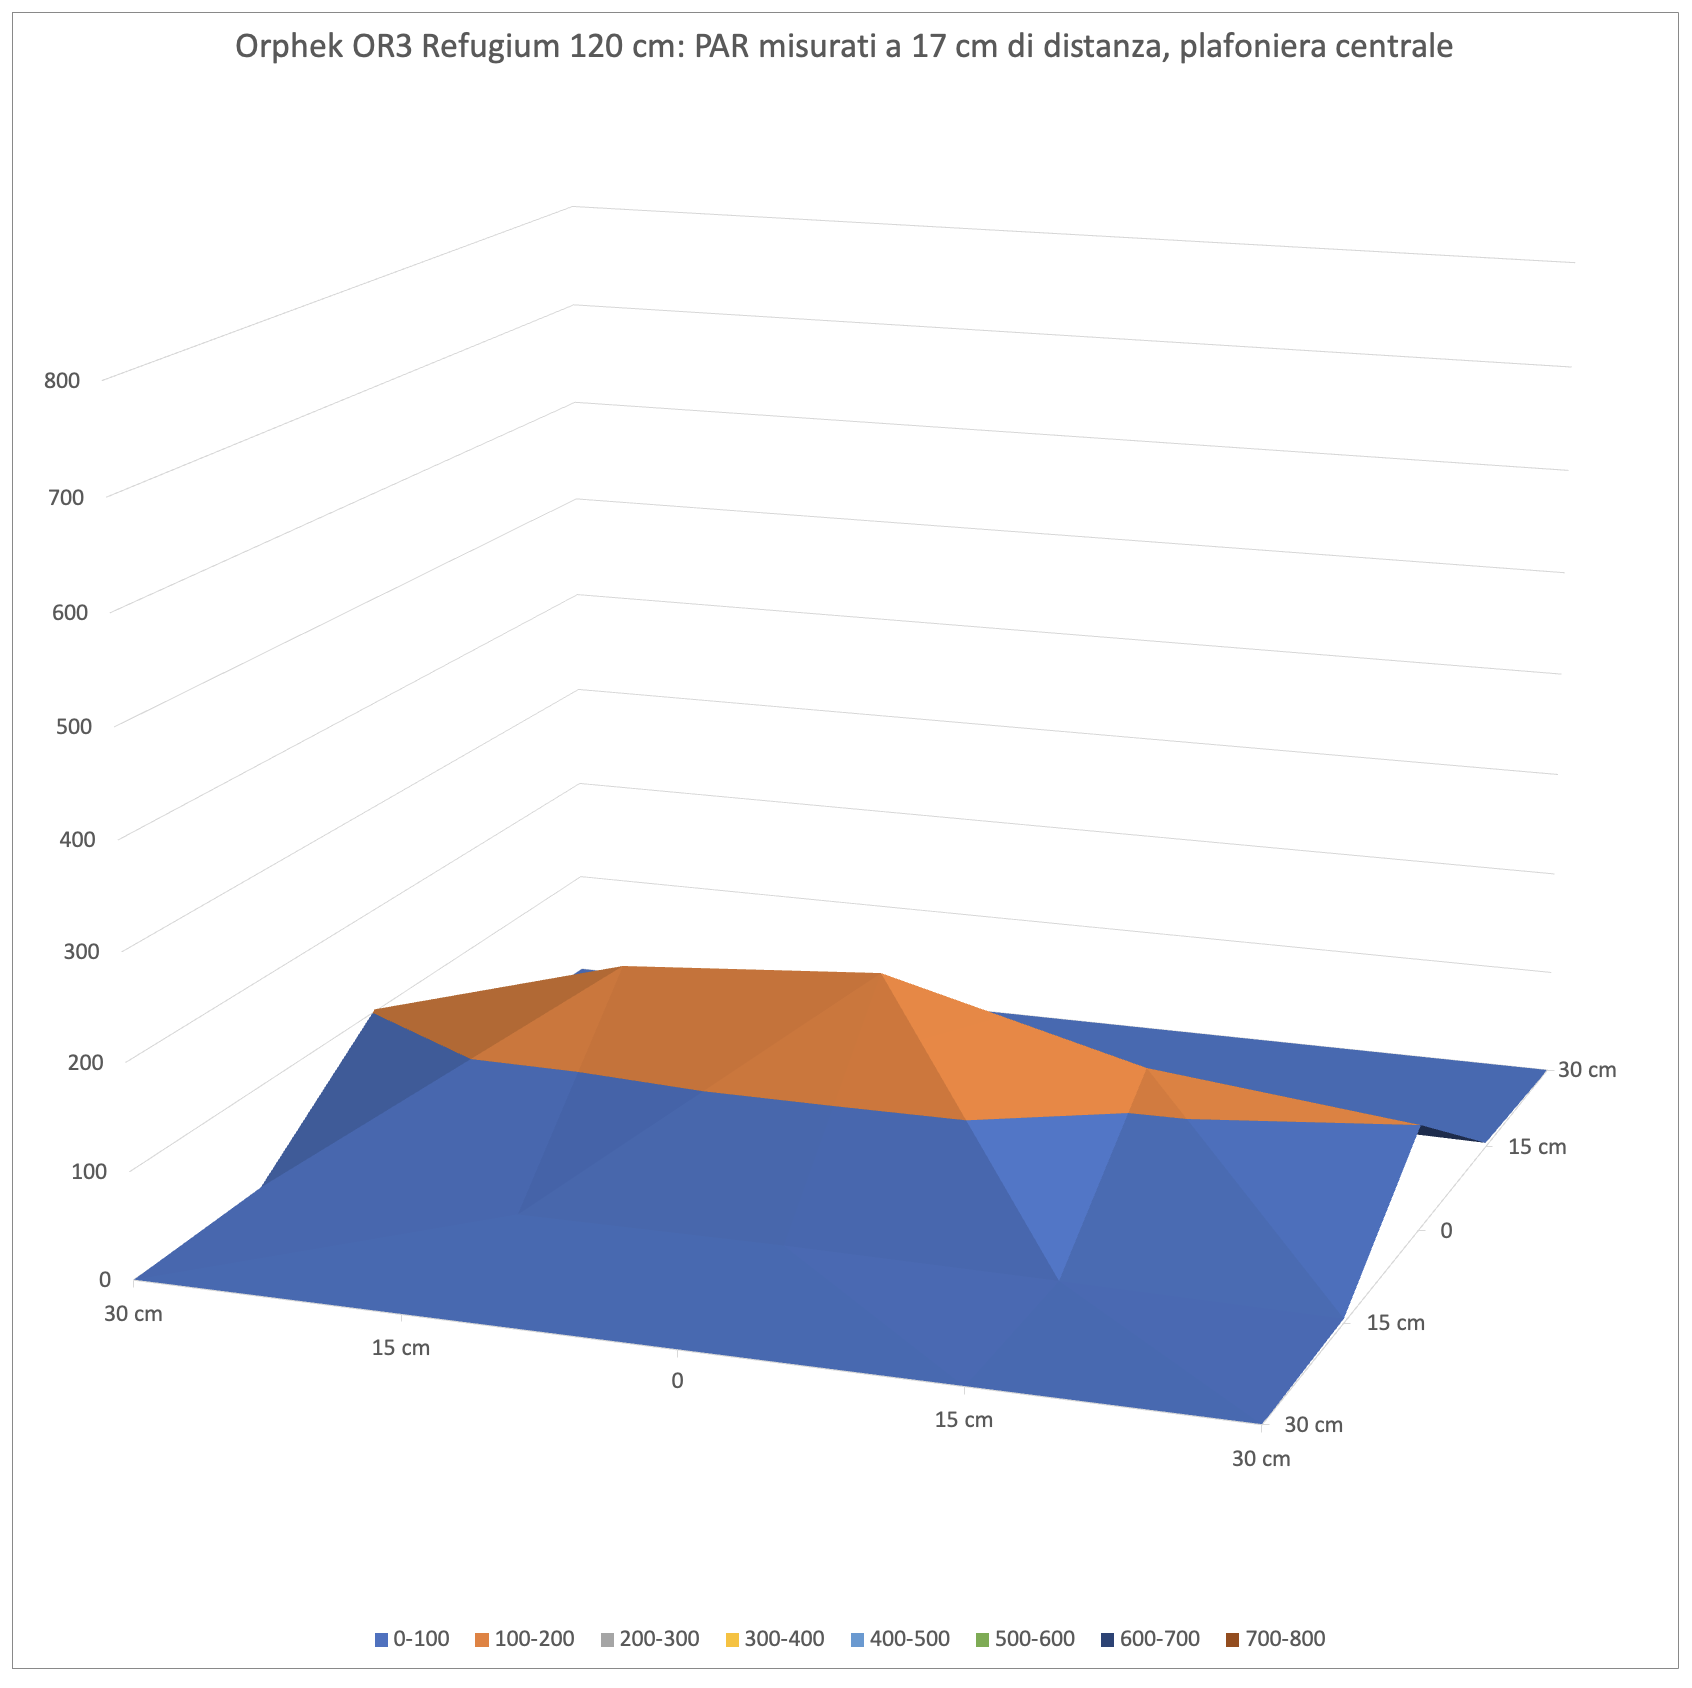
As you can see, the bar creates a curve that resembles a curtain, with the spatial differences due to the type of LEDs used. This is unlike classic ceiling lights where the decay is very linear, being about 20 cm from the light source. Virtually no PAR output at the extremes, and there is also a lack of symmetry at the top of the graph.
The measurement of PARs at a distance of 37 cm
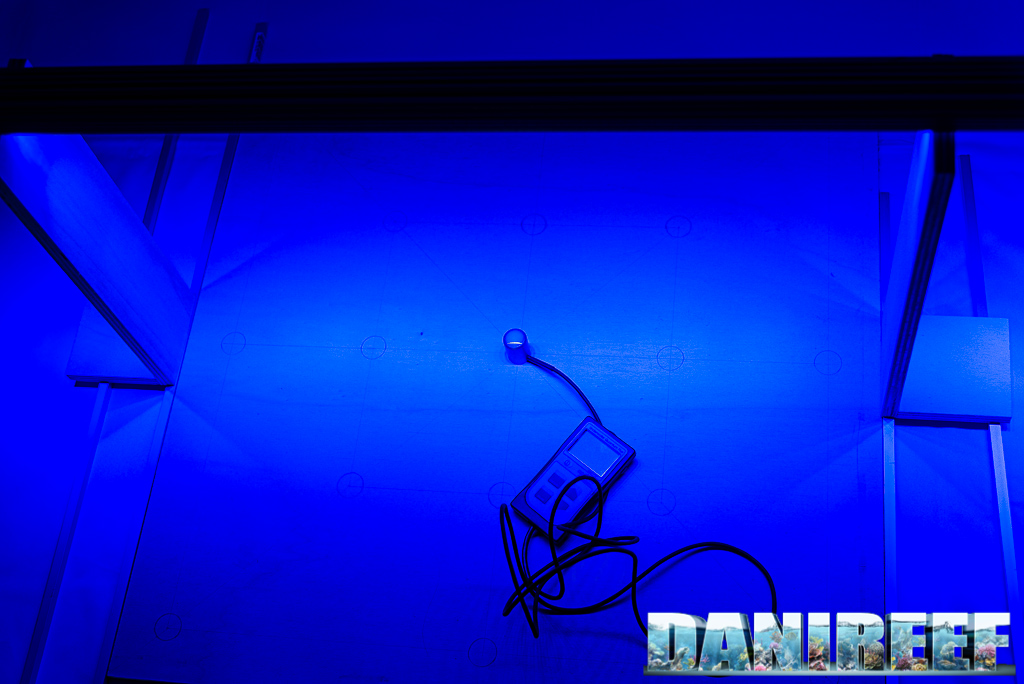
This is the test situation. Below you see the board, and the instrument, and above the ceiling light resting on the spacers.
These are the measured values:

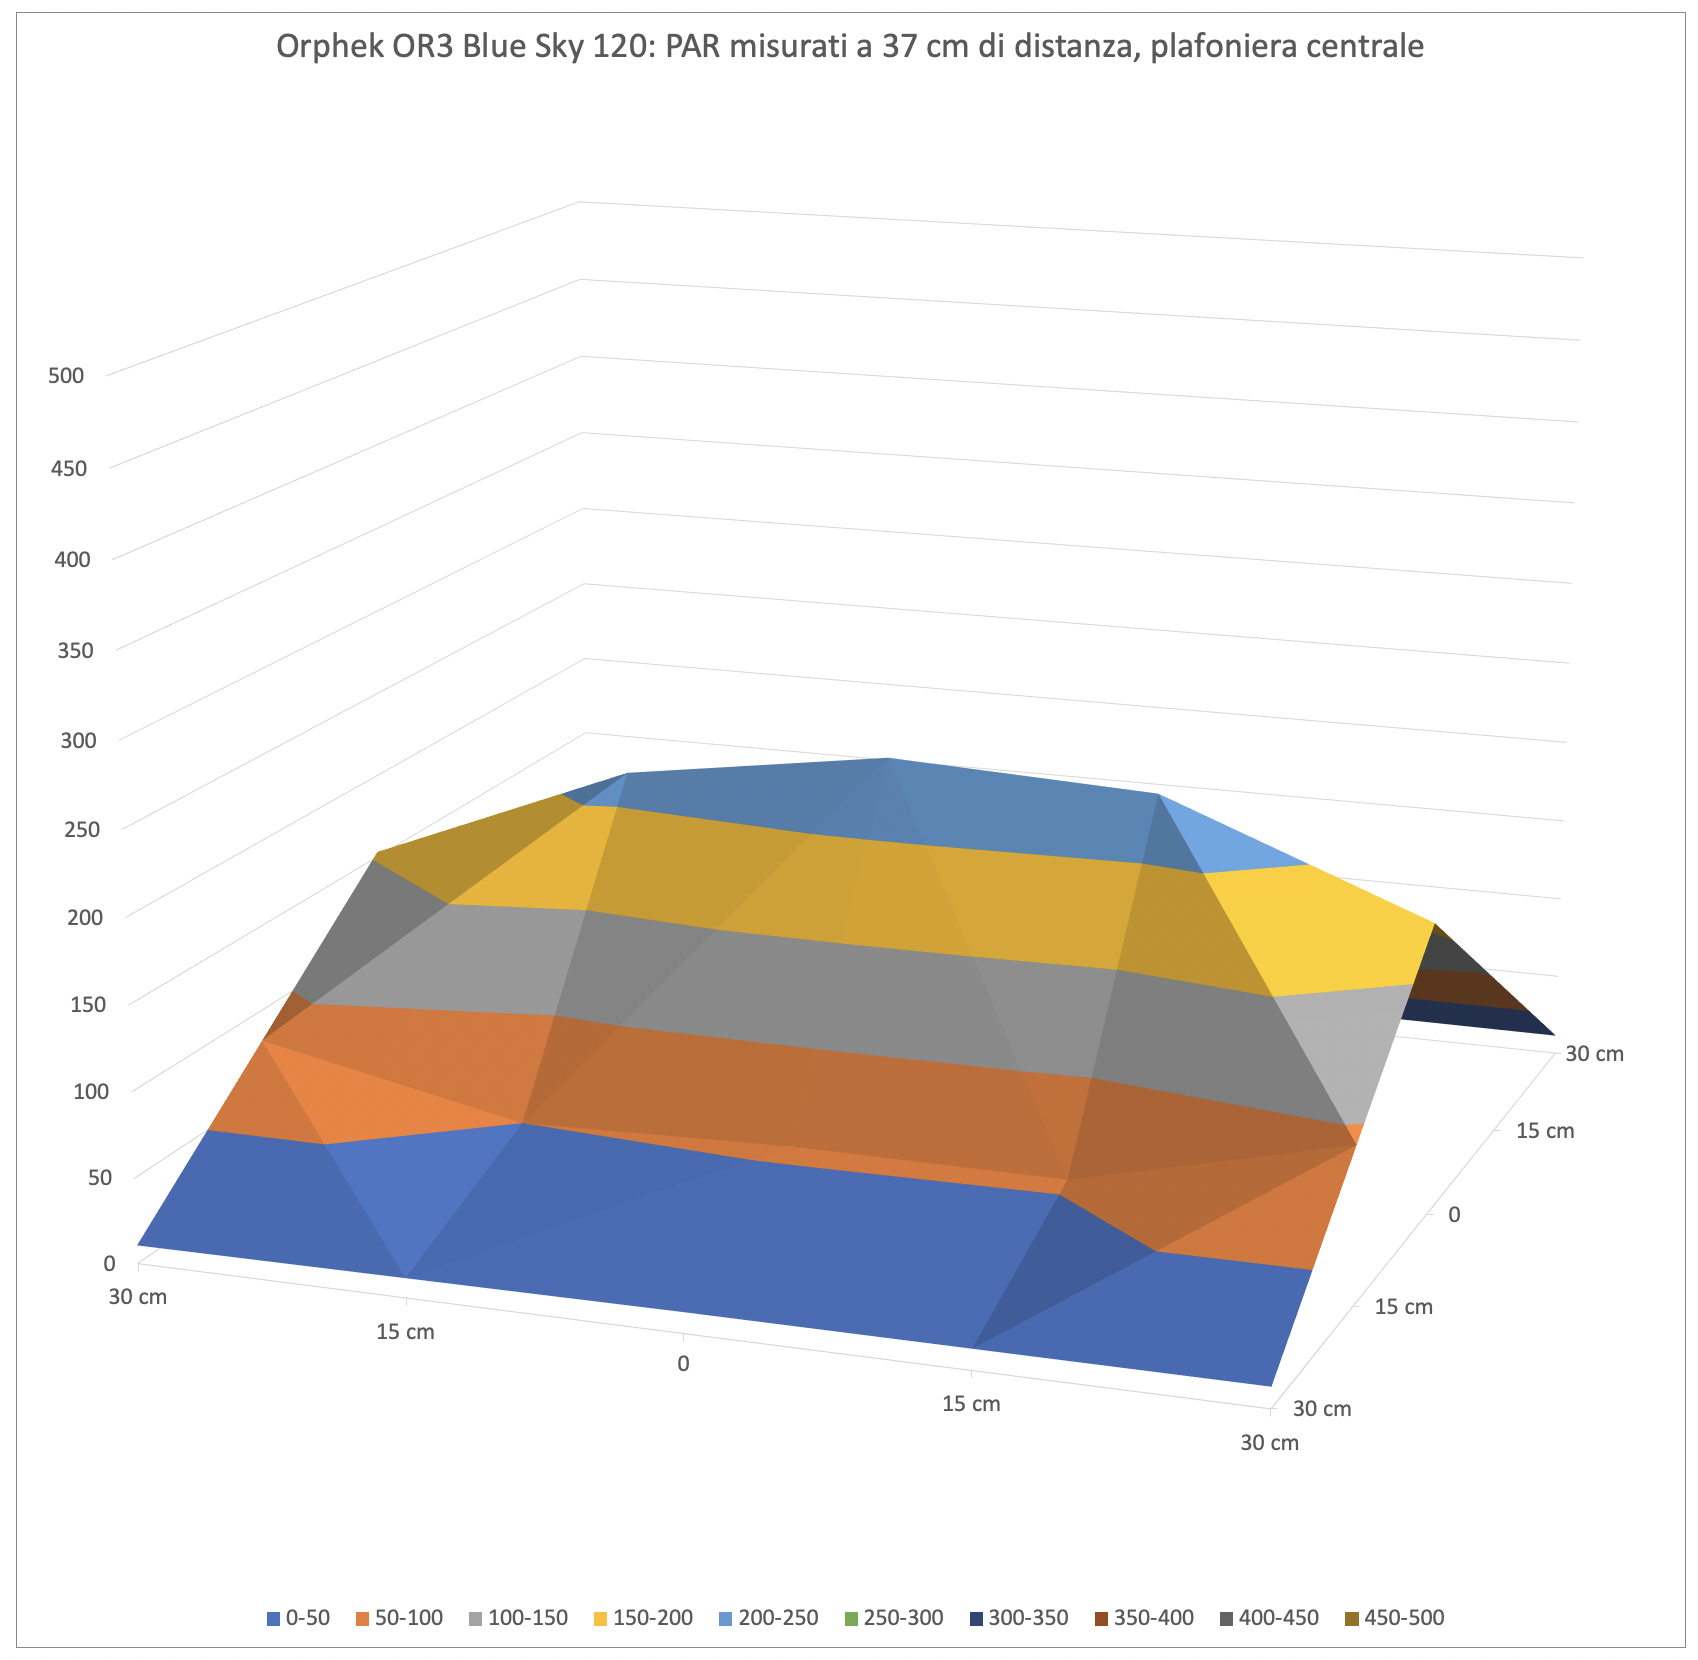
And this is the corresponding graph, for uniformity we will use the same scale for ceiling lights of homologous class, that is, similar in power and type.
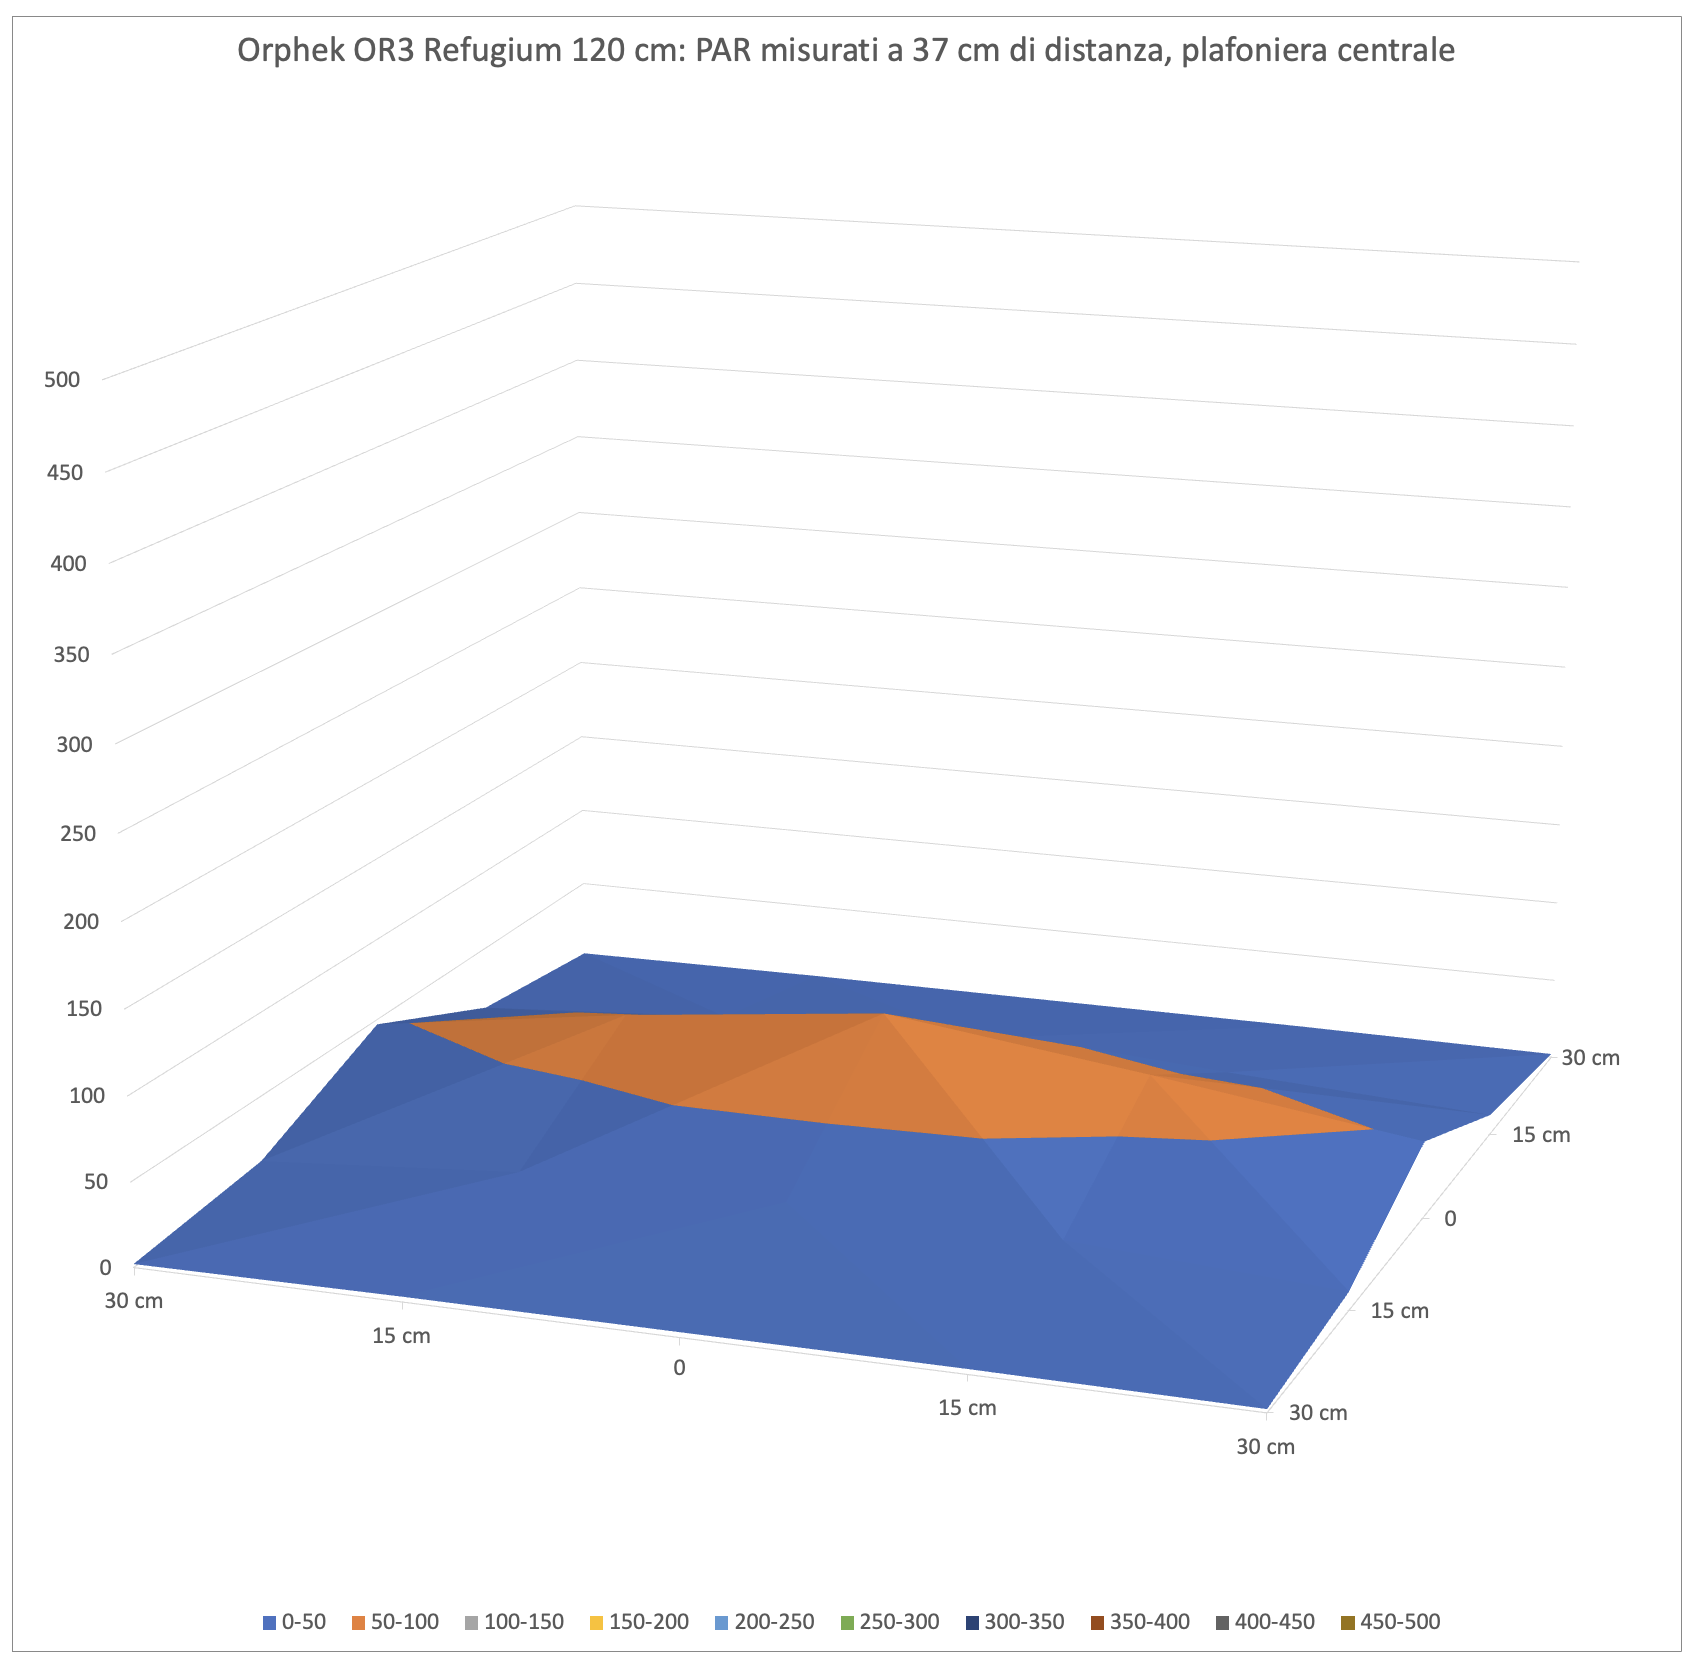
As the space between the light and the sensor increases, the difference between the PARs measured at the center and at the edges decreases. The light expands greatly, but the central value decreases from 190 to 88 μmol m-2 s-1, taken at the two brightest points.
It jumps out at you that there is full coverage, but much less powerful than a ceiling light such as the Orphek OR3 Blue Sky, aimed at illuminating corals. A similar curve is subtended by the Orphek OR3 Blue Sky and shown below. Same distance, same scale.
The measurement of PARs at a distance of 57 cm
This is the test situation. Below you see the board (from this distance you can see the instrument very well), and the ceiling light fixture resting on the spacers. Visually, the illuminated area is extremely large, and therefore the specific power per cm decreases.
These are the measured values:

And this is the corresponding graph, for uniformity we will use the same scale for ceiling lights of homologous class, that is, similar in power and type.
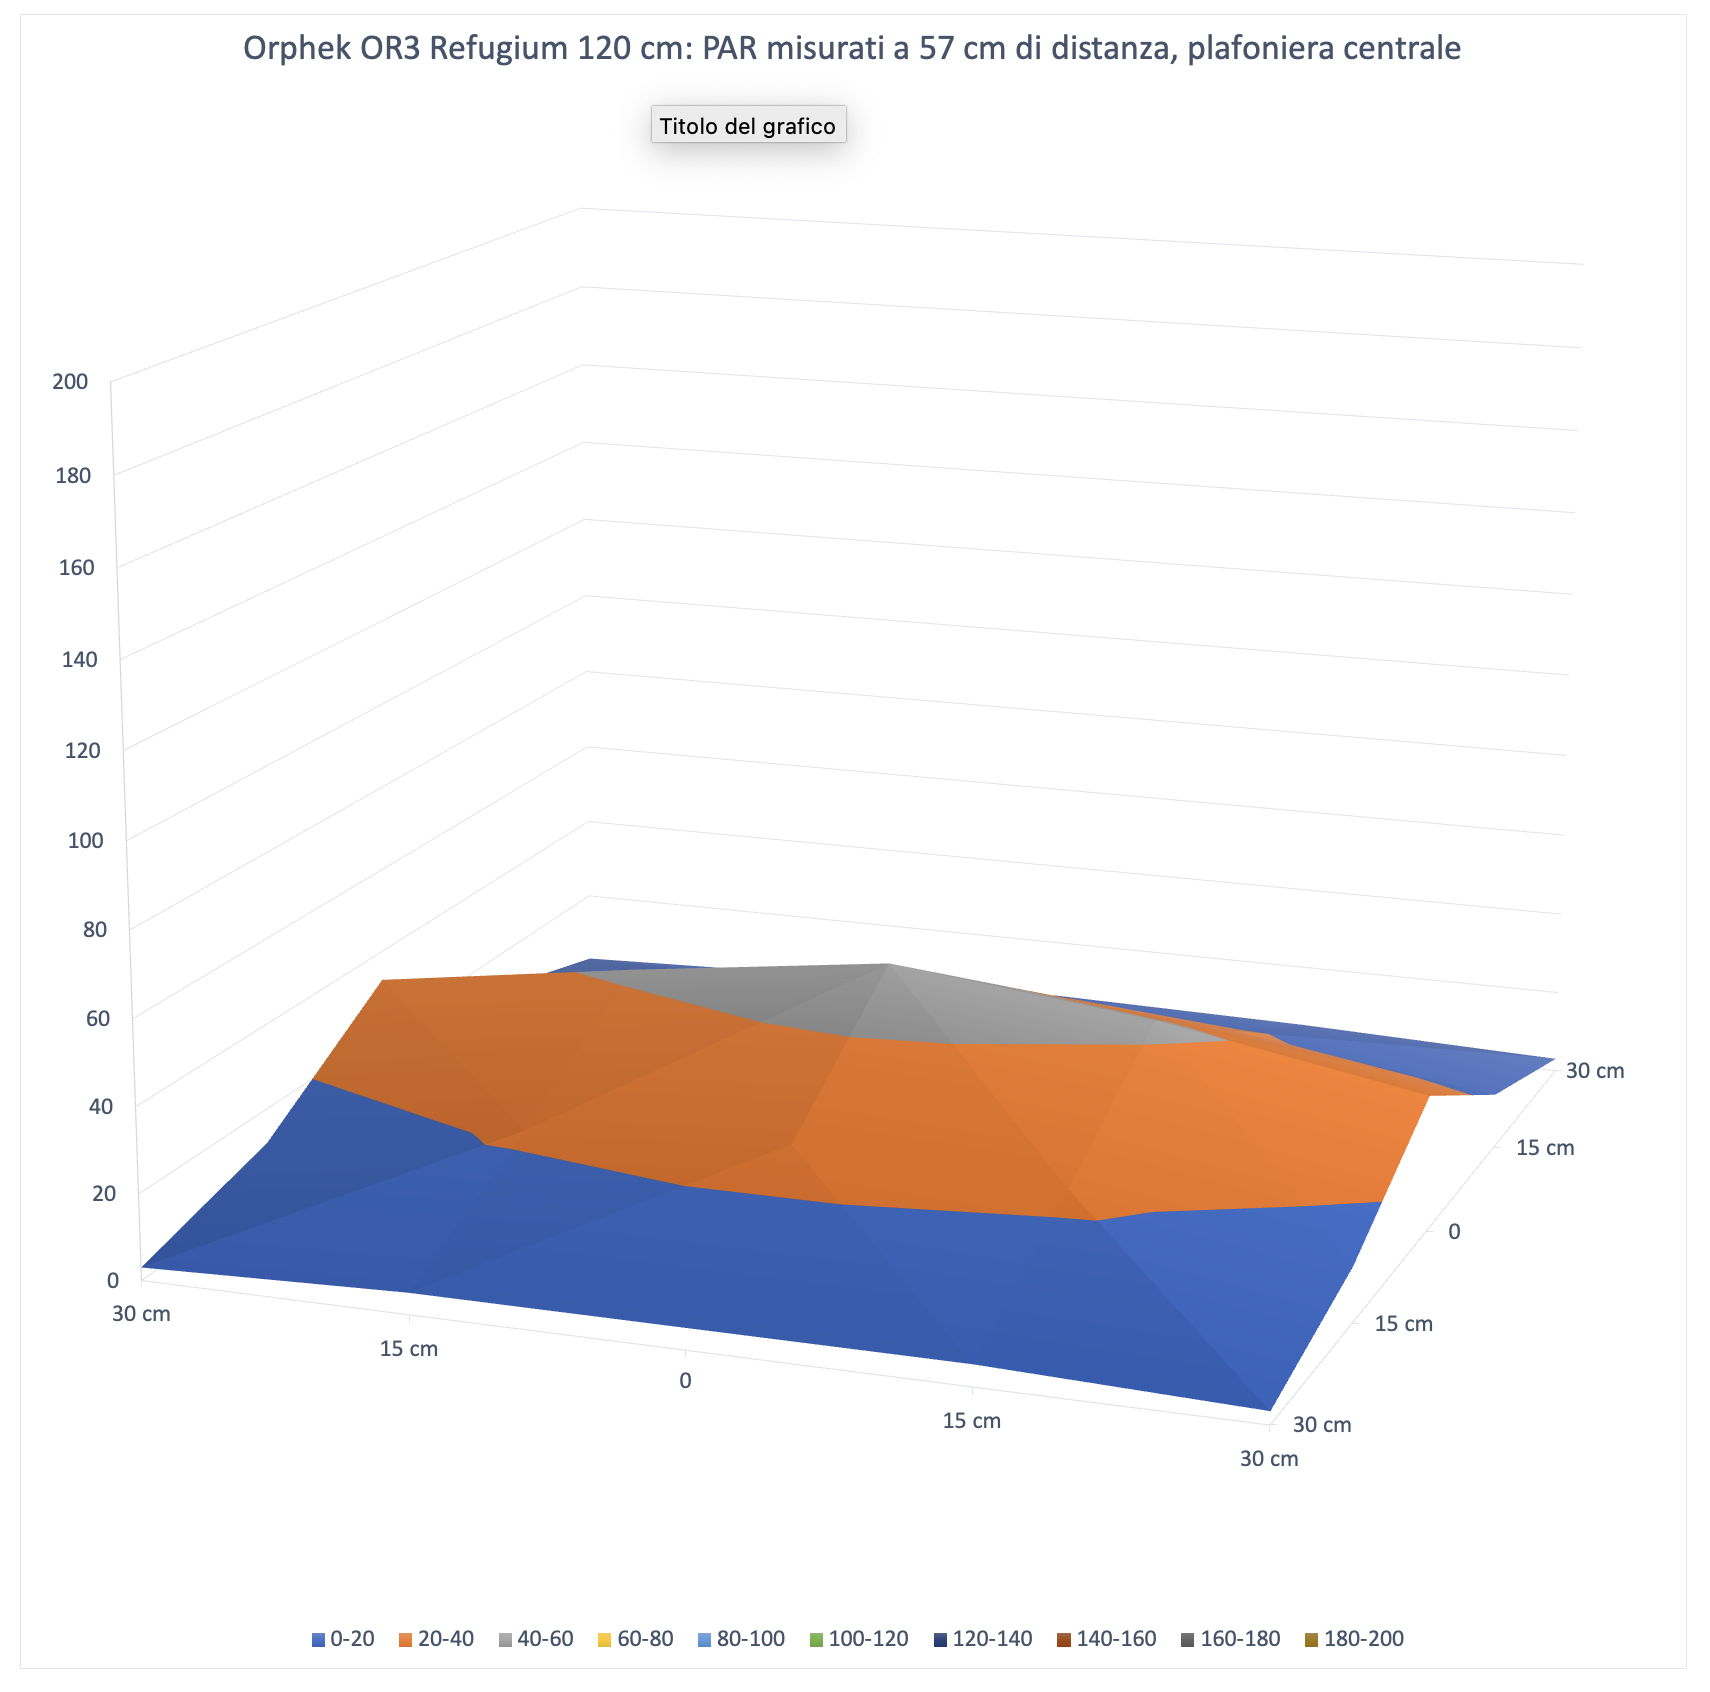
By increasing the space between the ceiling light fixture and the sensor again, the difference between the PARs measured in the center and at the edges does not decrease as we would have expected but returns to increase. The uniformity is practically perfect. The center value decreases again from 190 to 88 to 50 μmol m-2 s-1.
PARs in the center in different configurations
We continue with our technical measurements. Next we’ll see how the PAR measurements at the center in the three different distances of the test.
Energy Variation of Orphek OR2 Blue Plus LED Bars Based on Distance
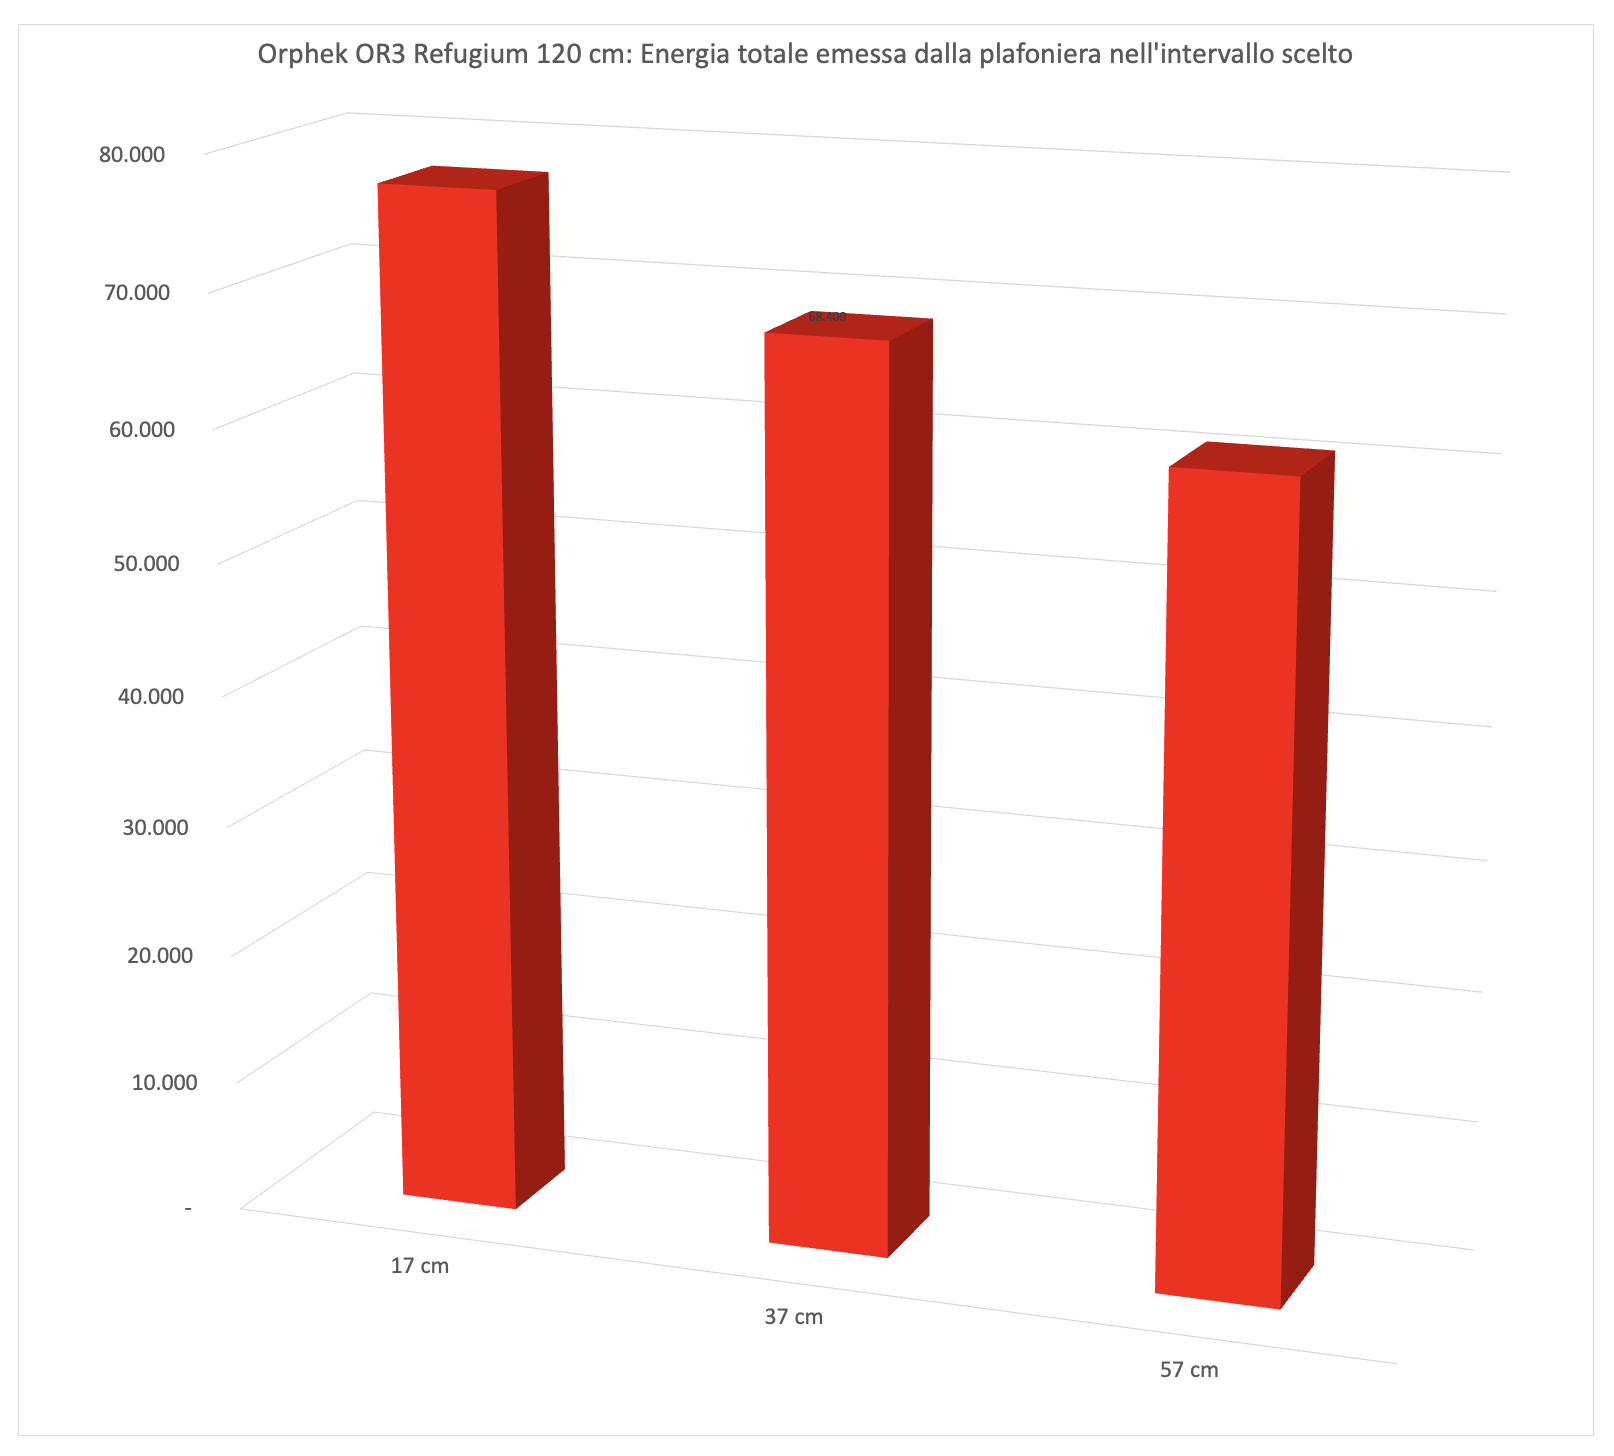
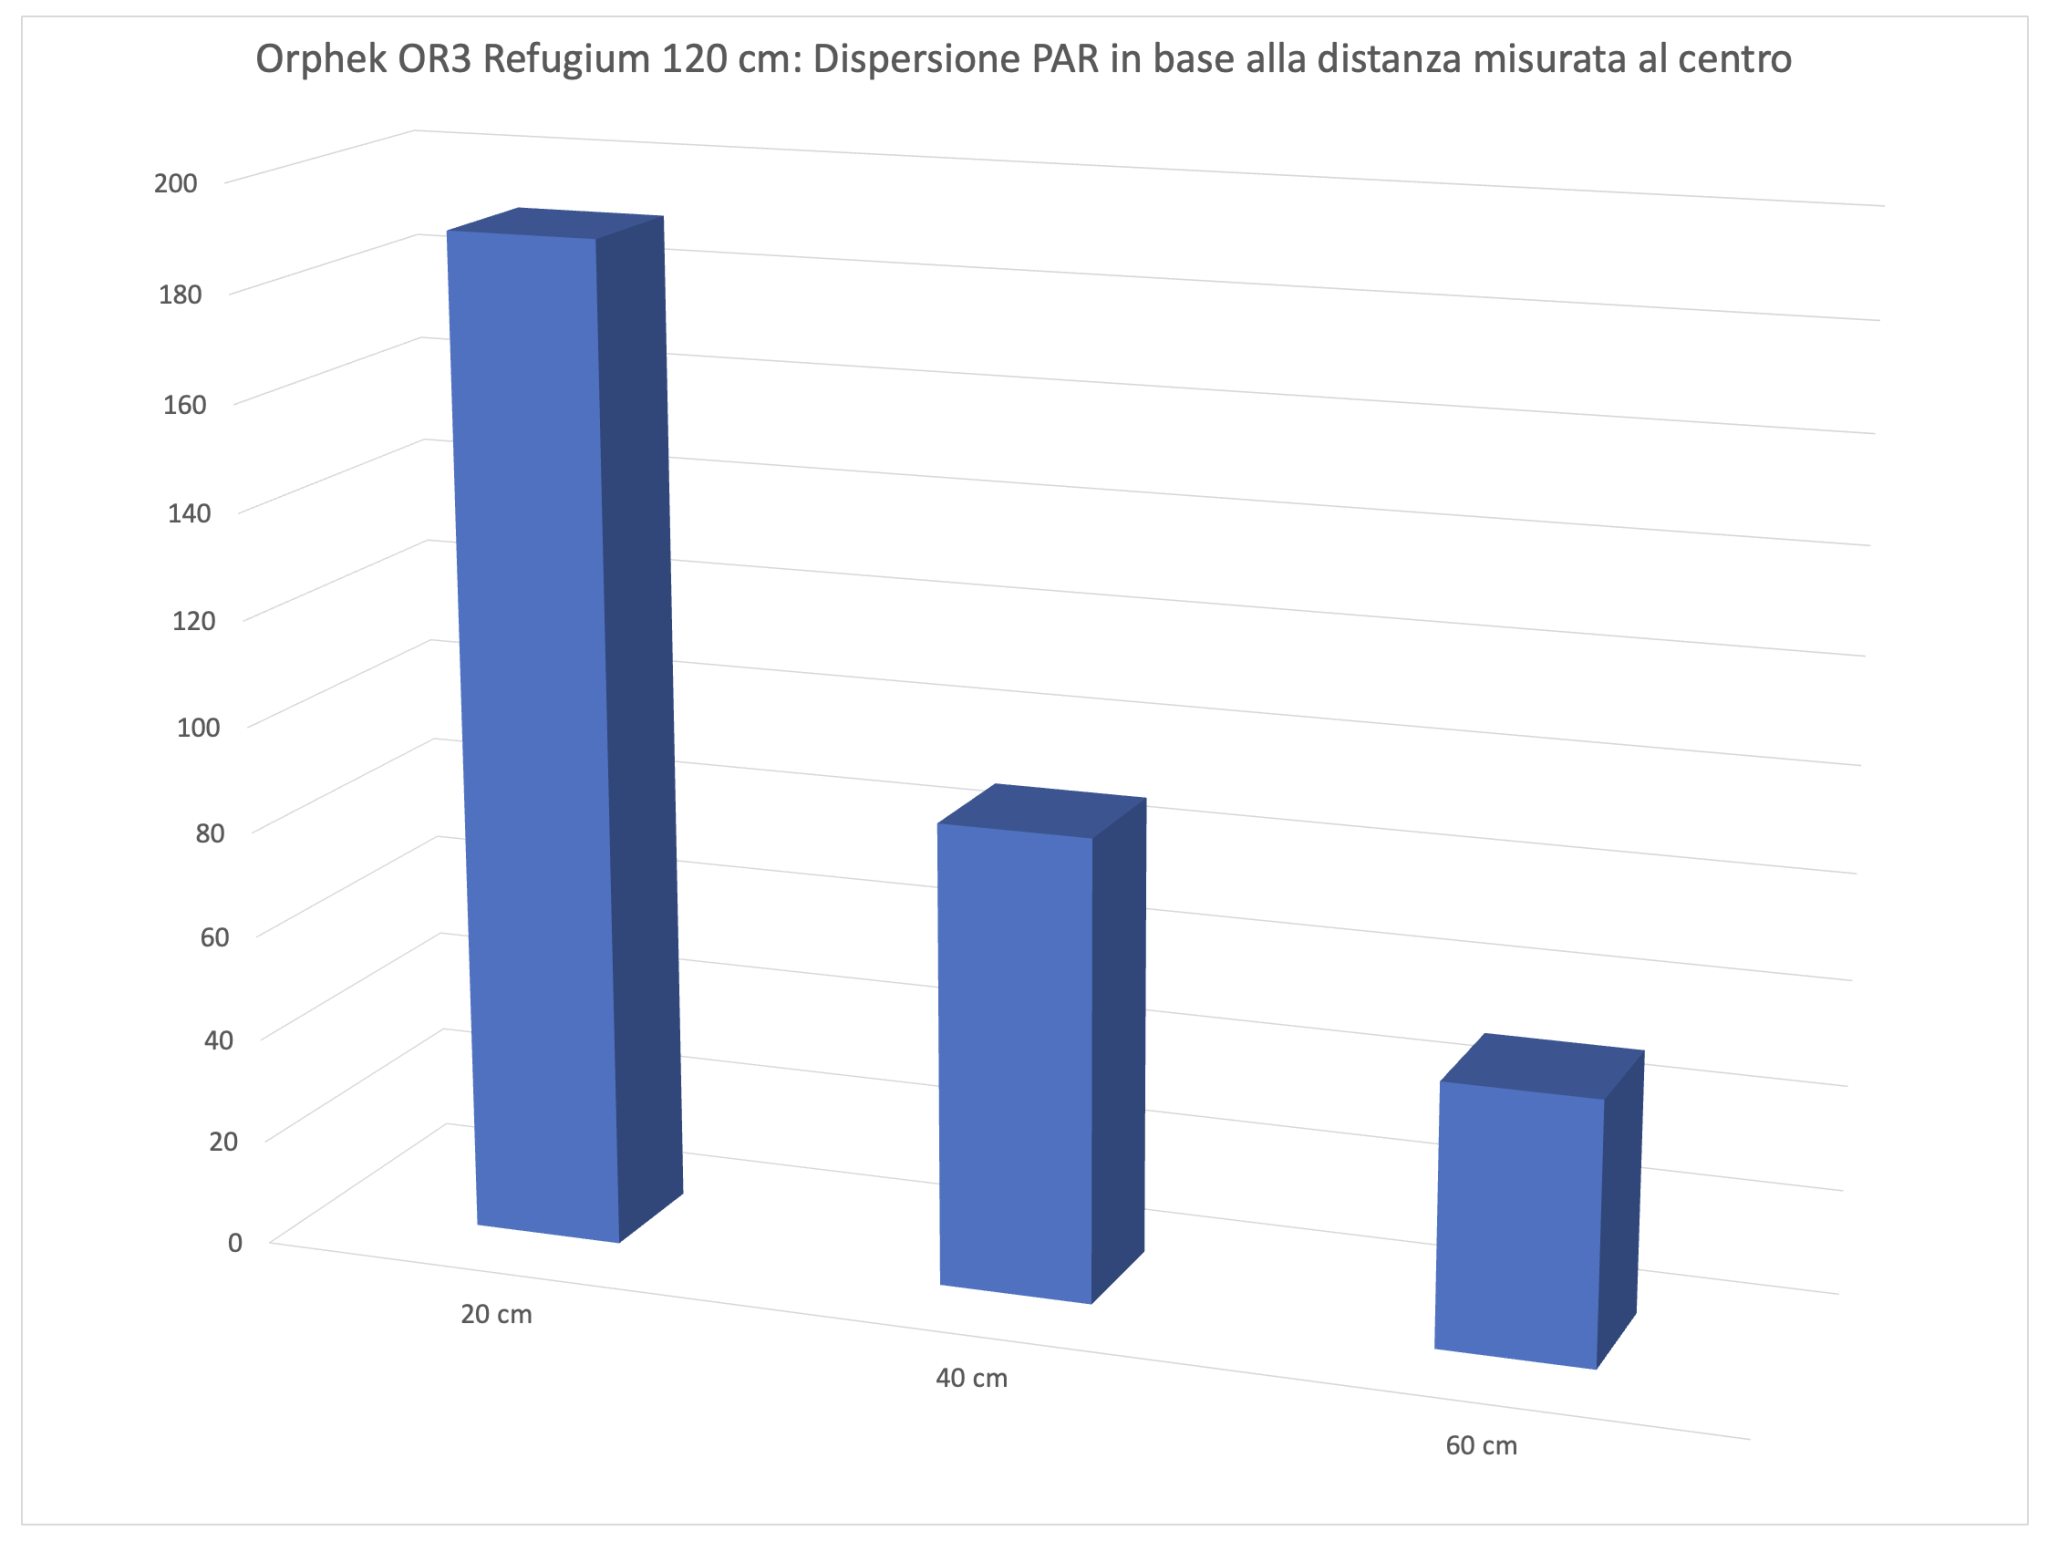
This, in my opinion, is the most significant thing measured, and the most comparable. The energy variation. The volumes subtended by the three surfaces you saw previously were calculated. It is obvious that by moving away from the light the PAR values drop, but the light illuminates a larger space. In this way you try to account for all the light energy contained in the hypothetical 60-cm square subtended by the ceiling light fixture. And you can see that the three values, 77,000, 68,000 and 61,000, take on a different connotation than the values measured in the center. While the former decrease a lot because the distances increase, the subtended area, that is, the energy, decreases very slowly. The differences between the three areas is very small indeed. Little, very little, energy is sent out of the subtended area.
In fact, looking at the values of the three curves we see that at the edges there is much more light at 57 cm than at 37. A single bar therefore is ideal for a 45 cm wide refugium, in our opinion. For larger widths we recommend adding a second bar.
How to evaluate these numbers in the aquarium?
This is a good question, in the sense that initially we thought we could translate these numbers to the aquarium tout-court. Then we filled an aquarium with water, submerged the probe, and did some measurements again. This displaced us, but, as we have mentioned in previous articles, we will discuss this in a forthcoming follow-up article, which we will then be sure to link below. Basically, at 20 cm the result is practically the same, thanks to the glass reflecting the light, and the water itself diffusing it more; you can find values even double those measured in air. Obviously this is not a detail that can be standardized, so we believe that our calculation methodology is the most correct, and the best for comparing the coverage of different lights.

Consumption
The Orphek OR3 Red Plus Grow/Refugium lamp claims a consumption of 30 watts.
The calculation of the absorbed current and thus the power turns out to be as follows:
Orphek OR3 Red Plus Grow/Refugium: 30 watts. Considering that at 17 cm the ceiling light fixture develops 190 μmol m-2 s-1 in the center, it can be said to have a peak value of 6.33 μmol m-2 s-1 w-1 (PAR per watt) for perspective. This value is difficult to compare with a normal ceiling light because of the completely different spectrum.
As we have already said about its OR3 sisters, the LED bar is impeccably built. Solid, massive, and very well assembled. I really like the extruded profile as well as the finish. No programming ensures perfect ease of operation, plus you can put several side by side until you get the power you need, although in refugium one will probably be more than enough, at least up to 45 cm wide.
[text by Matteo Fusco and DaniReef, translated by Aisja Baglioni]


0 Comments